
Set up the app
AI Overview
Explains the three-step Get started wizard in Backup & Restore Tipo, which opens on a new install and lets you choose what to protect, when backups run and who gets emails. Progress is saved, and you can change every choice later in Settings except the order history, which is set only once.
View moreView less
- Step 1, What to protect: choose Everything or Let me choose data types, and set order history.
- Order history can be set only once; more history means a longer first backup and more storage.
- Step 2, Schedule & alerts: pick Every day or Every week, a time, a time zone and notification emails.
- Step 3, Review & start: check your choices, then select Start first backup or Go to Dashboard.
- Continue stays disabled if every data type is off.
Summary generated by AI. It can make mistakes, so check the full guide below.
Choose what to protect, when backups run and who gets emails with the three-step Get started wizard.
The first time you open Backup & Restore Tipo, a short wizard called Get started helps you choose what to back up, how much order history to include, when backups run and who receives emails. Under the title it says Protect your store in 3 short steps. A step tracker shows the name of each step and which one you are on. Select Continue at the top of the page on each step until you reach Review & start.
| Step | Name | What you decide |
|---|---|---|
| 1 | What to protect | Which data types to protect and how much order history to include |
| 2 | Schedule & alerts | When backups run and who gets emails |
| 3 | Review & start | Check your choices and start your first backup |
When the wizard appears
Section titled “When the wizard appears”The wizard opens automatically on a new install. You don’t need to find it in the menu.
- Your progress is saved. If you close the app and come back, the wizard resumes where you left off.
- Until you finish it, Home shows the wizard instead of the dashboard.
- You can’t skip ahead. Continue saves the step and moves on. To go back, select Back, or select the name of a finished step (it shows a check mark) in the step tracker.
You can change every choice later in Settings, except the order history choice, which you set only once.
What to protect
Section titled “What to protect”The first step asks What should we protect? It says Every backup includes what you pick here. You can change it anytime in Settings.
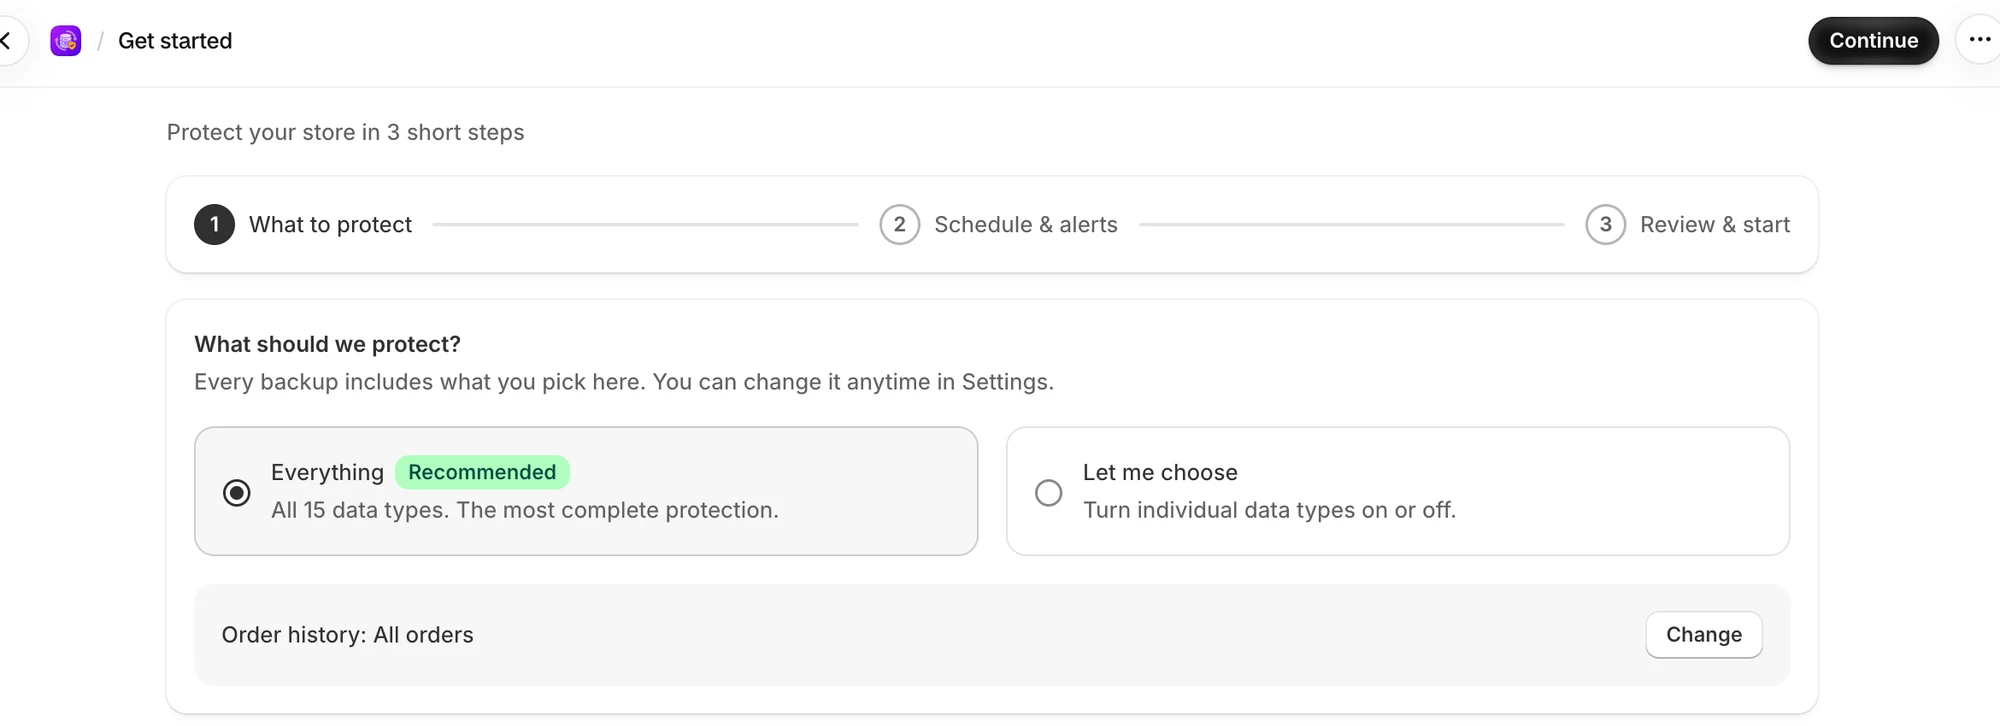
Keep Everything selected, or choose Let me choose to turn data types on or off.
Pick one of two options:
| Option | What it does |
|---|---|
| Everything (Recommended) | Backs up all 15 data types. All 15 data types. The most complete protection. |
| Let me choose | Shows every data type as a tile, in groups, so you can turn each one on or off. |
If you choose Let me choose, the data types appear in four groups:
| Group | Data types |
|---|---|
| Catalog | Products & variants, Collections, Metafield definitions, Metaobjects, Locations and Inventory |
| Online store | Themes, Pages, Blogs & articles, Menus, Files, Policies |
| Customers & orders | Customers, Orders |
| Store settings | Saved searches, Shipping zones |
- Select a tile to turn that data type on or off.
- Each group has a checkbox next to its name and a count such as 3 of 5 selected. Tick the group checkbox to turn on every data type in the group. Untick it to turn them all off.
- Some tiles carry a Backup only badge: Saved searches, Locations and Inventory, Policies, Shipping zones and Orders. As the note at the bottom says: Saved and exportable, but Shopify doesn’t let apps write it back.
Order history
Section titled “Order history”While Orders is on, this step also asks How much order history?
- With Everything selected, a line reads Order history: All orders. Select Change to pick something else.
- With Let me choose, the question appears under the Customers & orders group.
| Option | What it does |
|---|---|
| All orders | Backs up every order. It can show how many orders your store has and when it opened, for example 1,240 orders since your store opened on Mar 2, 2021. |
| Only orders from a date | A smaller, faster first backup. Pick a Start date. Orders created on or after that day are backed up. |
The start date must be before today. Otherwise you see Pick a start date before today. and Continue stays disabled.
Select Continue. Your data types and order history choice are saved straight away. If saving fails, a Couldn’t save your choices message appears with the reason. Fix it and select Continue again.
If you see Couldn’t load your settings, select Try again.
Schedule and alerts
Section titled “Schedule and alerts”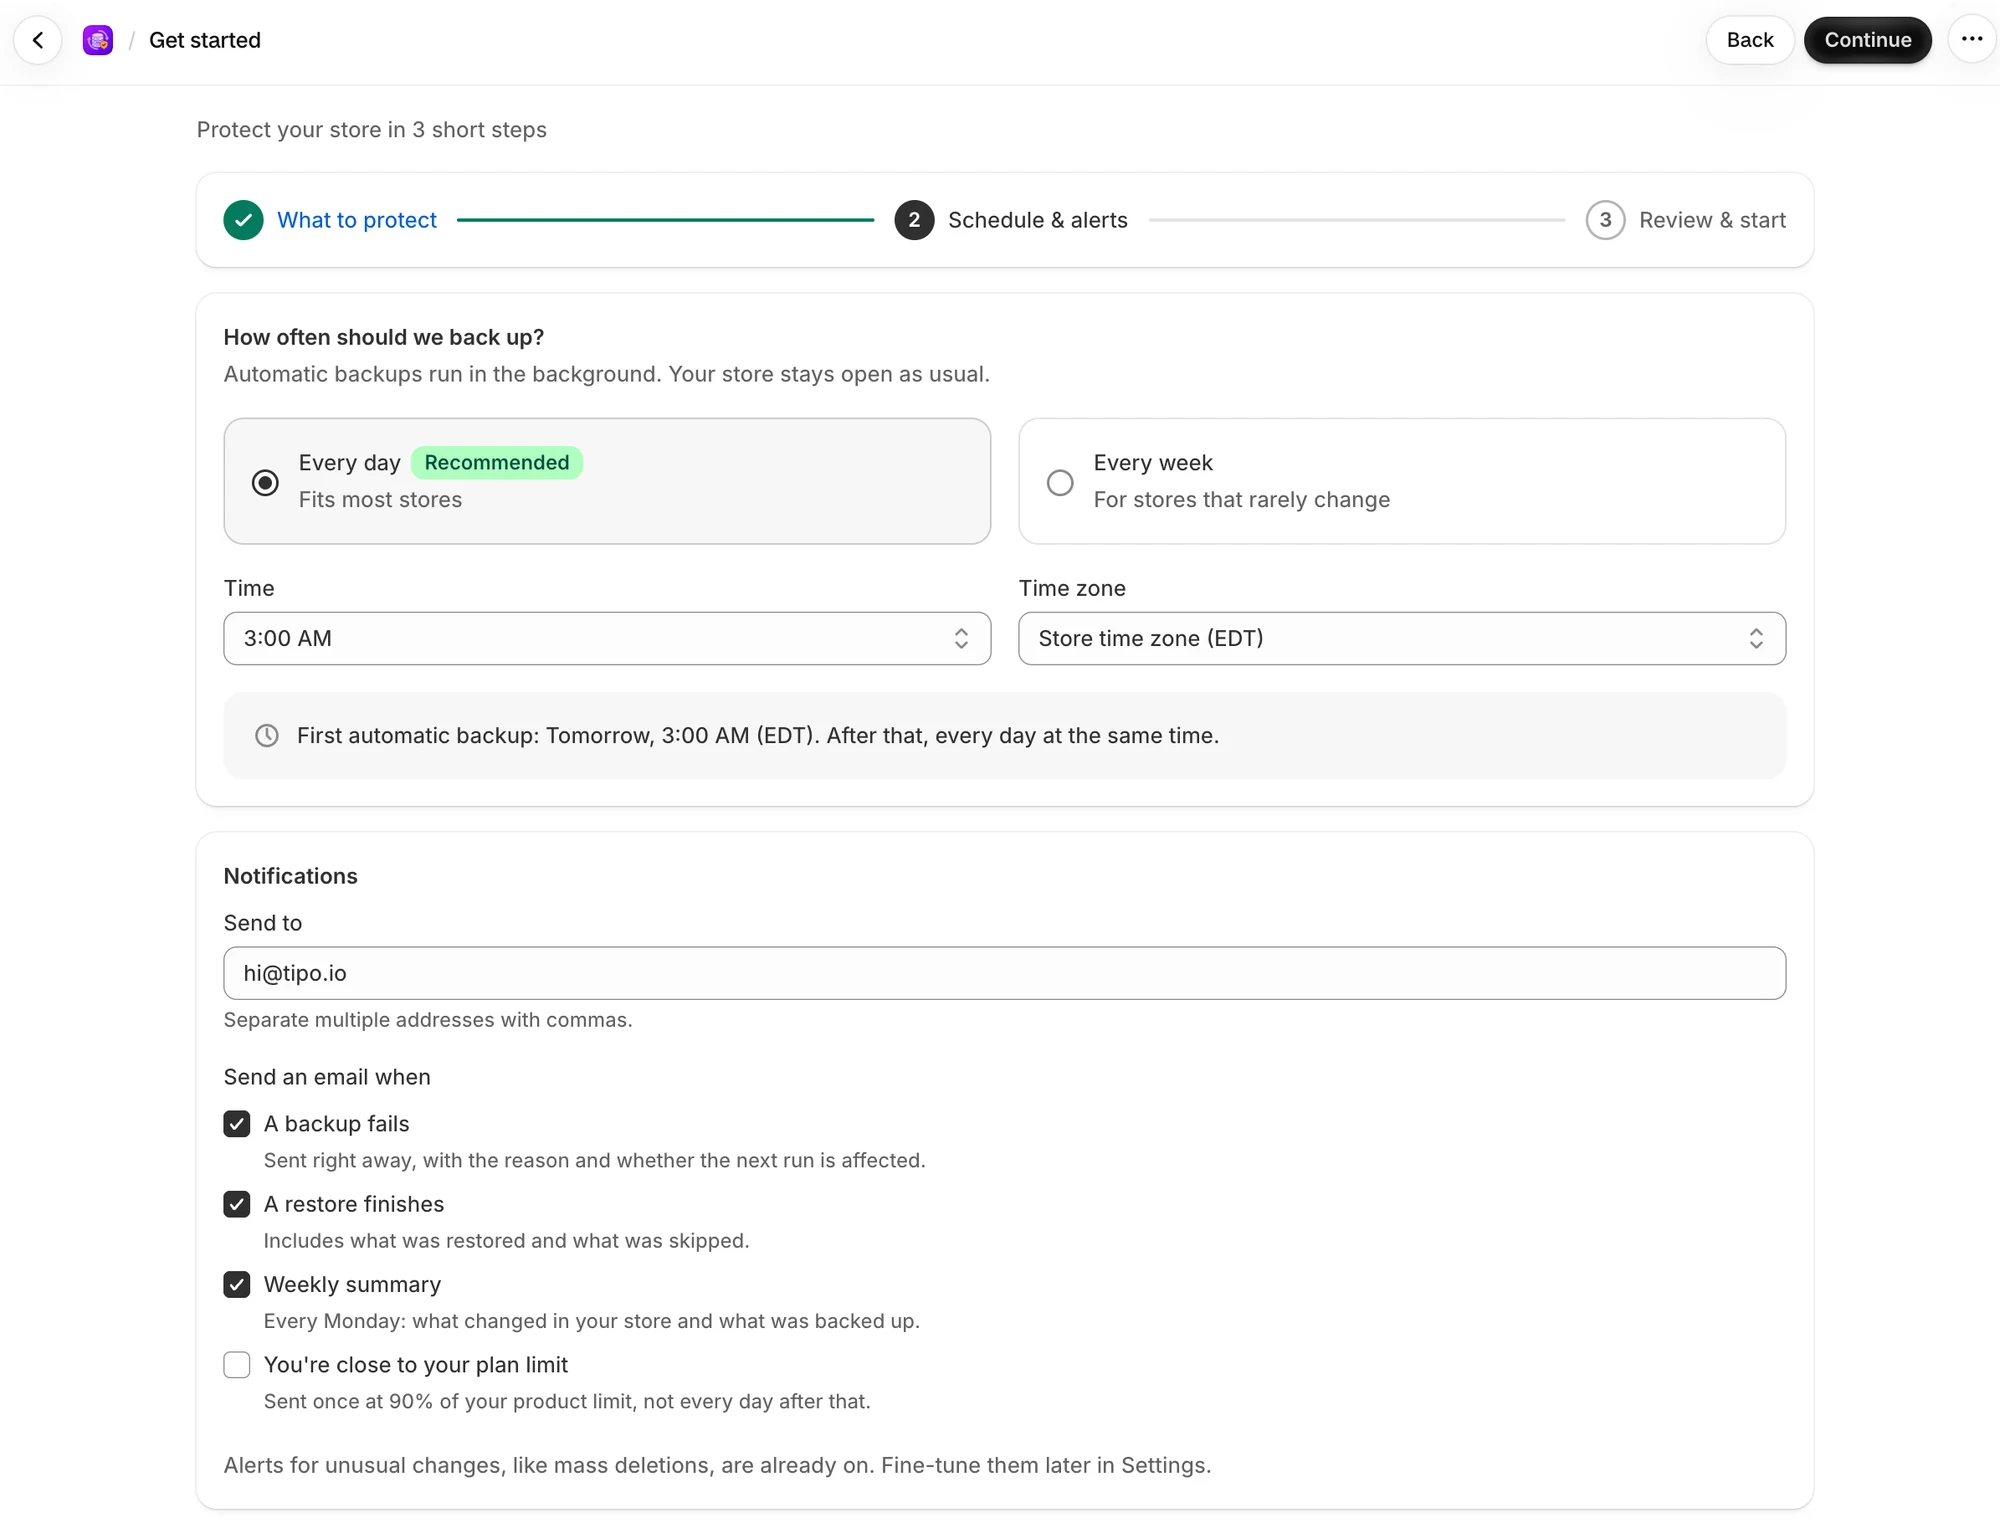
This step sets the schedule and the email address for alerts.
How often should we back up?
Section titled “How often should we back up?”Automatic backups run in the background. Your store stays open as usual. Pick a frequency:
| Option | Description |
|---|---|
| Every day (Recommended) | Fits most stores |
| Every week | For stores that rarely change |
Then set:
| Option | Choices | What it does |
|---|---|---|
| Time | 12:00 AM, 2:00 AM, 3:00 AM, 6:00 AM, 12:00 PM, 9:00 PM | When the backup runs. The wizard shows the default time. |
| Time zone | Store time zone, or UTC | Which clock the Time uses. The default is your store time zone. |
A line under the options tells you when the first automatic backup runs, for example First automatic backup: tomorrow at 3:00 AM (EST). After that, every day at the same time.
Automatic backups run at most once a day, so the wizard offers only these two options. See Usage and limits.
Notifications
Section titled “Notifications”- Send to is the email address for app emails. Separate several addresses with commas. If you haven’t saved an address yet, the field starts with your store’s email.
- Send an email when has four choices:
| Option | What it does | Default |
|---|---|---|
| A backup fails | Sent right away, with the reason and whether the next run is affected. | On |
| A restore finishes | Includes what was restored and what was skipped. | On |
| Weekly summary | Every Monday: what changed in your store and what was backed up. | On |
| You’re close to your plan limit | Sent once at 90% of your product limit, not every day after that. | Off |
Below the choices: Alerts for unusual changes, like mass deletions, are already on. Fine-tune them later in Settings. See Alert rules.
Select Continue to save. If you see Couldn’t save your settings, read the message, fix the problem and select Continue again. You stay on this step until it saves. Select Back to return to the previous step.
Review and start
Section titled “Review and start”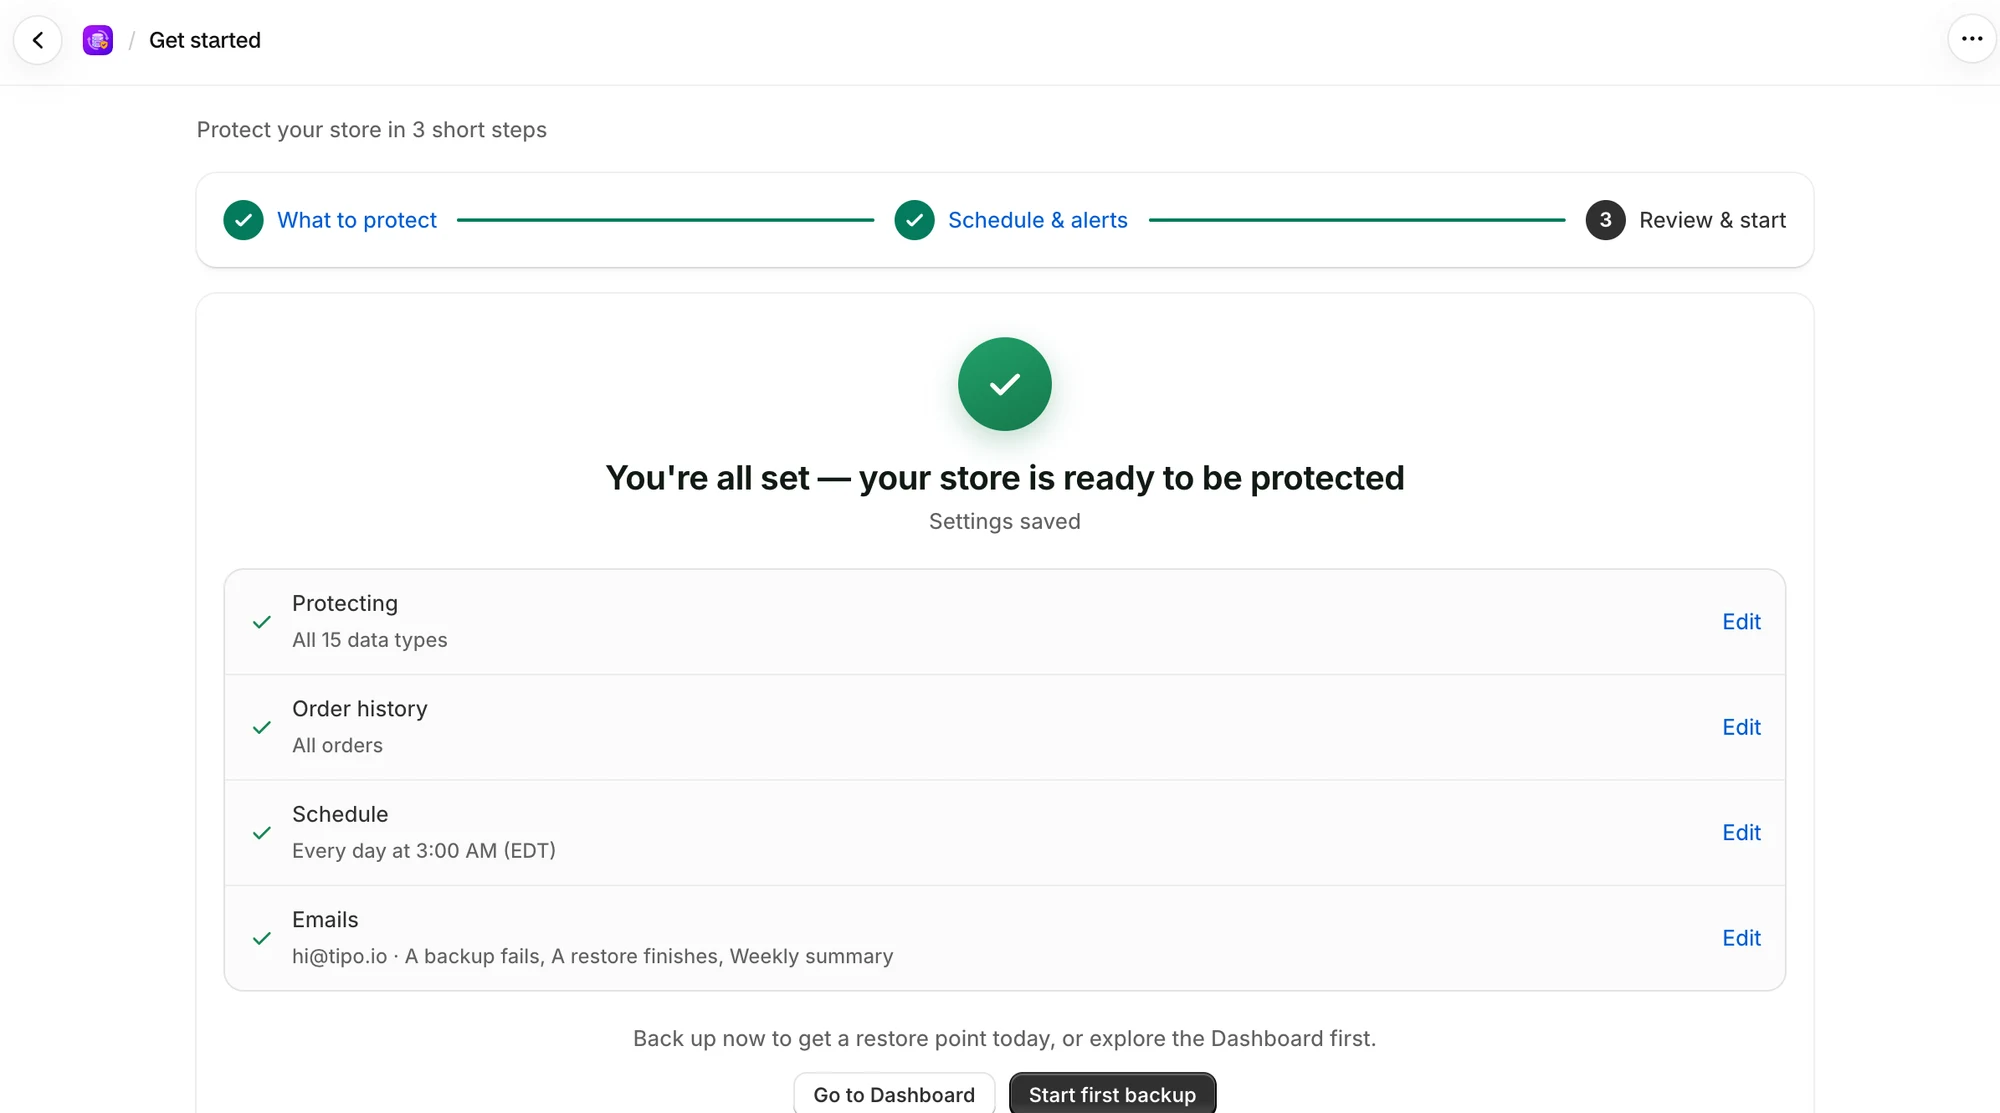
The last step sums up your choices and offers to run your first backup right away.
The last step says You’re all set — your store is ready to be protected and Settings saved. Everything is already saved at this point. The step lists your choices, each with an Edit link that takes you back to that step:
| Row | Example |
|---|---|
| Protecting | All 15 data types, or 12 of 15 data types |
| Order history | All orders, Orders from Mar 2, 2025 or Orders aren’t backed up |
| Schedule | Every day at 3:00 AM (EST) |
| Emails | The address and the emails you turned on, or No email alerts |
Back up now to get a restore point today, or explore the Dashboard first. Choose one of two buttons:
| Button | What it does |
|---|---|
| Start first backup | Starts your first backup and opens Home, where you can watch it run. |
| Go to Dashboard | Opens Home without starting a backup. |
Nothing happens until you select a button.
If the backup doesn’t start
Section titled “If the backup doesn’t start”A red message appears on the screen and you stay where you are. You can start a backup from Home instead.
| Message | What to do |
|---|---|
| A backup is already in progress for this store. | Wait for it to finish. |
| A restore is in progress for this store. Wait until it finishes before starting a backup. | Wait for the restore to finish. |
| No backup resources are enabled for this store. | Go to Settings and tick at least one data type. |
| Choose how much order history to back up before starting a backup. | Select Edit next to Order history and make a choice. |
| Could not start the backup. You can start one from the Home page. | Select Go to Dashboard, then select Back up now on Home. |
Change it later
Section titled “Change it later”- Data types: Choose what to back up
- Schedule: Backup schedule
- Emails: Email notifications