# 同步中繼欄位
本指南說明如何在 Tipo 應用程式中,將中繼欄位從 Source 商店同步到 Destination 商店。
### ℹ️ 什麼是中繼欄位?
* **商品中繼欄位**
* **款式中繼欄位**(若您啟用此功能)
Tipo 應用程式可以同步以下內容的中繼欄位:
* 材質、尺寸表、規格
* 自訂徽章(例如「best\_seller」)
* 佈景主題或應用程式使用的額外商品詳細資料
中繼欄位是 Shopify 中用來儲存額外商品資料的自訂欄位,例如:
***
### ✅ **支援的中繼欄位類型**
* 多行文字
* 格式化文字
* 整數
* 小數
* 日期和時間
* 日期
* 尺寸
* 體積
* 重量
* 是或否
* 評分
* URL
* 金額
* 連結
* JSON
🚫 **目前尚未支援:**\
參照類型(例如商品參照、商品系列參照)目前尚未支援。
***
### 🛠️ 步驟 1:在 Source 商店設定中繼欄位
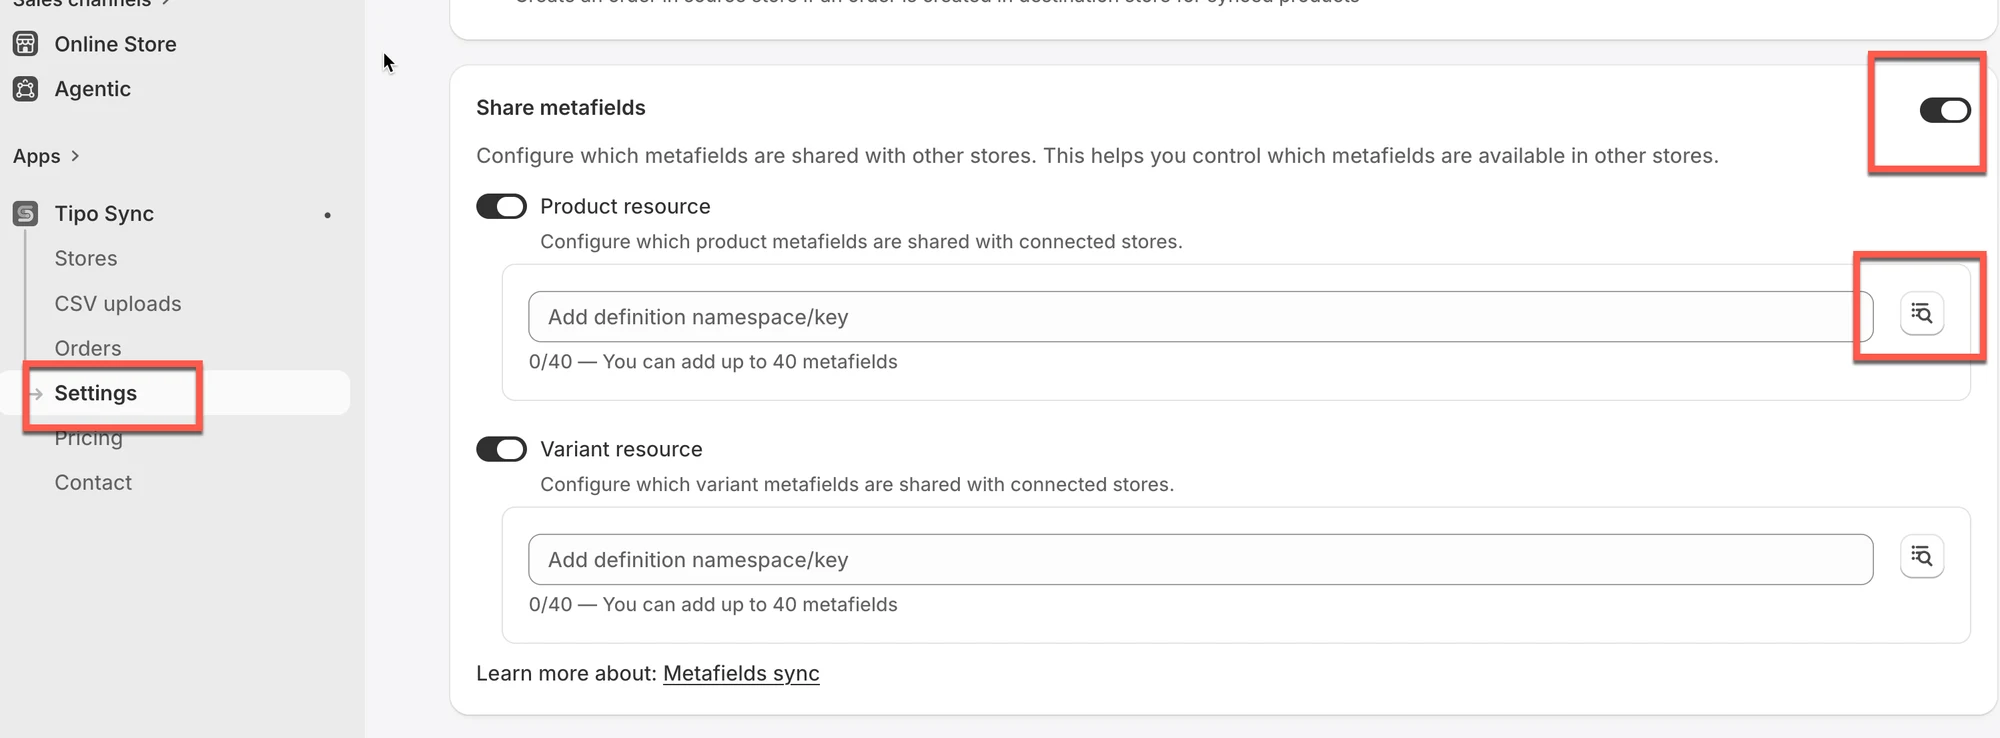
1. 開啟應用程式 > 點選 **Settings** > 開啟 **Share Metafields**
2. 選擇您想分享的資源:
* **Product resource** – 分享商品中繼欄位。
* **Variant resource** – 分享款式中繼欄位。
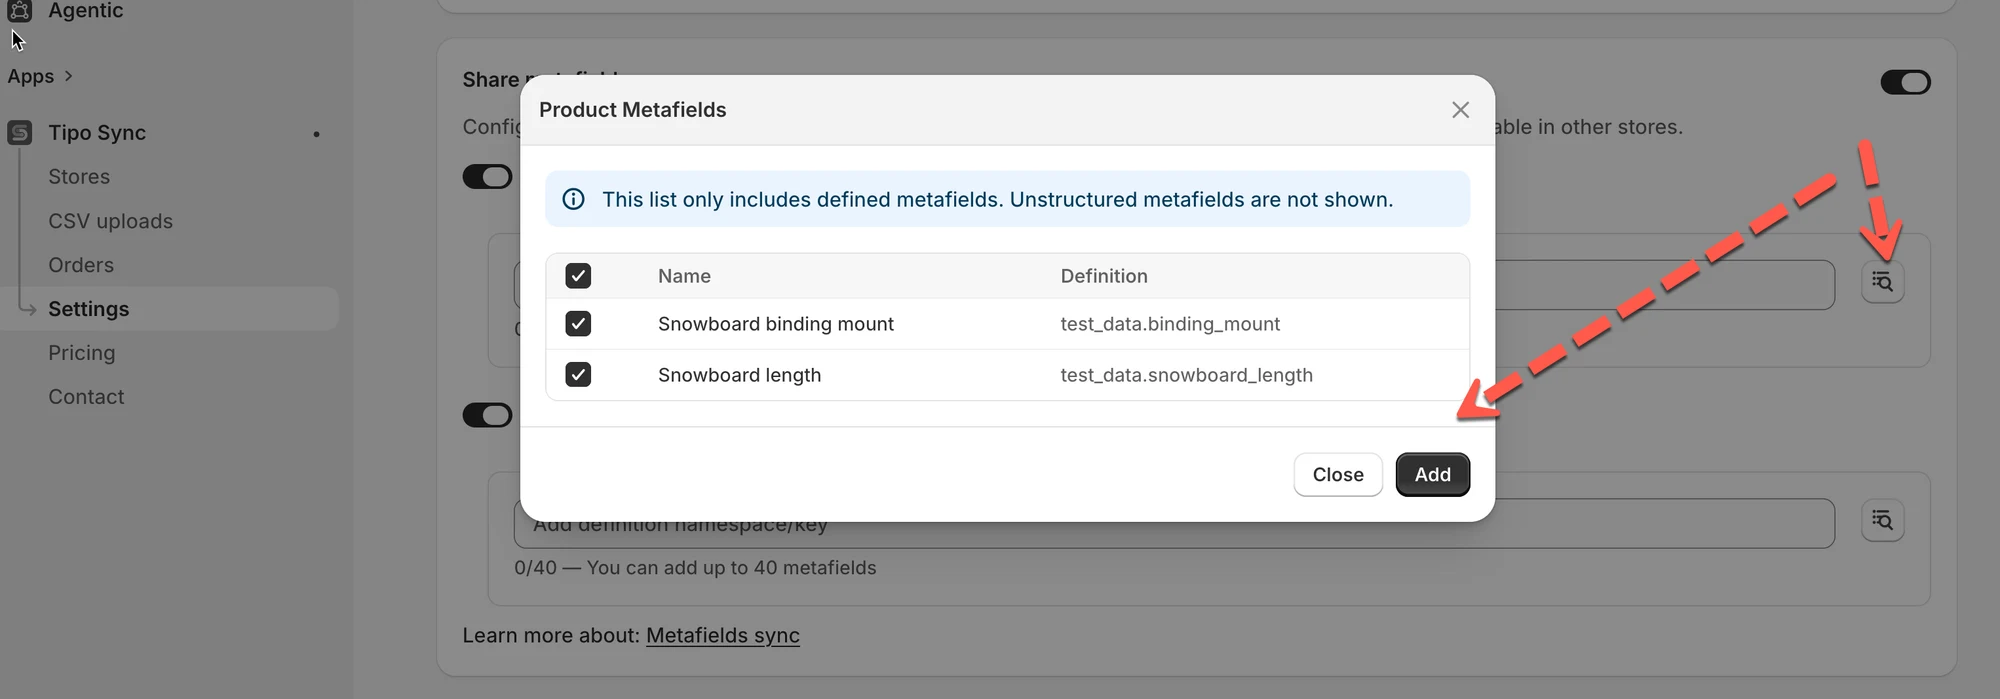
3. 新增特定的中繼欄位定義,以限制要分享哪些中繼欄位。
* 點選 **Browse metafields** 圖示,或
* 依下列格式輸入中繼欄位定義:
```
namespace.key
```
例如:
```
custom.materialseo.titlespecifications.weight
```
4. Click **Save** to update the changes
 ***
### 🛠️ 步驟 2:在 Destination 商店設定中繼欄位
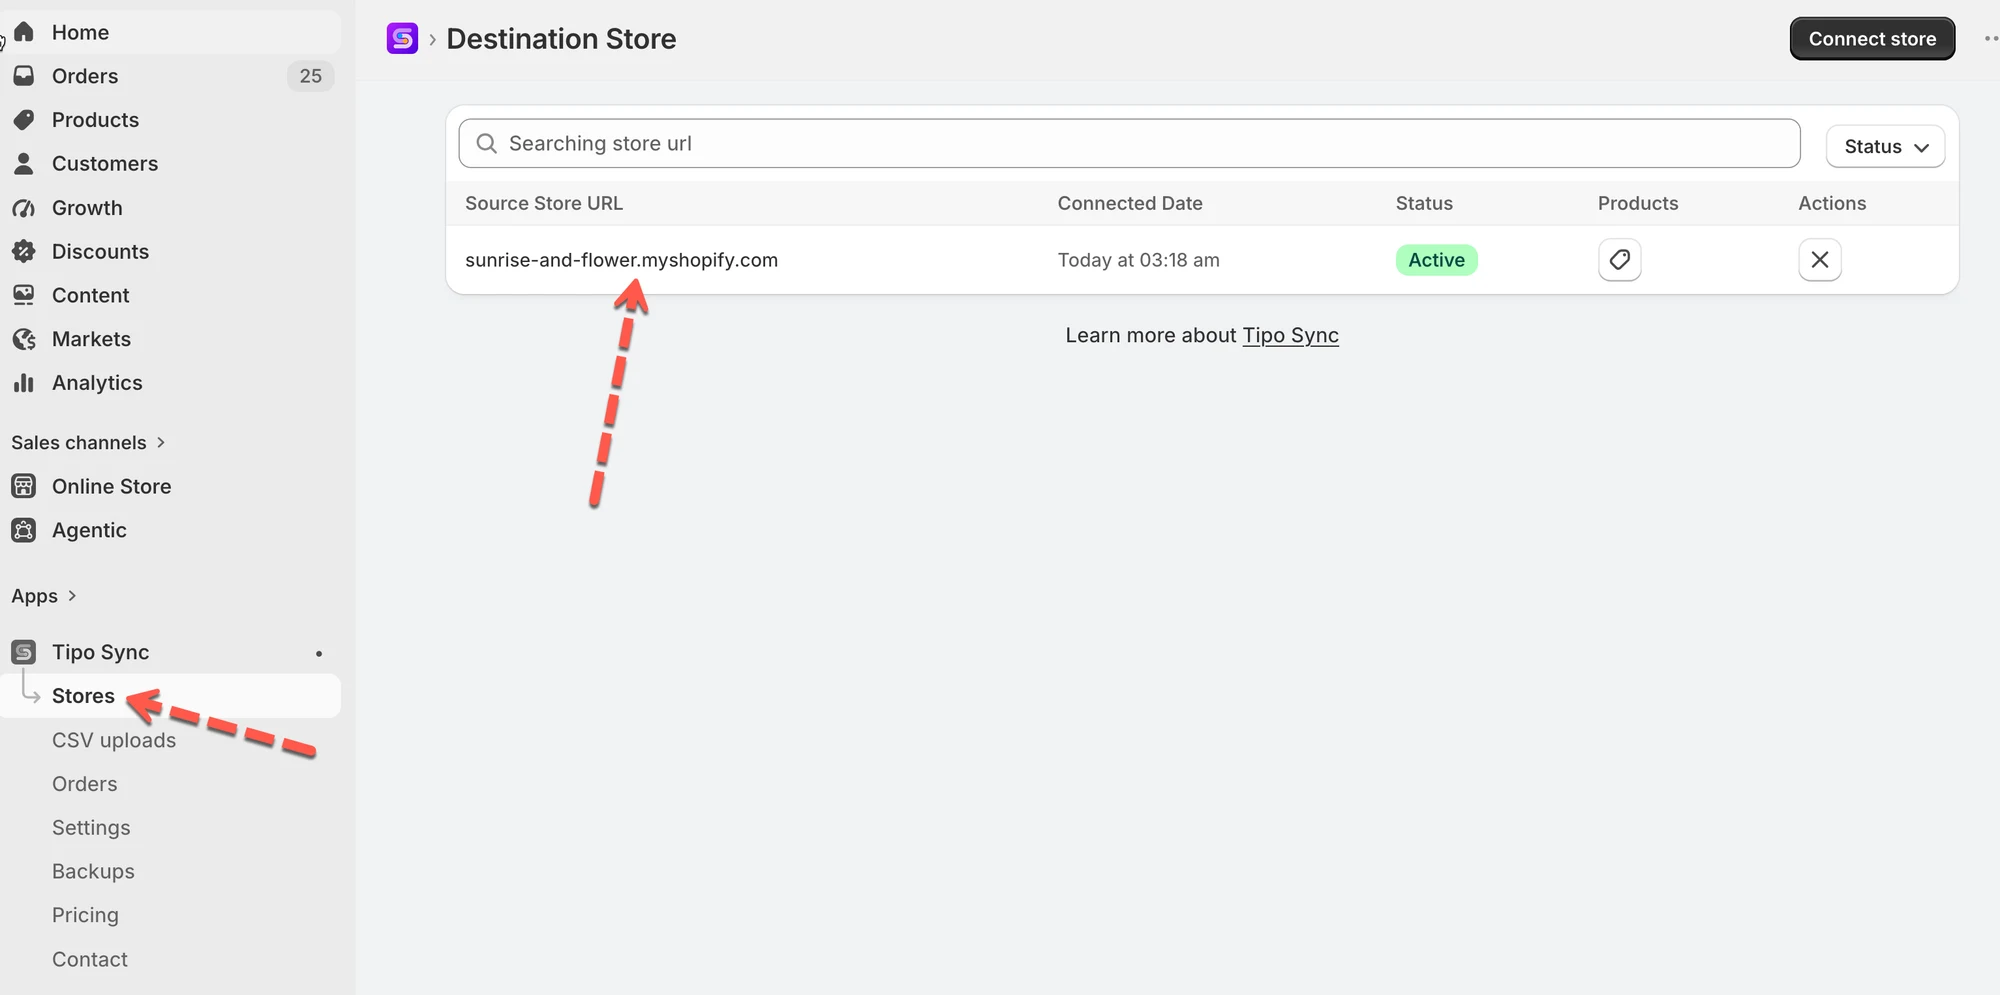
1. 開啟應用程式 > 點選 **Stores** > 點選來源商店的網址,開啟連線詳細資料
 2. 開啟 **Metafields sync**
3. 選擇要同步的內容
在 **Allow data** 下,選擇其中一項或兩項皆選:
* **Product Resource** → 同步商品中繼欄位
* **Variant Resource** → 同步款式中繼欄位
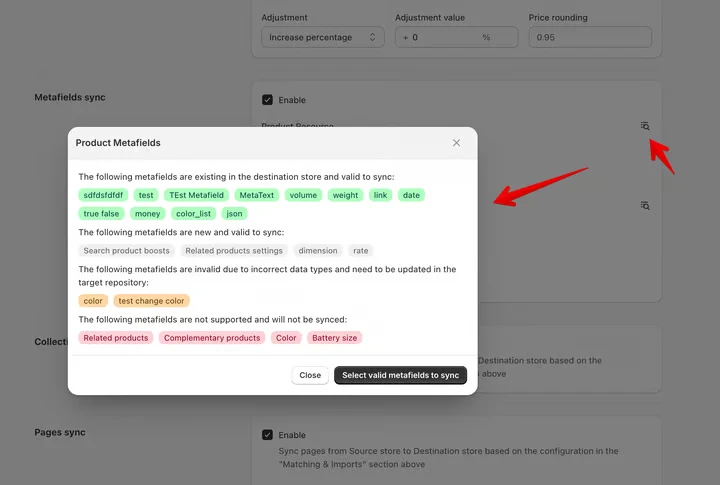
4. 點選右側的搜尋圖示,查看所有支援的中繼欄位 > 點選 **Select valid metafield to sync** 按鈕
5. 點選 **Save** 以更新變更
***
### 🔄 同步期間會發生什麼事
#### **1) 如果 Destination 商店沒有該中繼欄位定義**
應用程式會在需要時,自動在 Destination 商店中建立該中繼欄位定義。
建立完成後,同步的中繼欄位值就會顯示在 Destination 商店的商品/款式上。
#### **2) 如果中繼欄位存在,但尚未「結構化」(非結構化中繼欄位)**
在某些情況下,即使中繼欄位尚未在 Destination 商店中完整定義或結構化,也可能會被同步。
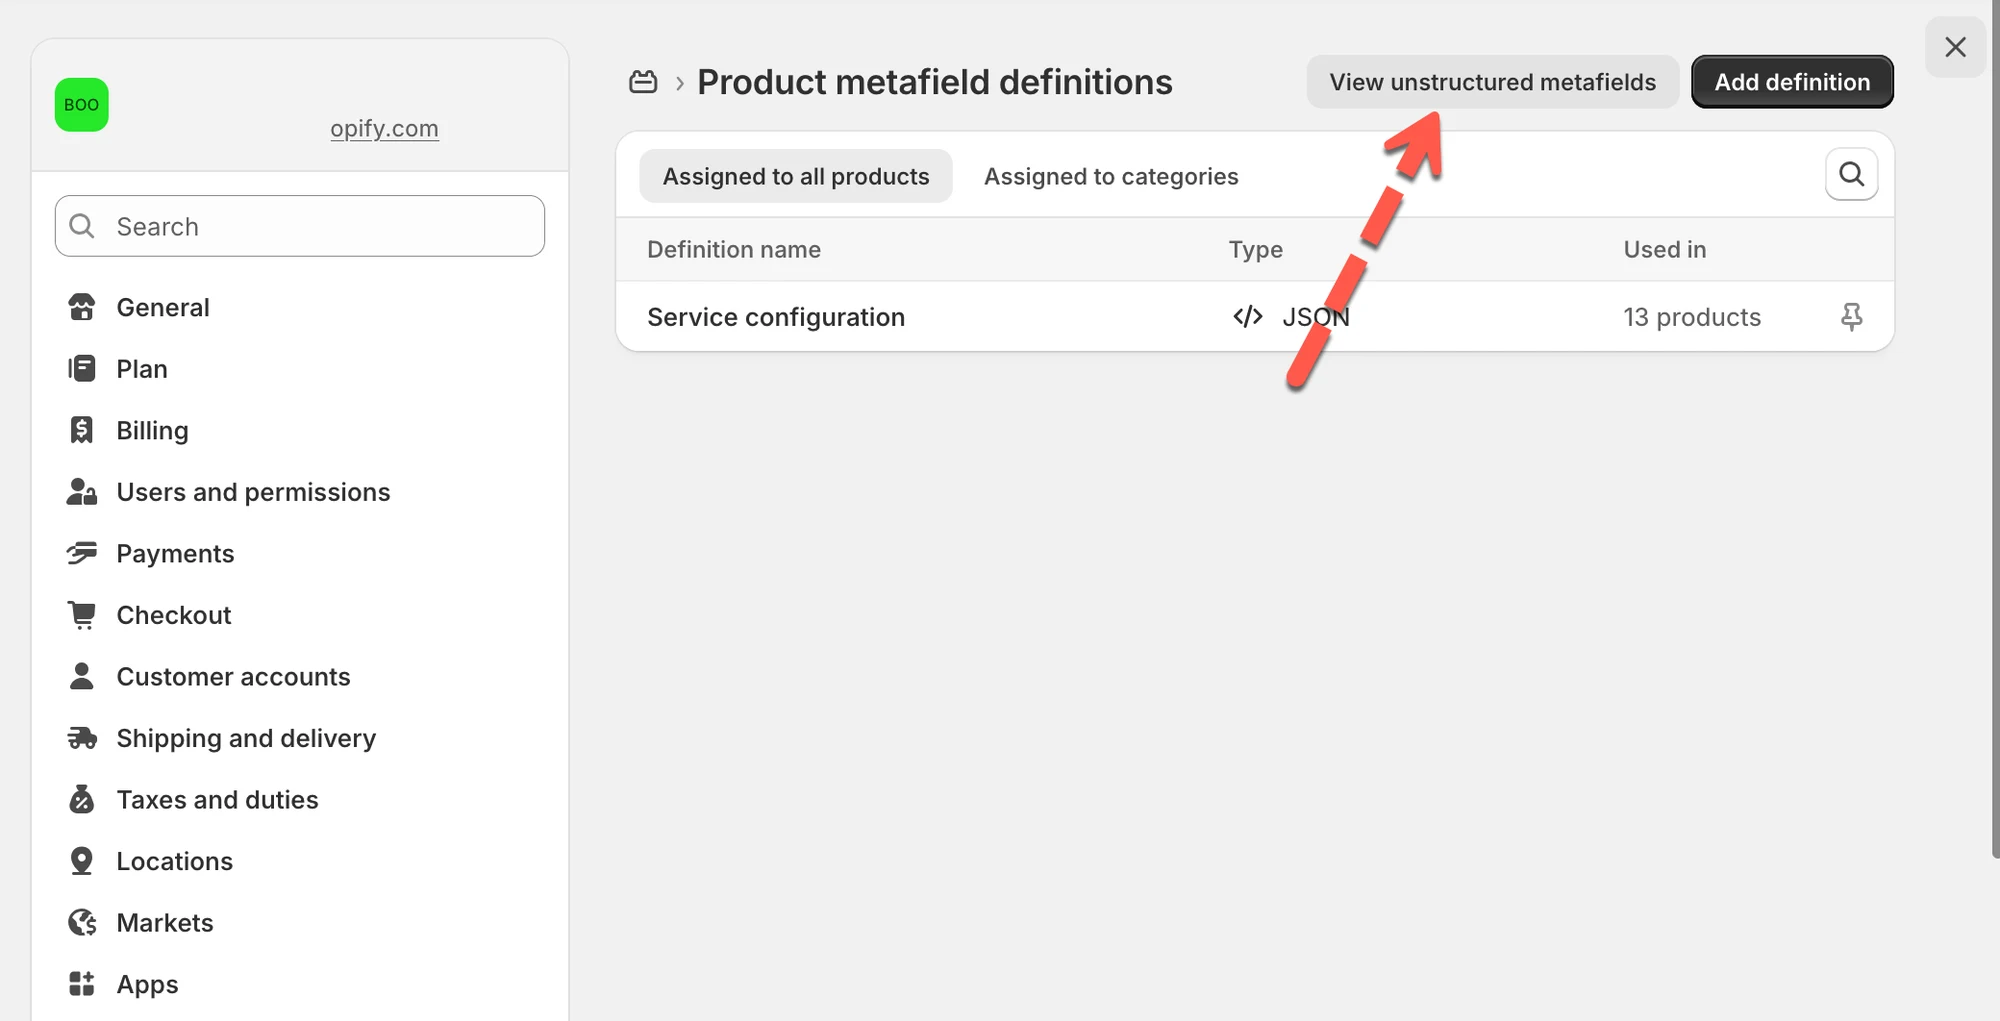
若要在 Shopify Admin 中查看這些中繼欄位:
* **開啟**商店 **Settings → Metafields and metaobjects**
* 選擇 **Product**(或 **Variant**)
* 開啟 **View unstructured metafields**
💡 提示:您之後可以手動定義/結構化這些中繼欄位,讓商店資料保持整潔一致。
 #### **3) 如果 Source 商店沒有值,Destination 不會被覆寫**
如果中繼欄位存在於 Destination,但 Source 的值是空的,Tipo Sync 不會覆寫 Destination 的值。
#### **4) 資料類型必須相符(非常重要)**
Source 與 Destination 之間的中繼欄位資料類型必須完全相符。
資料類型不相符的範例:
* `single_line_text_field` 與 `multi_line_text_field`
* `number_integer` 與 `number_decimal`
* `product_reference` 與 `text`
⚠️ 如果資料類型不相符,同步可能會失敗,或略過該中繼欄位。
***
### 📌 範例:同步商品中繼欄位「Material」
您想使用我們的應用程式,將名為 **Material** 的**自訂商品中繼欄位**(例如「Cotton」、「Leather」、「Wool」)從 **Source Store** 同步到 **Destination Store**。
#### **步驟 1:在 Shopify 中定義中繼欄位**
在您的 **Source Store** 中:
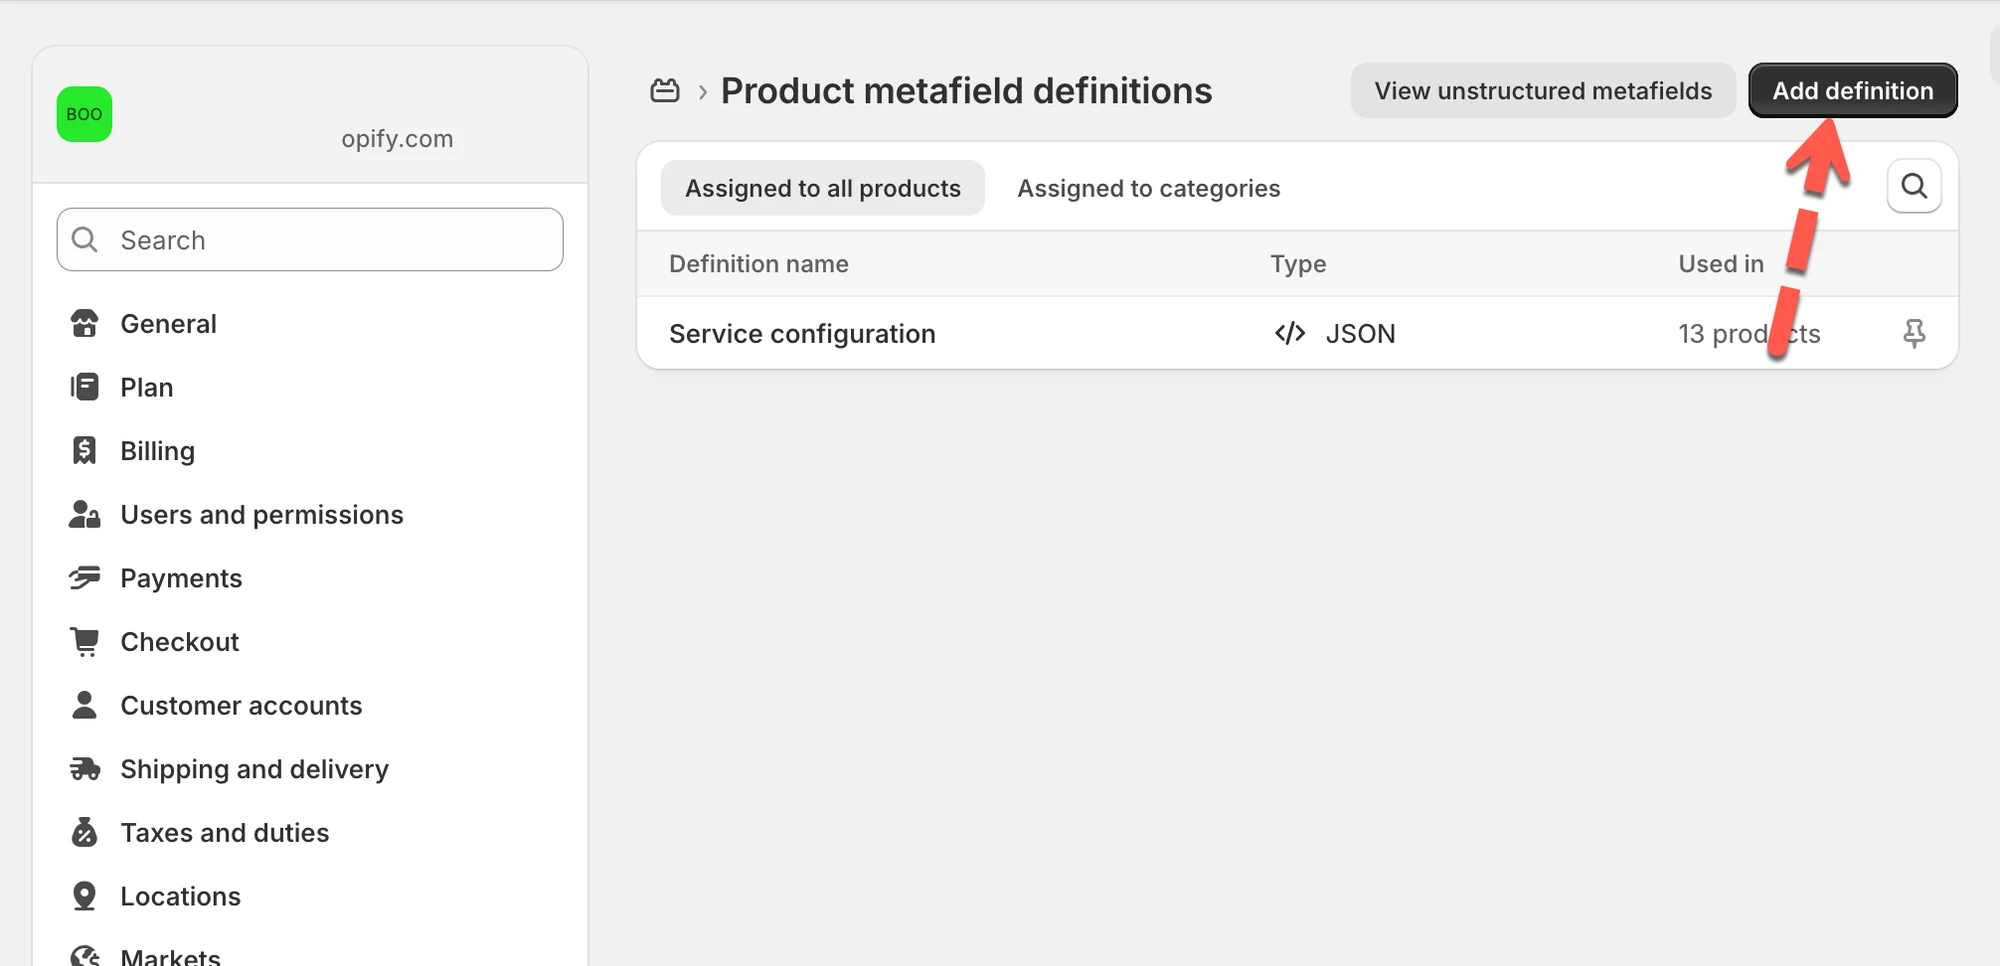
1. 前往 **Shopify Admin >** 開啟商店 **Settings > Metafields and metaobjects** > 選擇 **Product**(或 **Variant**)
2. 點選 **Add definition**(若尚未建立)> 填寫中繼欄位定義:
* **Name**:Material
* **Namespace**:`custom`
* **Key**:`material`
* **Type**:Single line text
\=> 這會得到完整的中繼欄位鍵值:`custom.material`
請在您的 **Destination Store** 中重複此步驟(鍵值和類型必須相同)。
 #### **步驟 2:為商品新增中繼欄位資料**
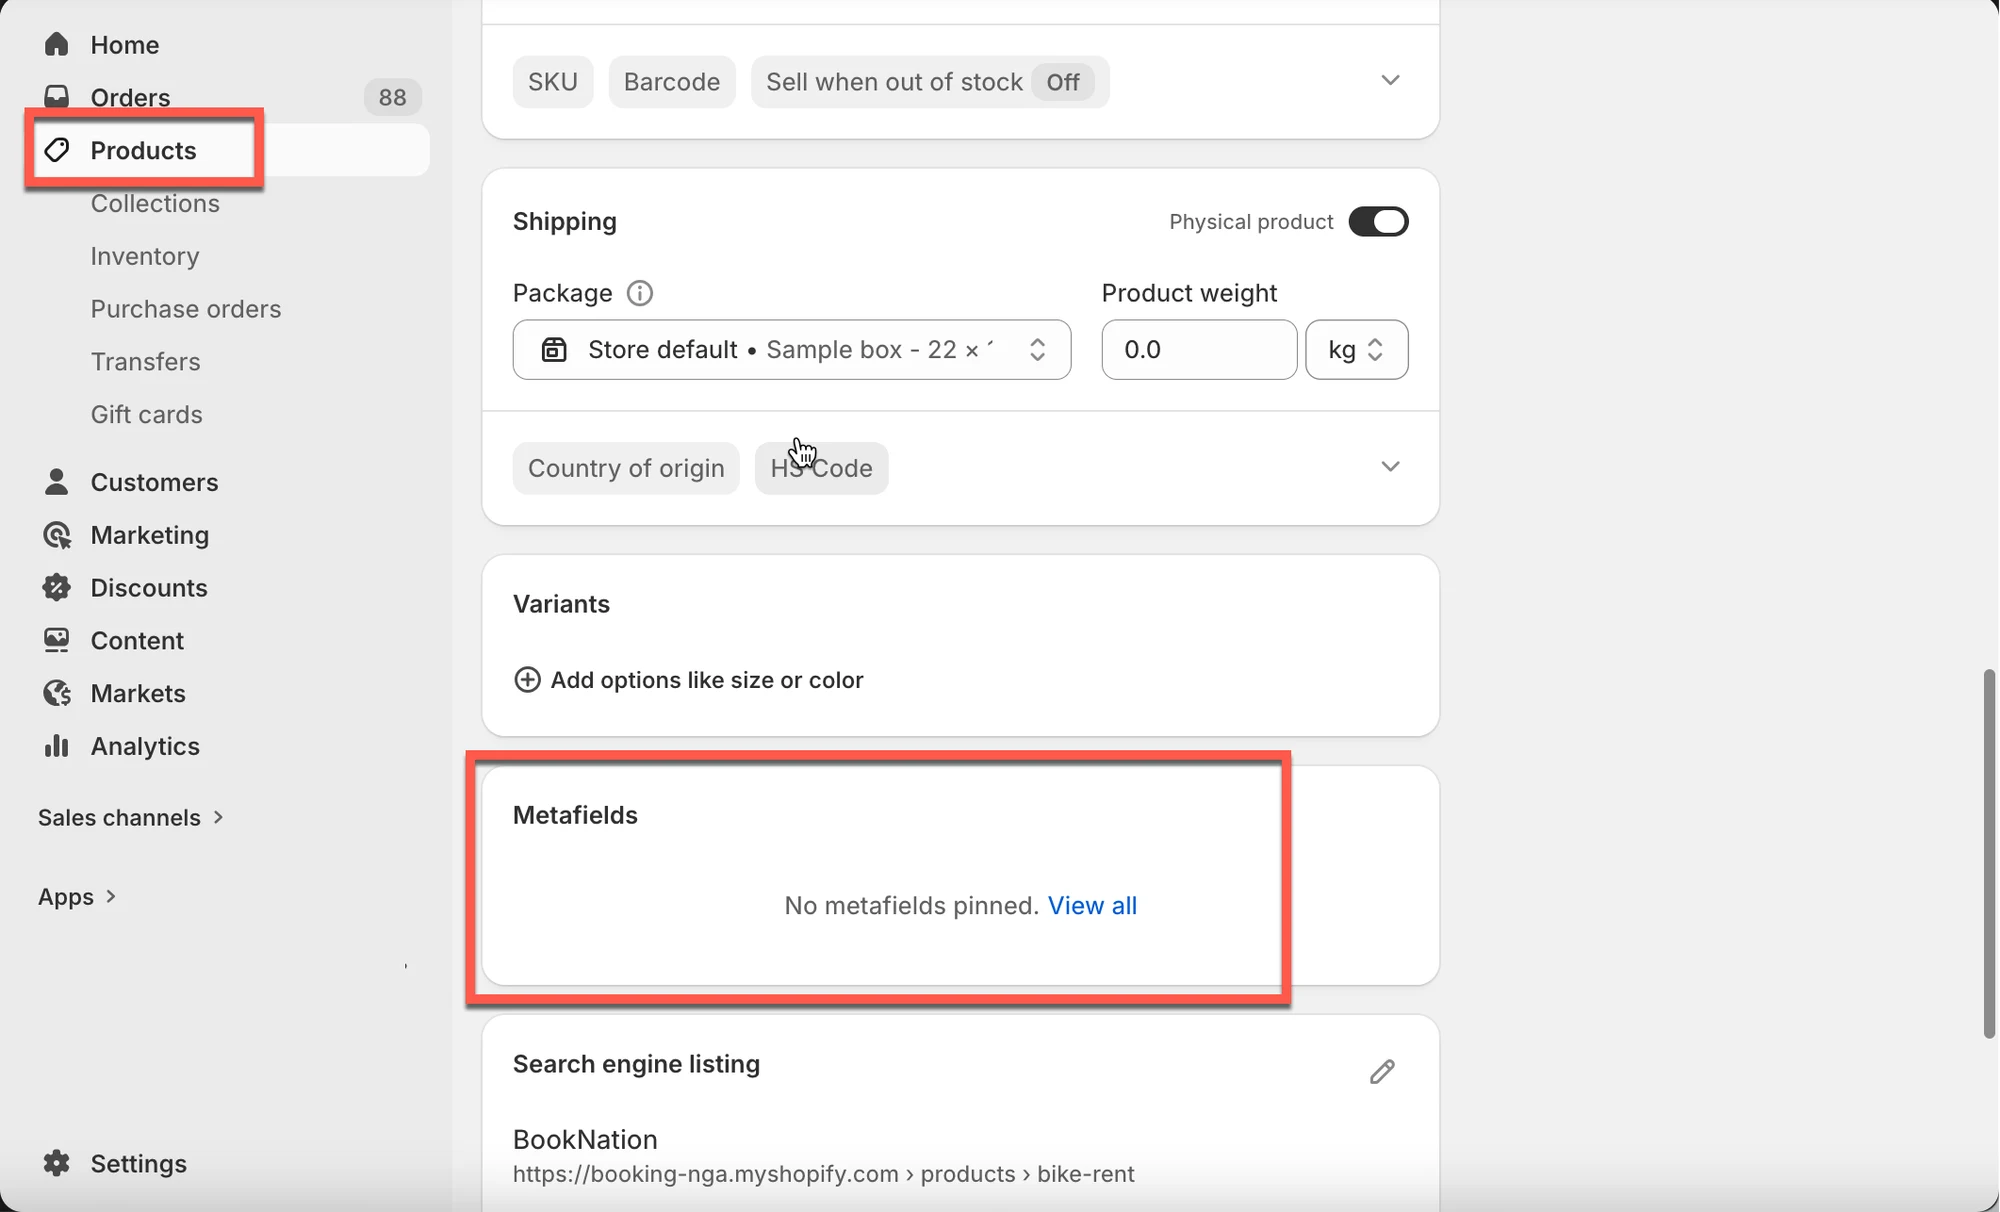
在您的 **Source Store** 中,前往某項商品並向下捲動至 **Metafields** > 在 **Material** 下輸入:`Cotton`
這項商品現在擁有中繼欄位 `custom.material = "Cotton"`。
 #### **步驟 3:在 Tipo 應用程式中設定同步**
* 在 **Destination Store** 中開啟我們的應用程式 > 前往 Connect Configuration **> Metafield Sync**
* 選擇 **Specific Metafields >** 輸入完全一致的中繼欄位鍵值:`custom.material`
**結果**
* 我們的應用程式會在 Source Store 中找到 `custom.material`
* 如果 Destination 的商品中**不存在**該欄位,應用程式會**建立它**\
\=> 結果:兩間商店都會有 `custom.material = "Cotton"`
* 如果 Destination 已存在該欄位但 Source 為空,我們**不會覆寫**該值
***
### ❓常見問題
#### Q1:如何在您的商店中設定 `namespace.key`?
若要同步特定的中繼欄位,您需要以此格式輸入**中繼欄位定義鍵值**:`namespace.key`(例如:`custom.color`)。
以下是在 Shopify 管理後台中找到它的方式:
1. 前往 Shopify Admin >,進入 **Settings > Custom Data > Products**
2. 點選您想同步的中繼欄位\
→ 您會看到 **Namespace** 與 **Key** 的值
3. 將兩者以此格式組合:`namespace.key`\
→ 範例:`custom.description`
#### Q2:為什麼我的中繼欄位沒有同步?
如果您的中繼欄位沒有正確同步,可能是下列其中一個原因:
1. **未啟用中繼欄位同步**\
請確認兩間商店都已開啟中繼欄位同步:
* 在 **Source Store** 中啟用 **Share Metafields**。
* 在 **Destination Store** 中啟用 **Receive Metafields**。
2. **尚未新增中繼欄位定義鍵值**
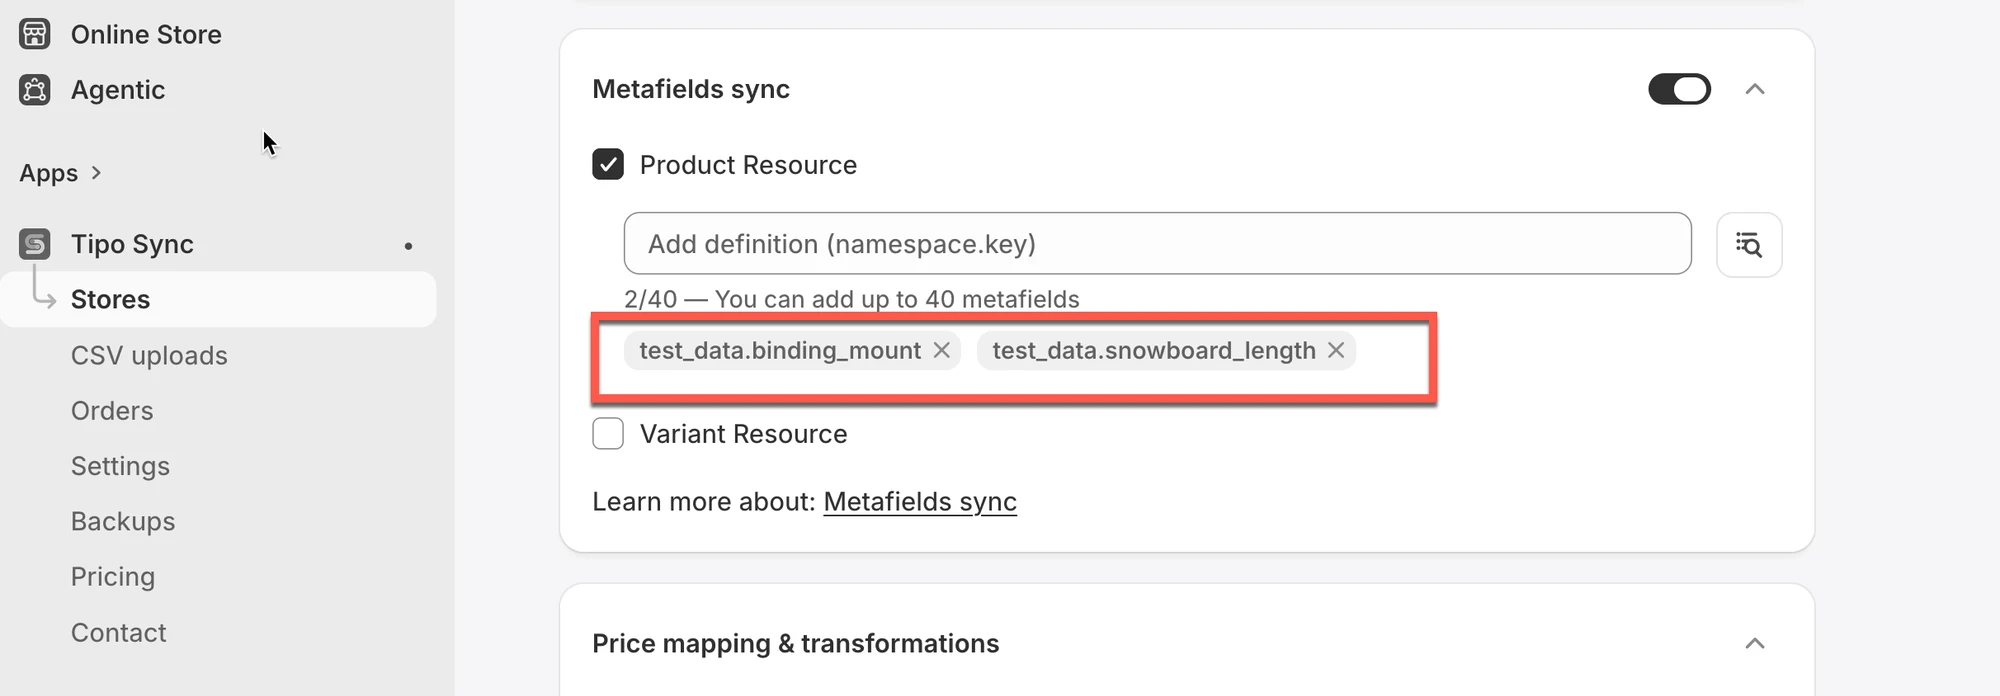
除了啟用中繼欄位同步之外,您還必須新增想要同步的**中繼欄位定義鍵值(namespace.key)**。
* 前往 **Settings → Share Metafields**
* 確認已勾選 **Enable**
* 在 **Allow data** 下,以此格式新增中繼欄位定義:\
`namespace.key`\
範例:`custom.material`
 3. **不支援的中繼欄位類型**\
部分中繼欄位資料類型不受支援,例如 **Reference types** 或 **MetaObjects**。
紅色:應用程式無法同步的不支援中繼欄位
 4. **兩間商店的中繼欄位類型不相符**\
Source 與 Destination 的中繼欄位必須具有**相同的資料類型和結構**。\
常見的不相符情況包括:
* 其中一個中繼欄位是 **Single line text**,另一個卻是 **Multi-line text**。
* 其中一個中繼欄位使用 **Single value**,另一個卻使用 **List of values**。
若要解決這些問題,請確認兩間商店的中繼欄位具有相同的 **namespace**、**key** 和**資料類型**,然後再試著同步一次。
***
**🙋 還需要協助嗎?**
如果您仍需要協助,歡迎隨時寄信至 與我們聯繫,我們很樂意為您提供進一步的協助。