# Connect stores

本指南說明如何連接兩間 Shopify 商店，讓 Tipo Sync 能在兩者之間同步商品、庫存及其他資料。

在 Multi-store sync 中，您會連接：

* **Source store**（傳送資料）
* **Destination store**（接收資料）

## 🛠️ 步驟 1：安裝應用程式並選擇商店類型&#x20;

請在**兩間**商店都安裝 Tipo Sync，然後在各商店中開啟應用程式開始設定。

* 商店 1：安裝應用程式並將其設為 **Source store**
* 商店 2：安裝應用程式並將其設為 **Destination store**

## 🧭 步驟 2：完成設定

第一次開啟應用程式時，會有 3 個步驟的設定引導您完成。您的同步對應圖會隨著您的選擇顯示**即時預覽**。

<div class="guide-steps">

<div class="guide-step">


### 1️⃣ 商店模式

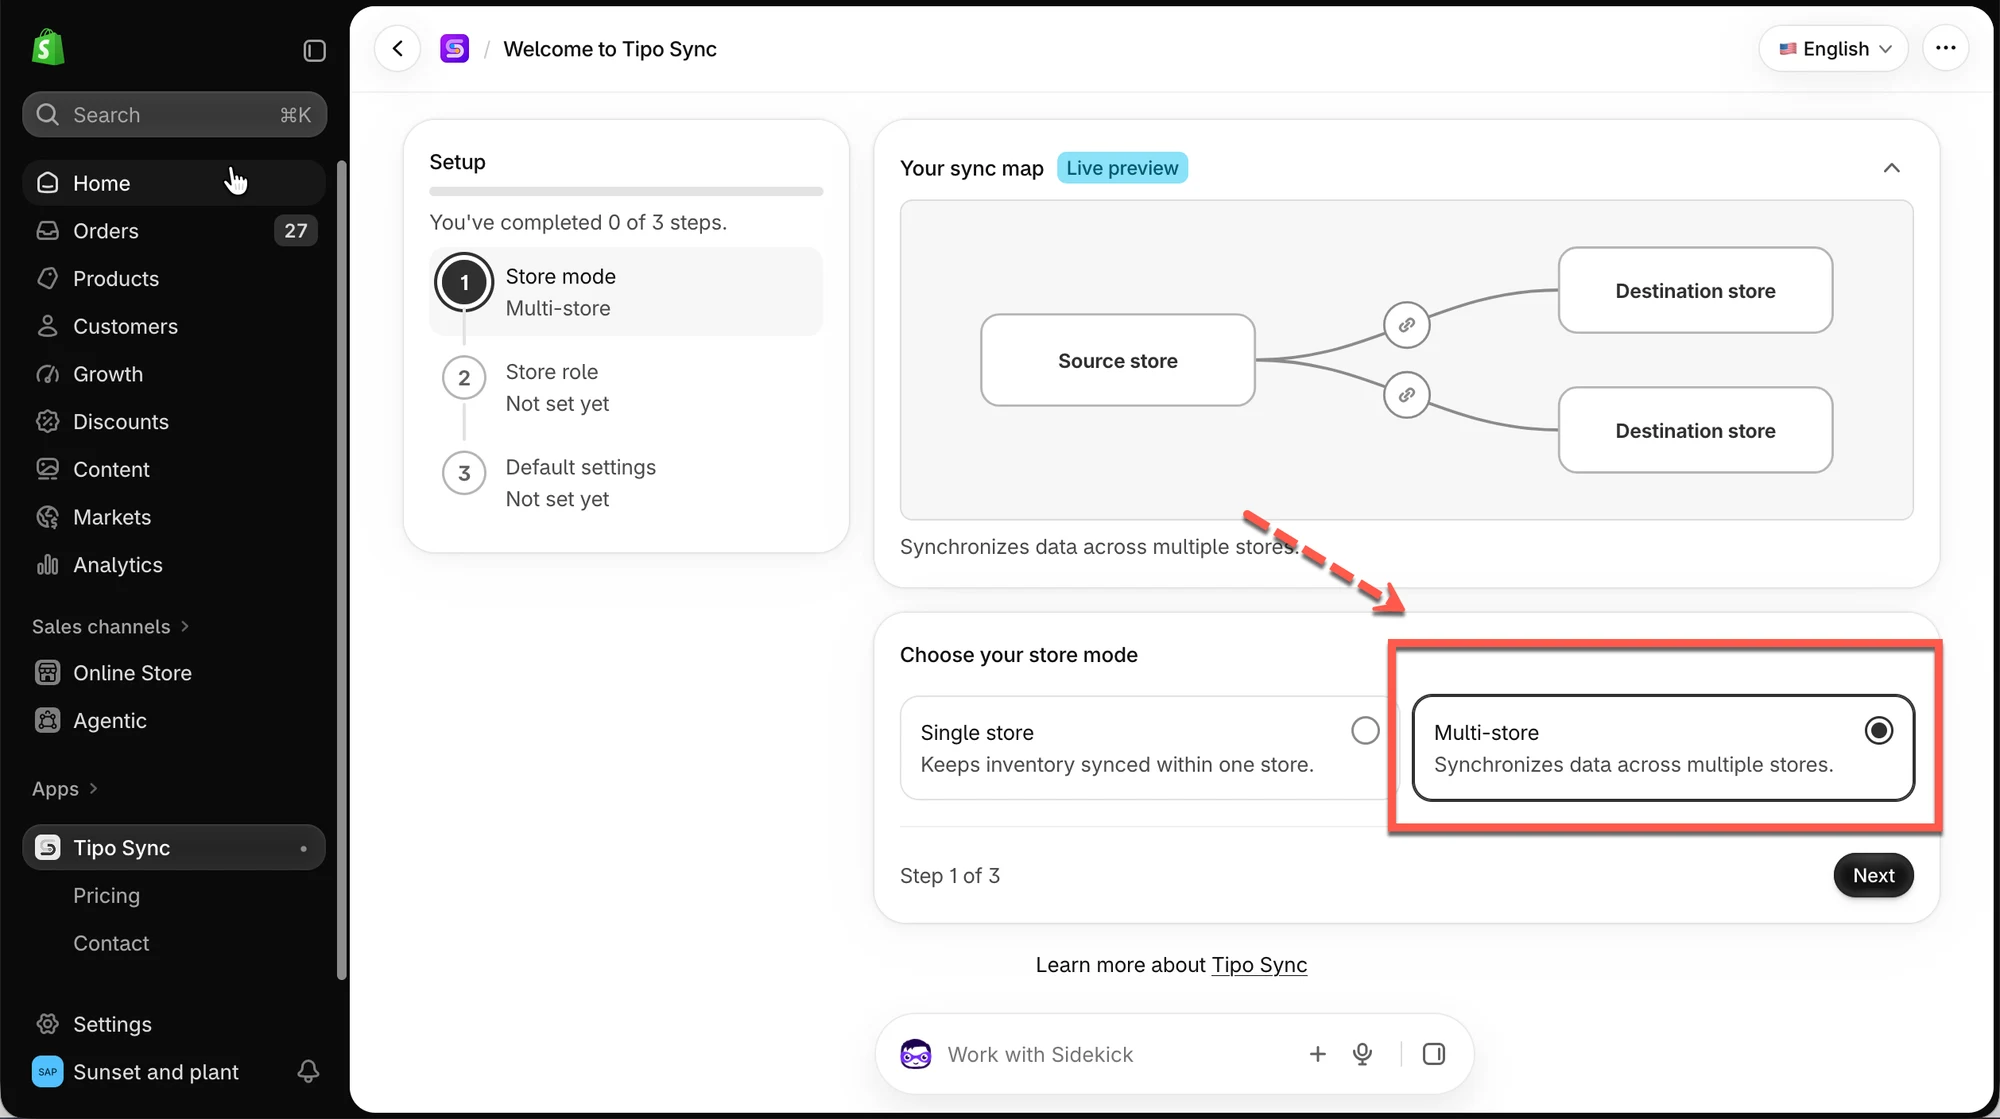
選擇您要使用應用程式的方式：

* **Single store**：在單一商店內同步庫存。
* **Multi-store**：在多間商店之間同步資料。

若要連接兩間商店，請選擇 **Multi-store**，然後點選 **Next**。

<figure><img src="/media/6cbcc6a79889657a2913.webp" alt="" loading="lazy" decoding="async"><figcaption></figcaption></figure>

</div>

<div class="guide-step">


### 2️⃣ Store role

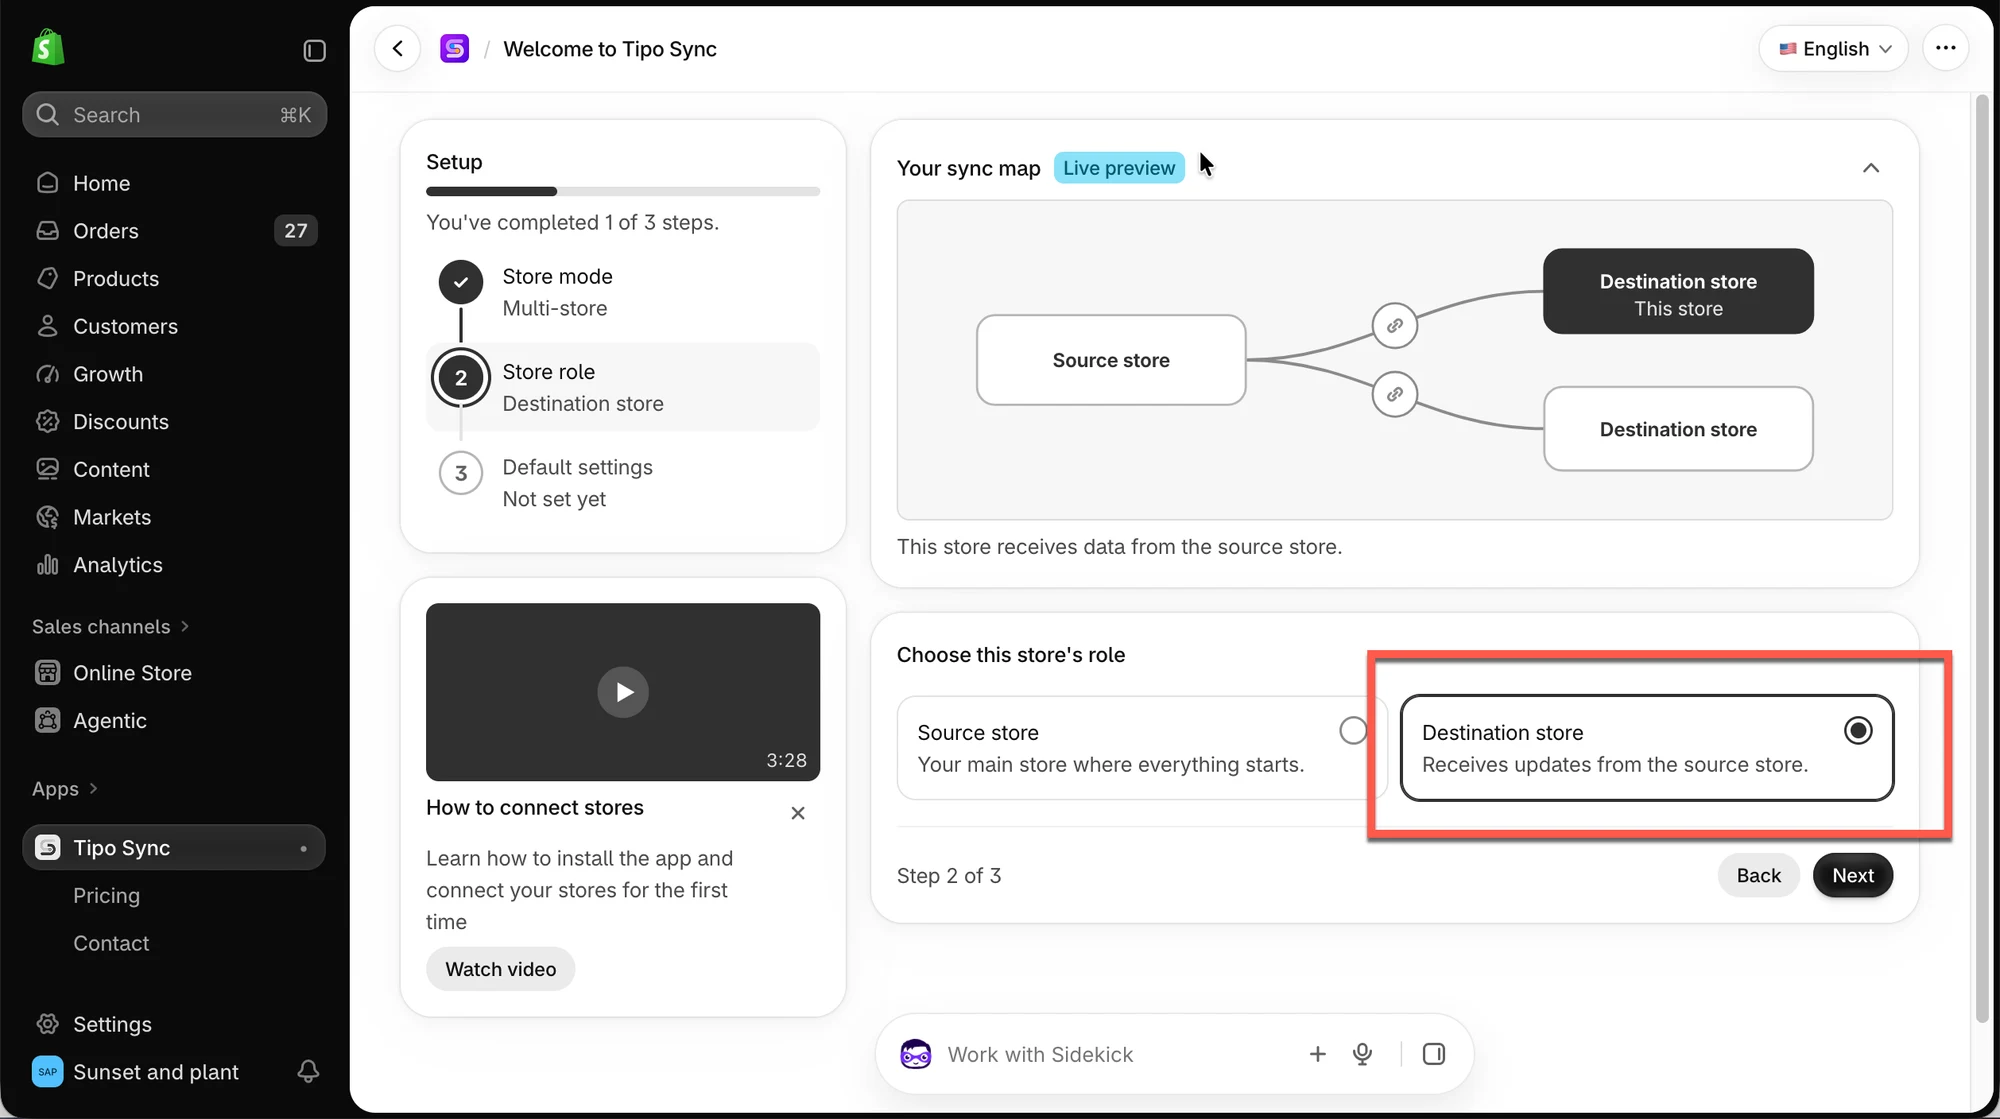
選擇您目前所在商店的角色：

* **Source store**：一切資料的起點，也就是您的主要商店。
* **Destination store**：接收來自 Source store 的更新。

選擇角色後，點選 **Next**。

<figure><img src="/media/7c5648f84e5a6447cc5d.webp" alt="" loading="lazy" decoding="async"><figcaption></figcaption></figure>


</div>

<div class="guide-step">


### 3️⃣ Default settings

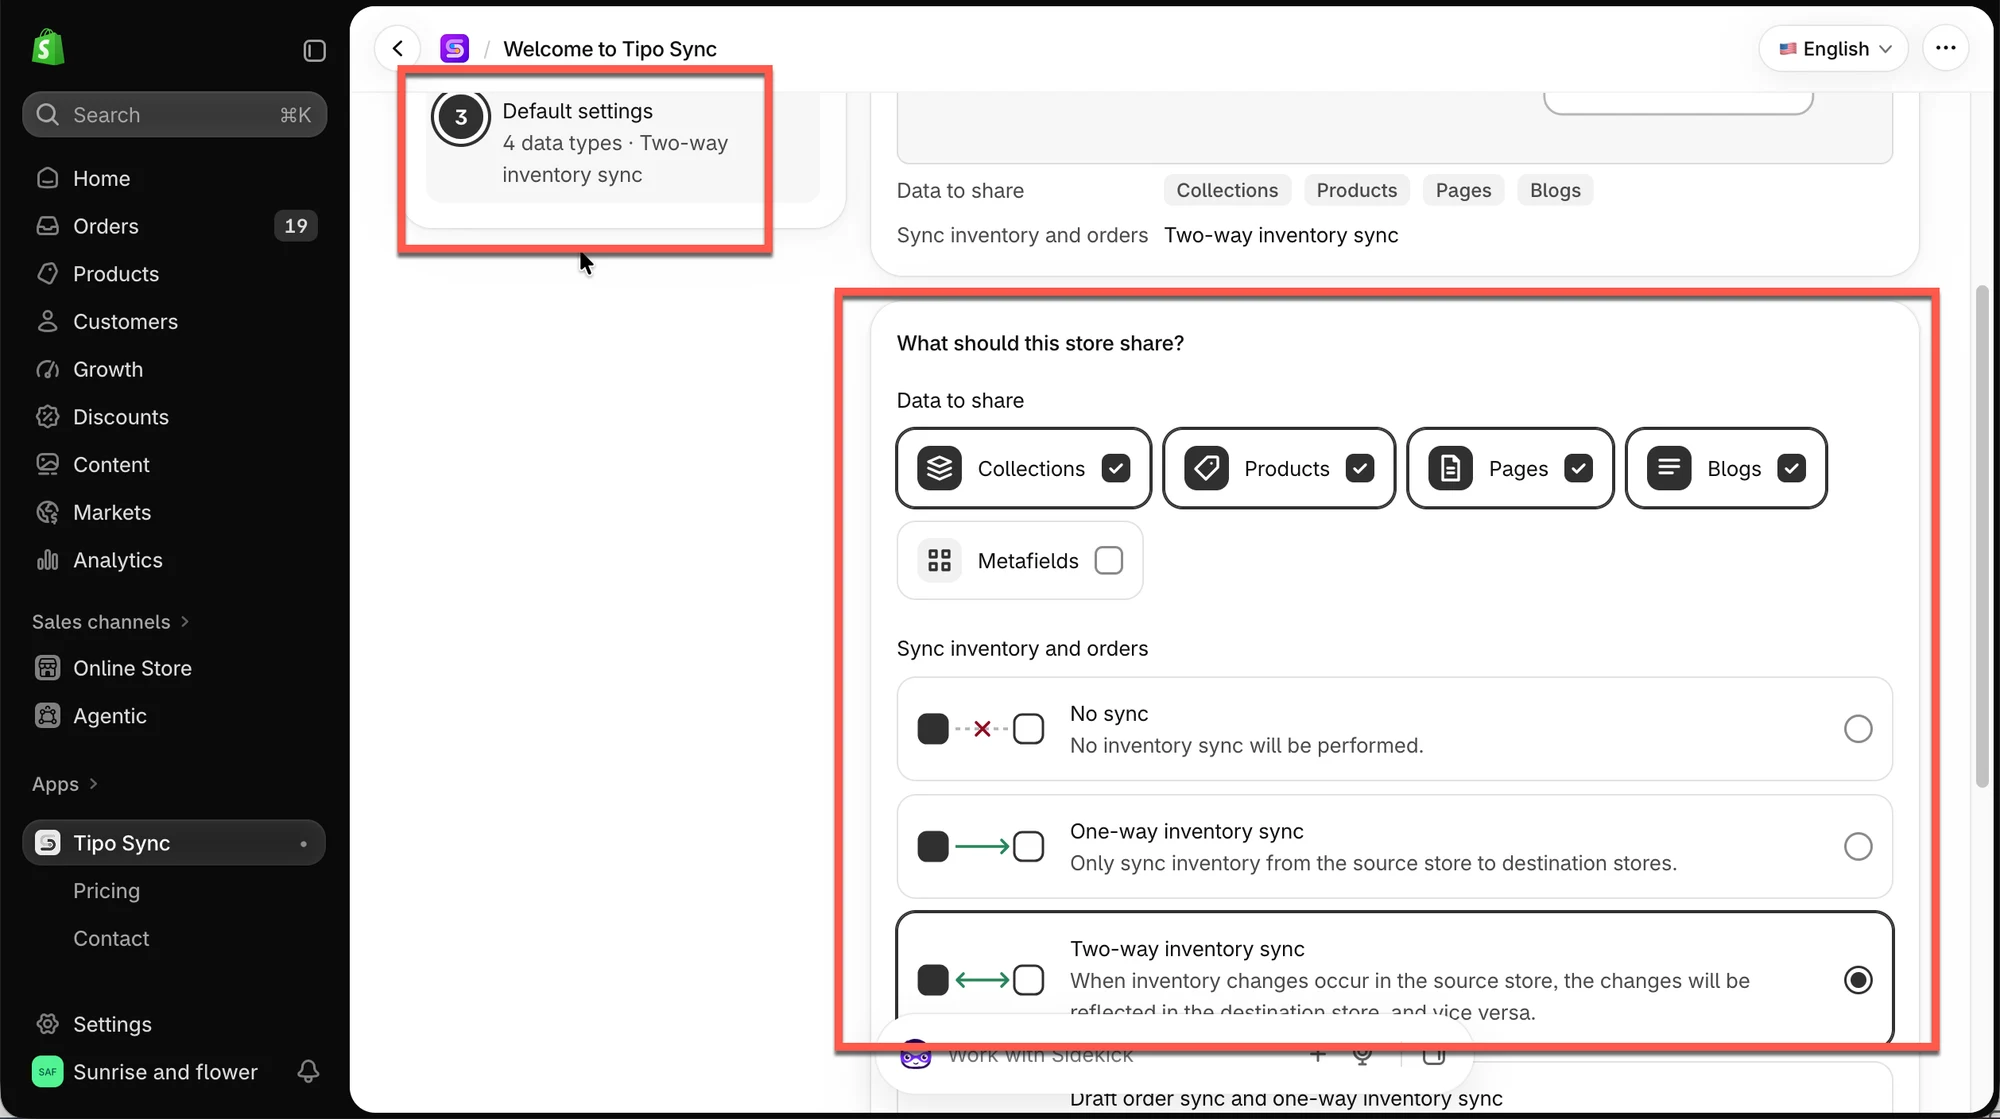
選擇哪些資料要從這間商店同步到其他商店（適用於 Source store）

<figure><img src="/media/23eadcbf64c521f1d97c.webp" alt="" loading="lazy" decoding="async"><figcaption></figcaption></figure>

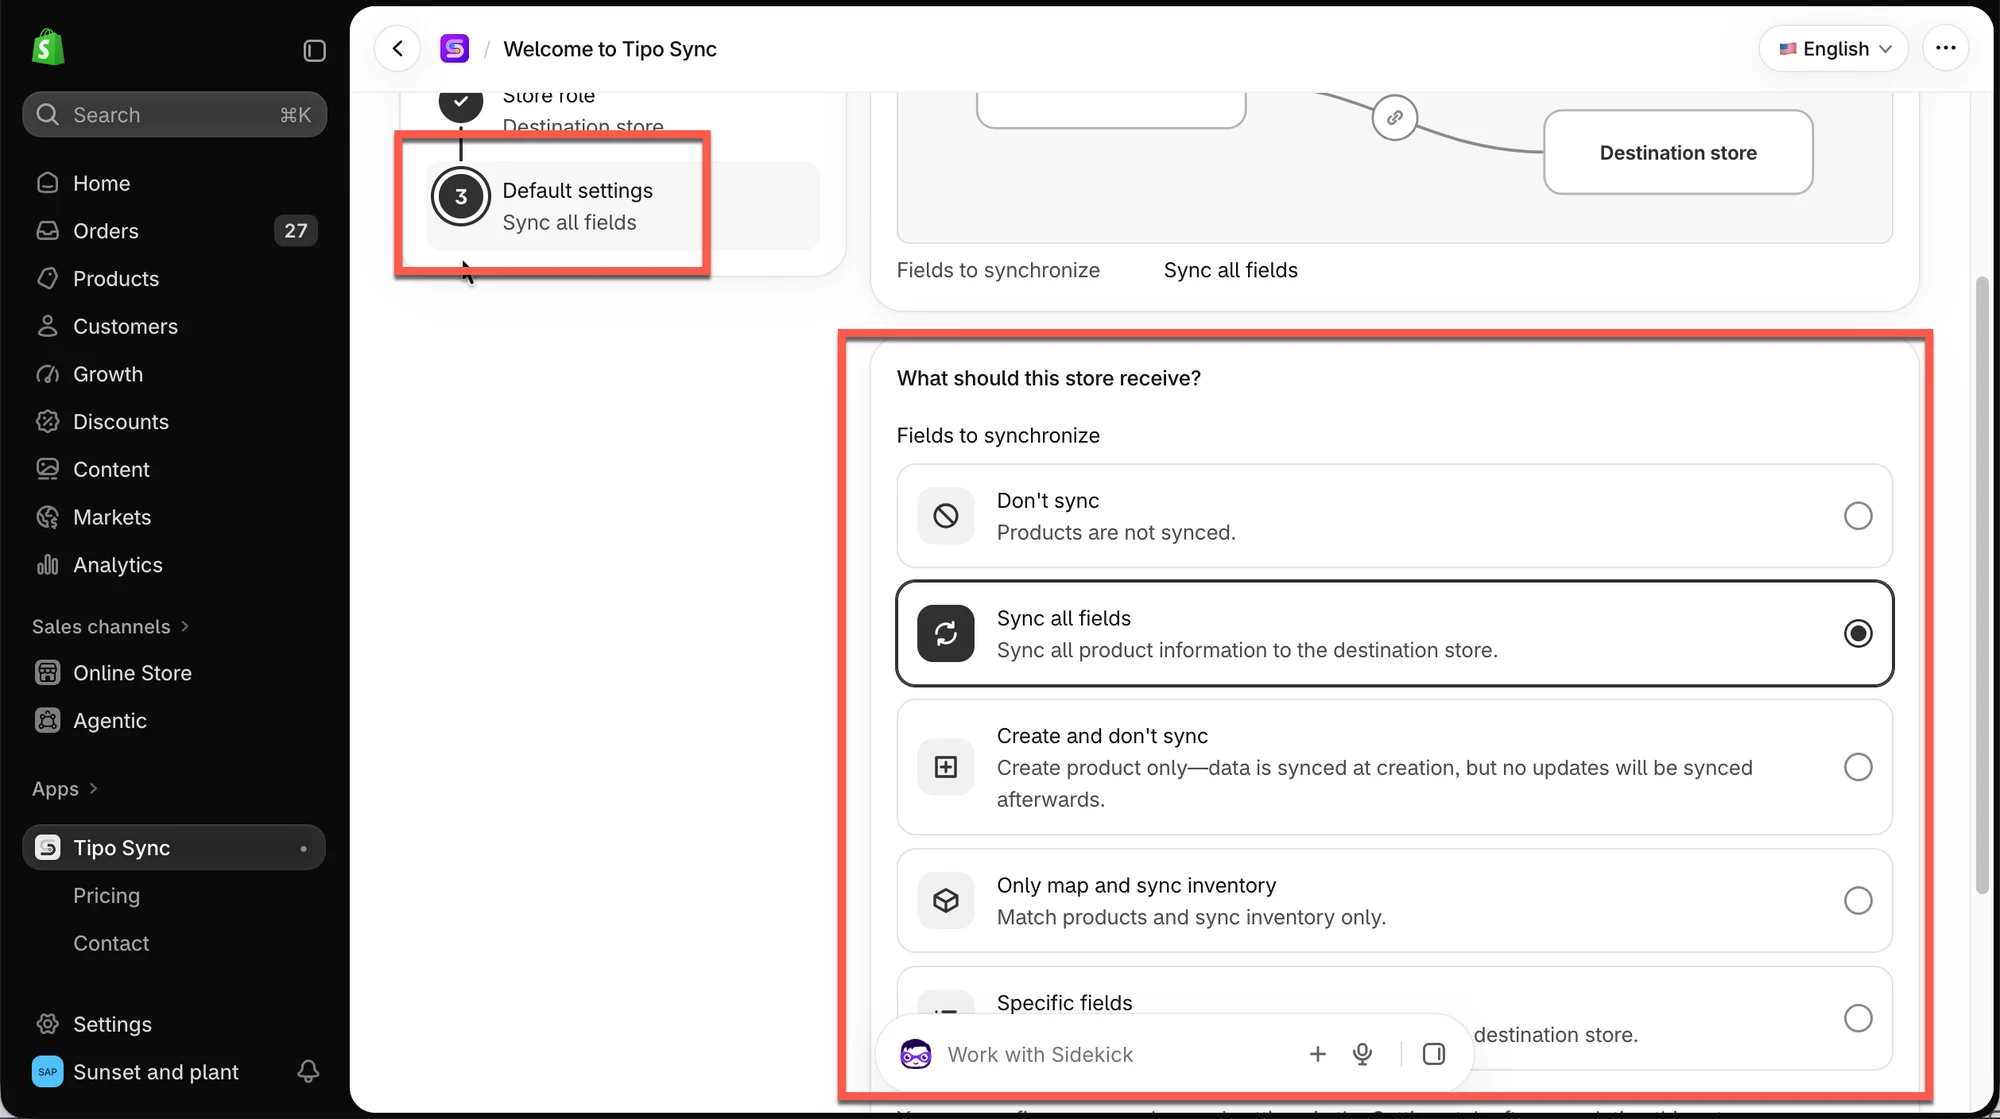
選擇這間商店要接收哪些資料（適用於 Destination store）。&#x20;

<figure><img src="/media/2edbcbbfbdddd0755c5e.webp" alt="" loading="lazy" decoding="async"><figcaption></figcaption></figure>

點選 **Finish** 完成設定。

💡 **提示：** 您之後可以在 **Settings** 分頁中變更這些選項，並設定更進階的選項。

</div>

</div>

## 🔑 步驟 3：連接商店


:::note

**注意：** 連線一律由 **Destination store** 發起。

:::


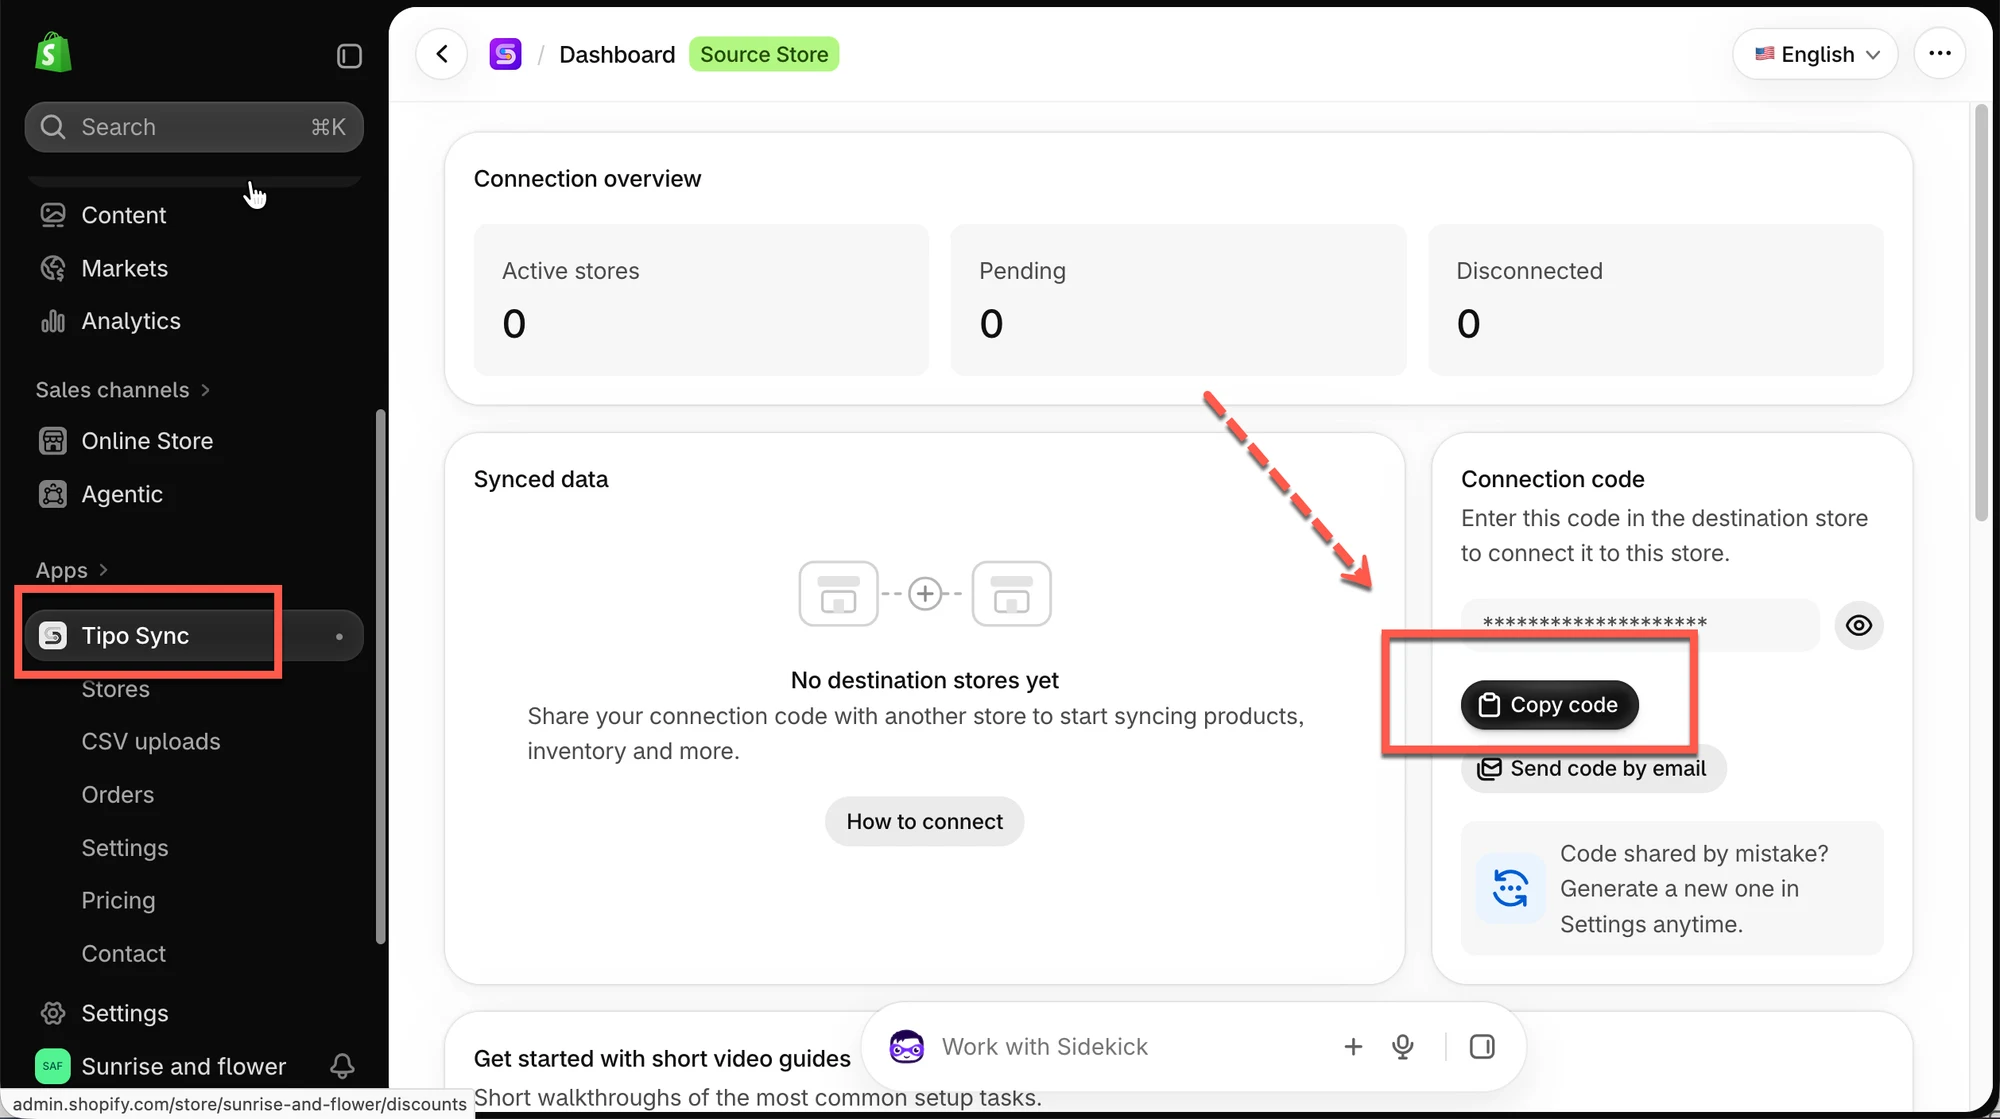
### 取得連線代碼（在 Source store）

1. 在 Source store 中開啟應用程式  > 應用程式 Dashboard
2. 找到 **Connection** **code** > 點選 **Copy code**

<figure><img src="/media/1b57c8b4d5b57e28ad6c.webp" alt="" loading="lazy" decoding="async"><figcaption></figcaption></figure>

### 使用連線代碼（在 Destination store）

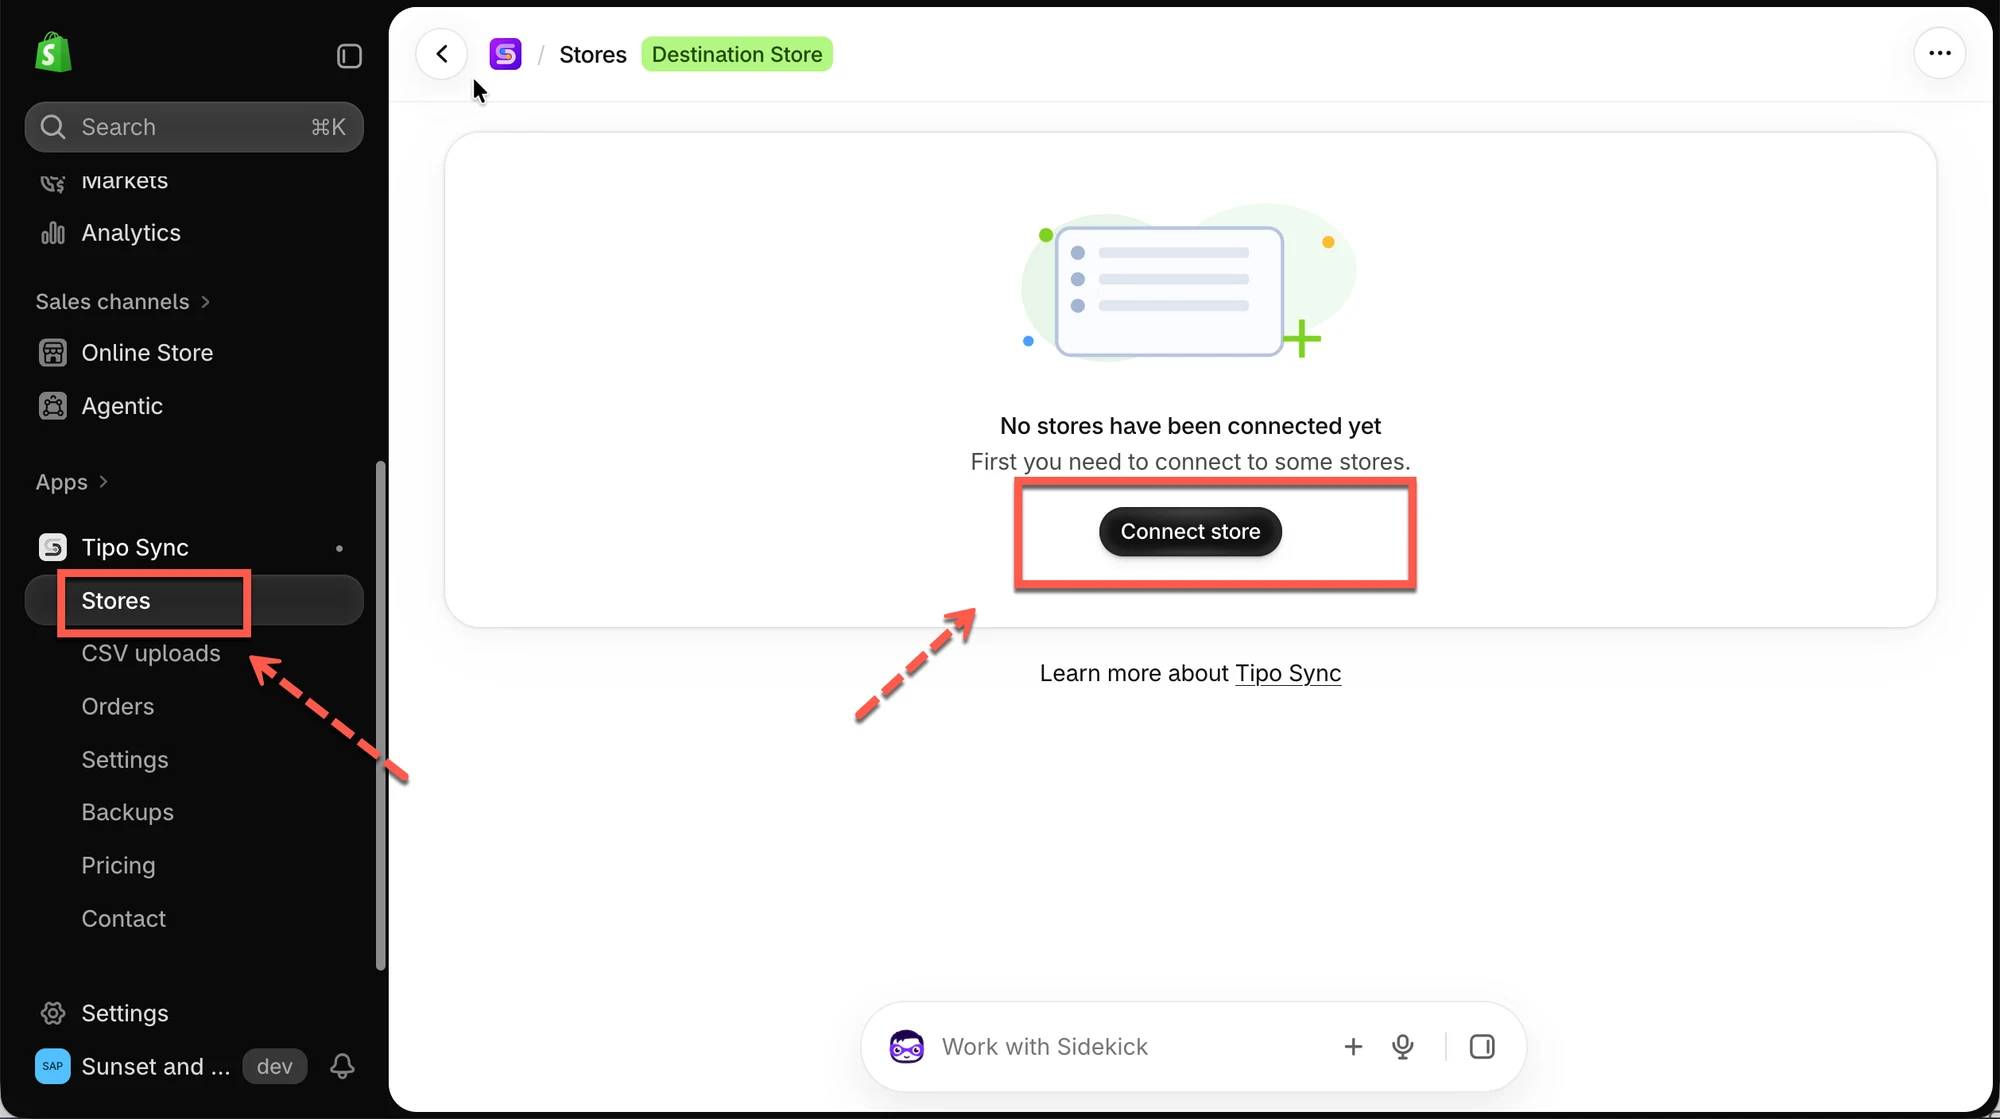
1. 在 Destination store 中開啟應用程式，並點選 **Stores**
2. 點選 **Connect store**
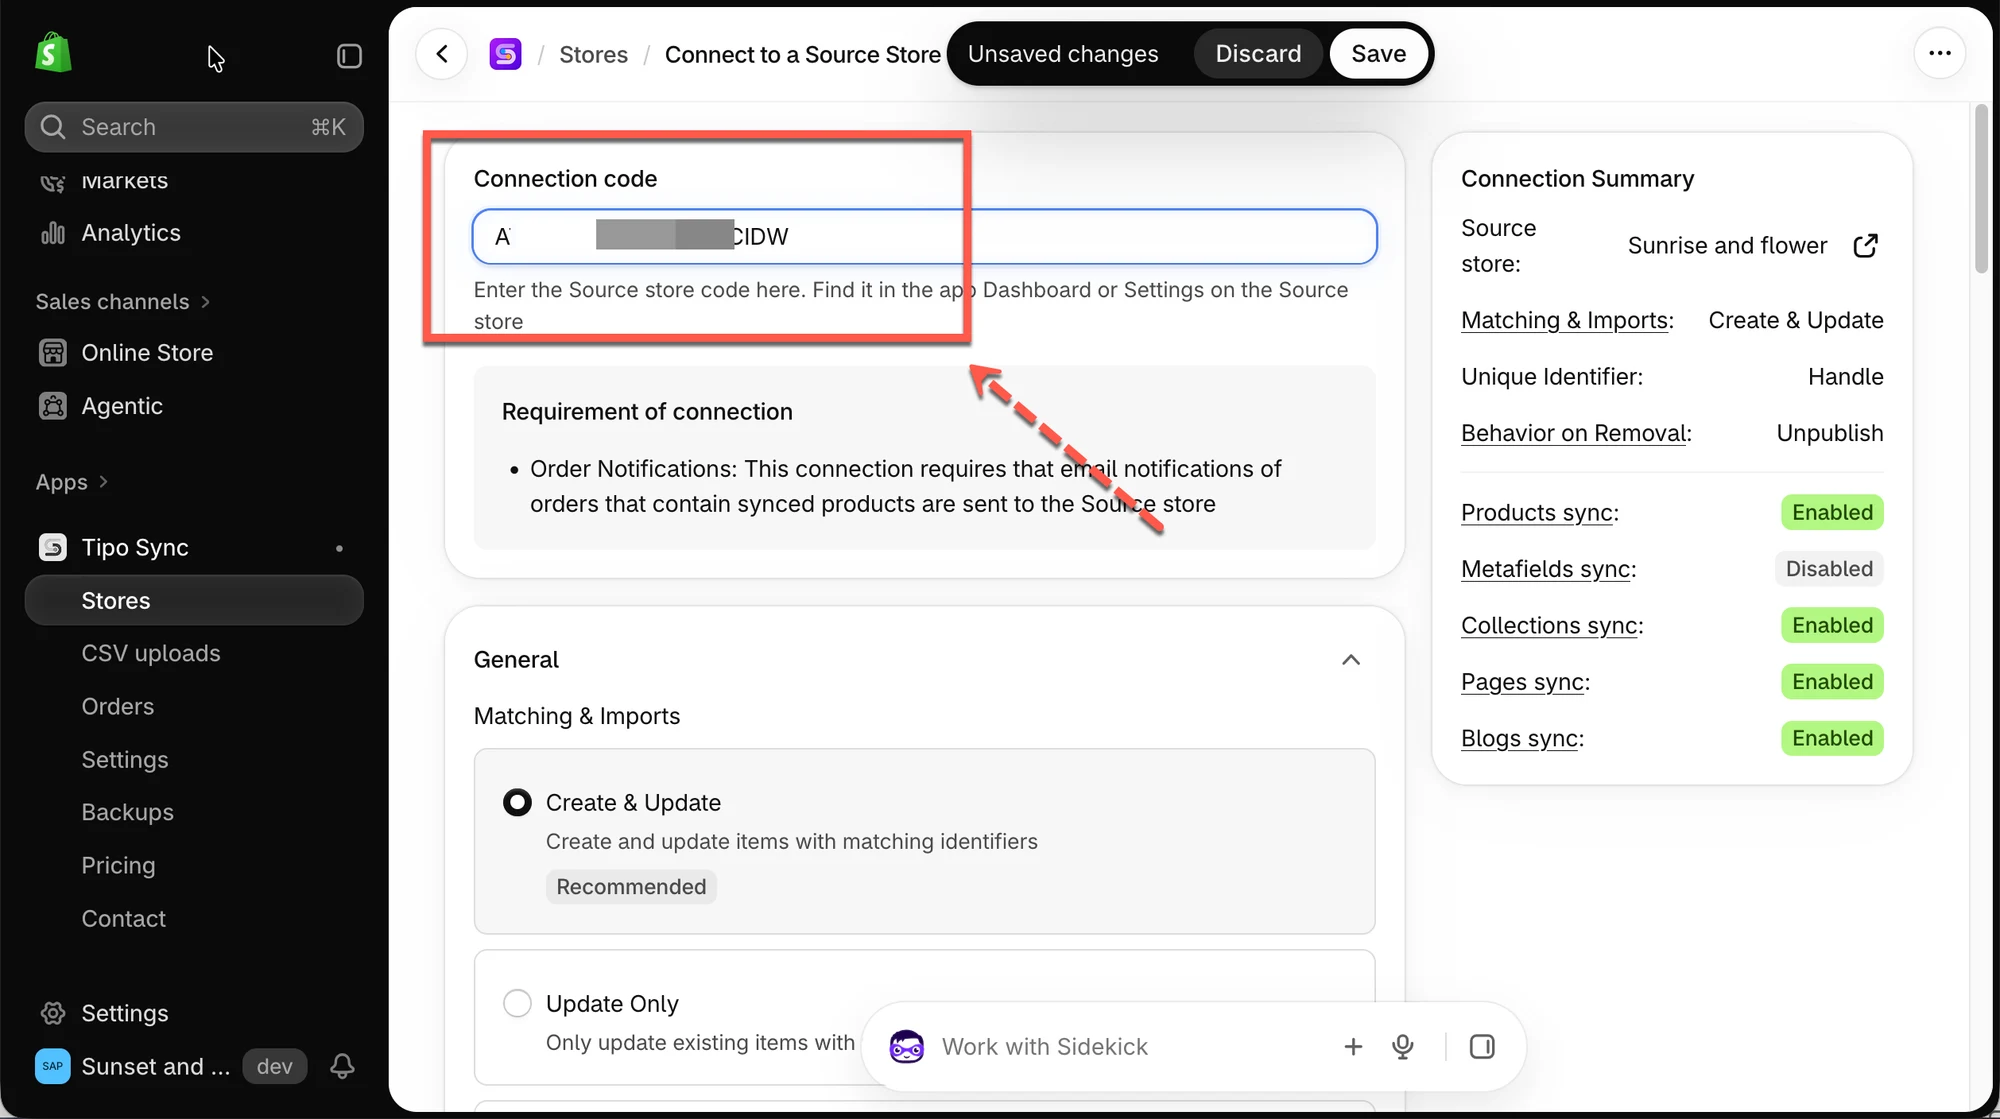
3. 將代碼貼到 **Connection code** 欄位

<figure><img src="/media/753ef1d862e5ff40e41a.webp" alt="" loading="lazy" decoding="async"><figcaption></figcaption></figure>

<figure><img src="/media/c23c3394844a58b5693f.webp" alt="" loading="lazy" decoding="async"><figcaption></figcaption></figure>

## ⚙️ 步驟 4：選擇同步設定

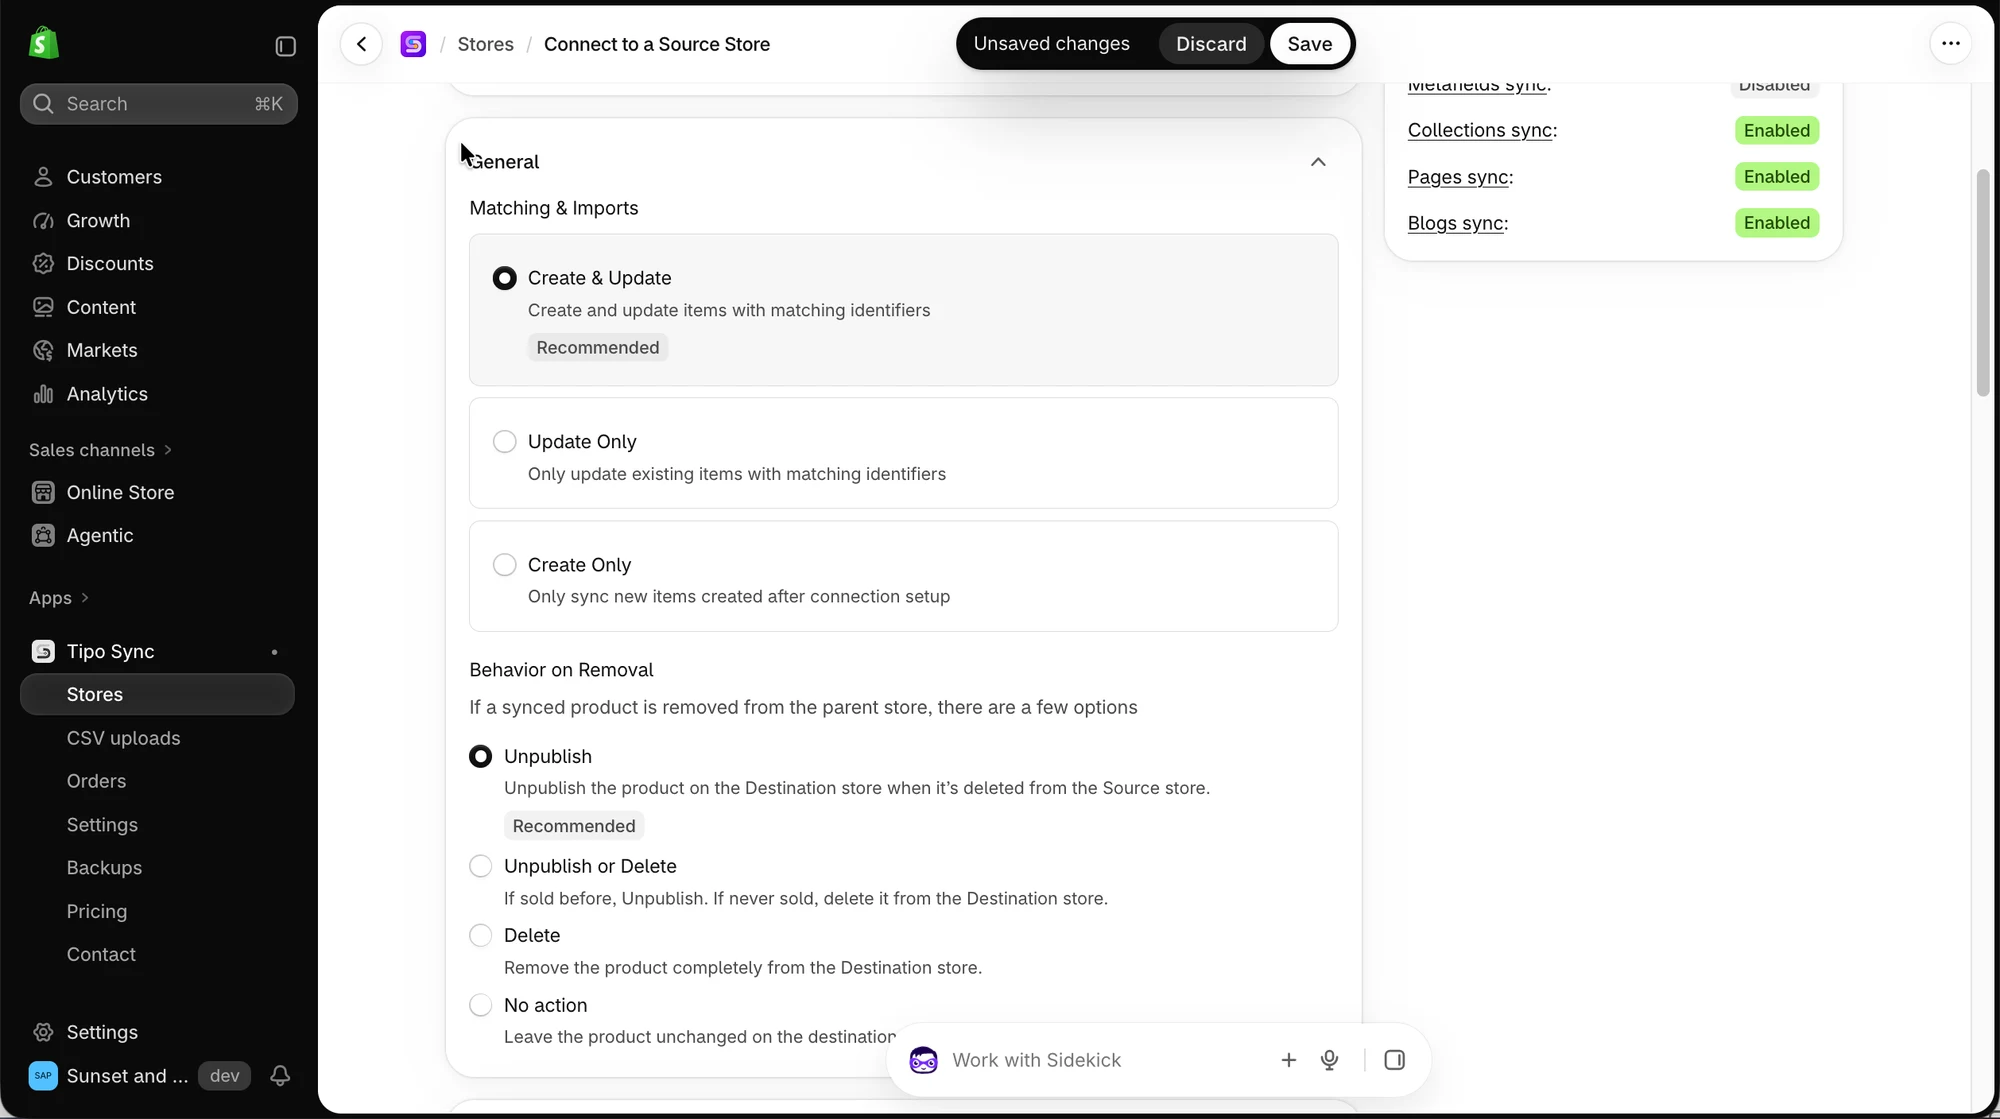
### Matching & imports

* **Create & Update**：在 Destination store 建立缺少的商品，並讓現有商品保持更新。
* **Update Only**：如果商品已存在於兩間商店，且您只想同步更新，請使用此選項。
* **Create Only :** 僅同步連線設定完成後，在 Source store 新建立的商品。Destination store 中的現有商品不會被更改。&#x20;

### Behavior on removal

選擇當商品從 Source store 被刪除時要採取的動作。例如，**Unpublish** 會在 Destination store 隱藏該商品，但不會永久刪除。

<figure><img src="/media/6403fba8625cb9541402.webp" alt="" loading="lazy" decoding="async"><figcaption></figcaption></figure>

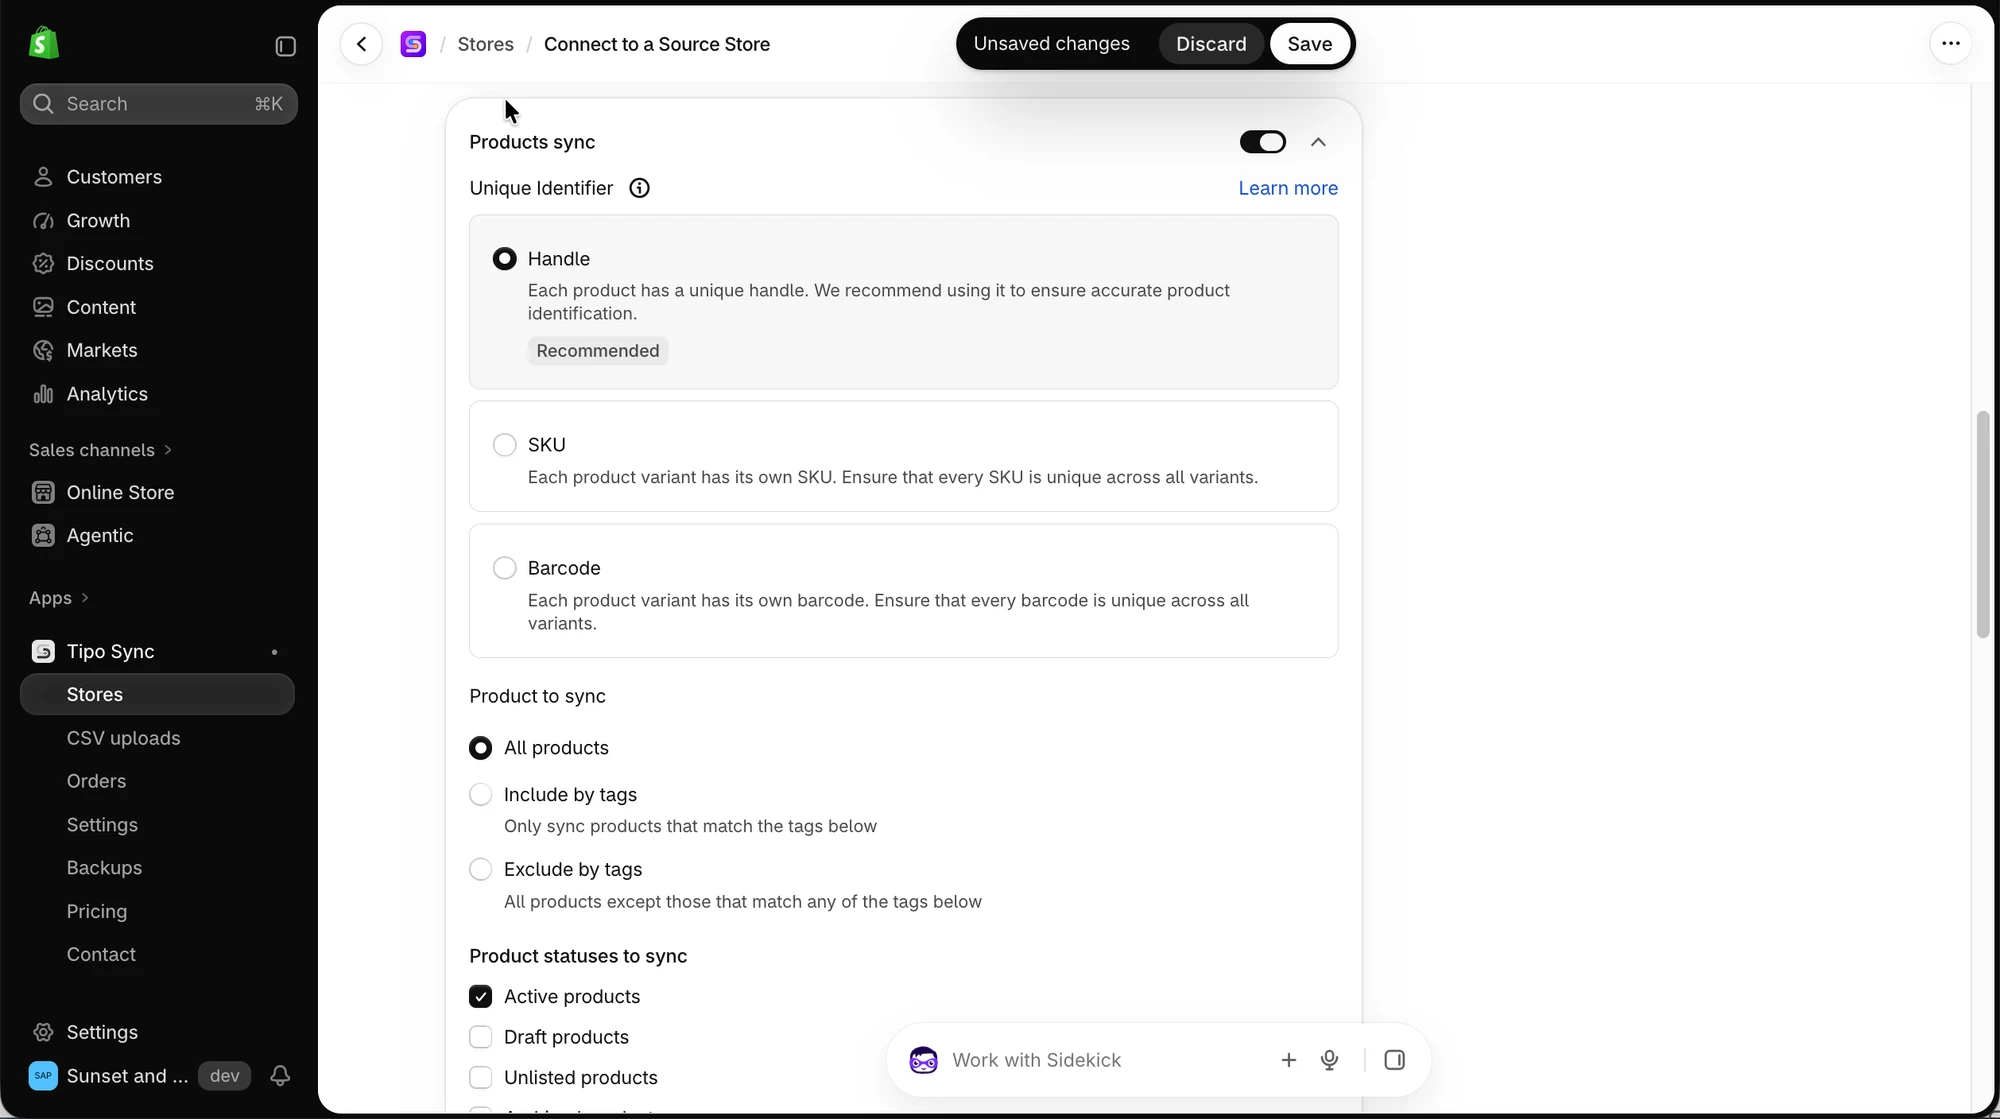
### Product sync

1. 開啟 **Products sync**。
2. 選擇 **Unique identifier**，用來在商店之間比對商品：
   * **Handle**：當兩間商店已使用相同的商品 handle 時最適合。
   * **SKU**：當每個款式都有唯一的 SKU 時最適合。
3. 選擇要同步的商品。例如，選擇 **Only sync products that match the tags below**，即可僅同步標記為 `wholesale` 的商品。
4. 選擇要同步的 **Product statuses**。

<figure><img src="/media/cc0ef6e13eadcc1ccbcc.webp" alt="" loading="lazy" decoding="async"><figcaption></figcaption></figure>

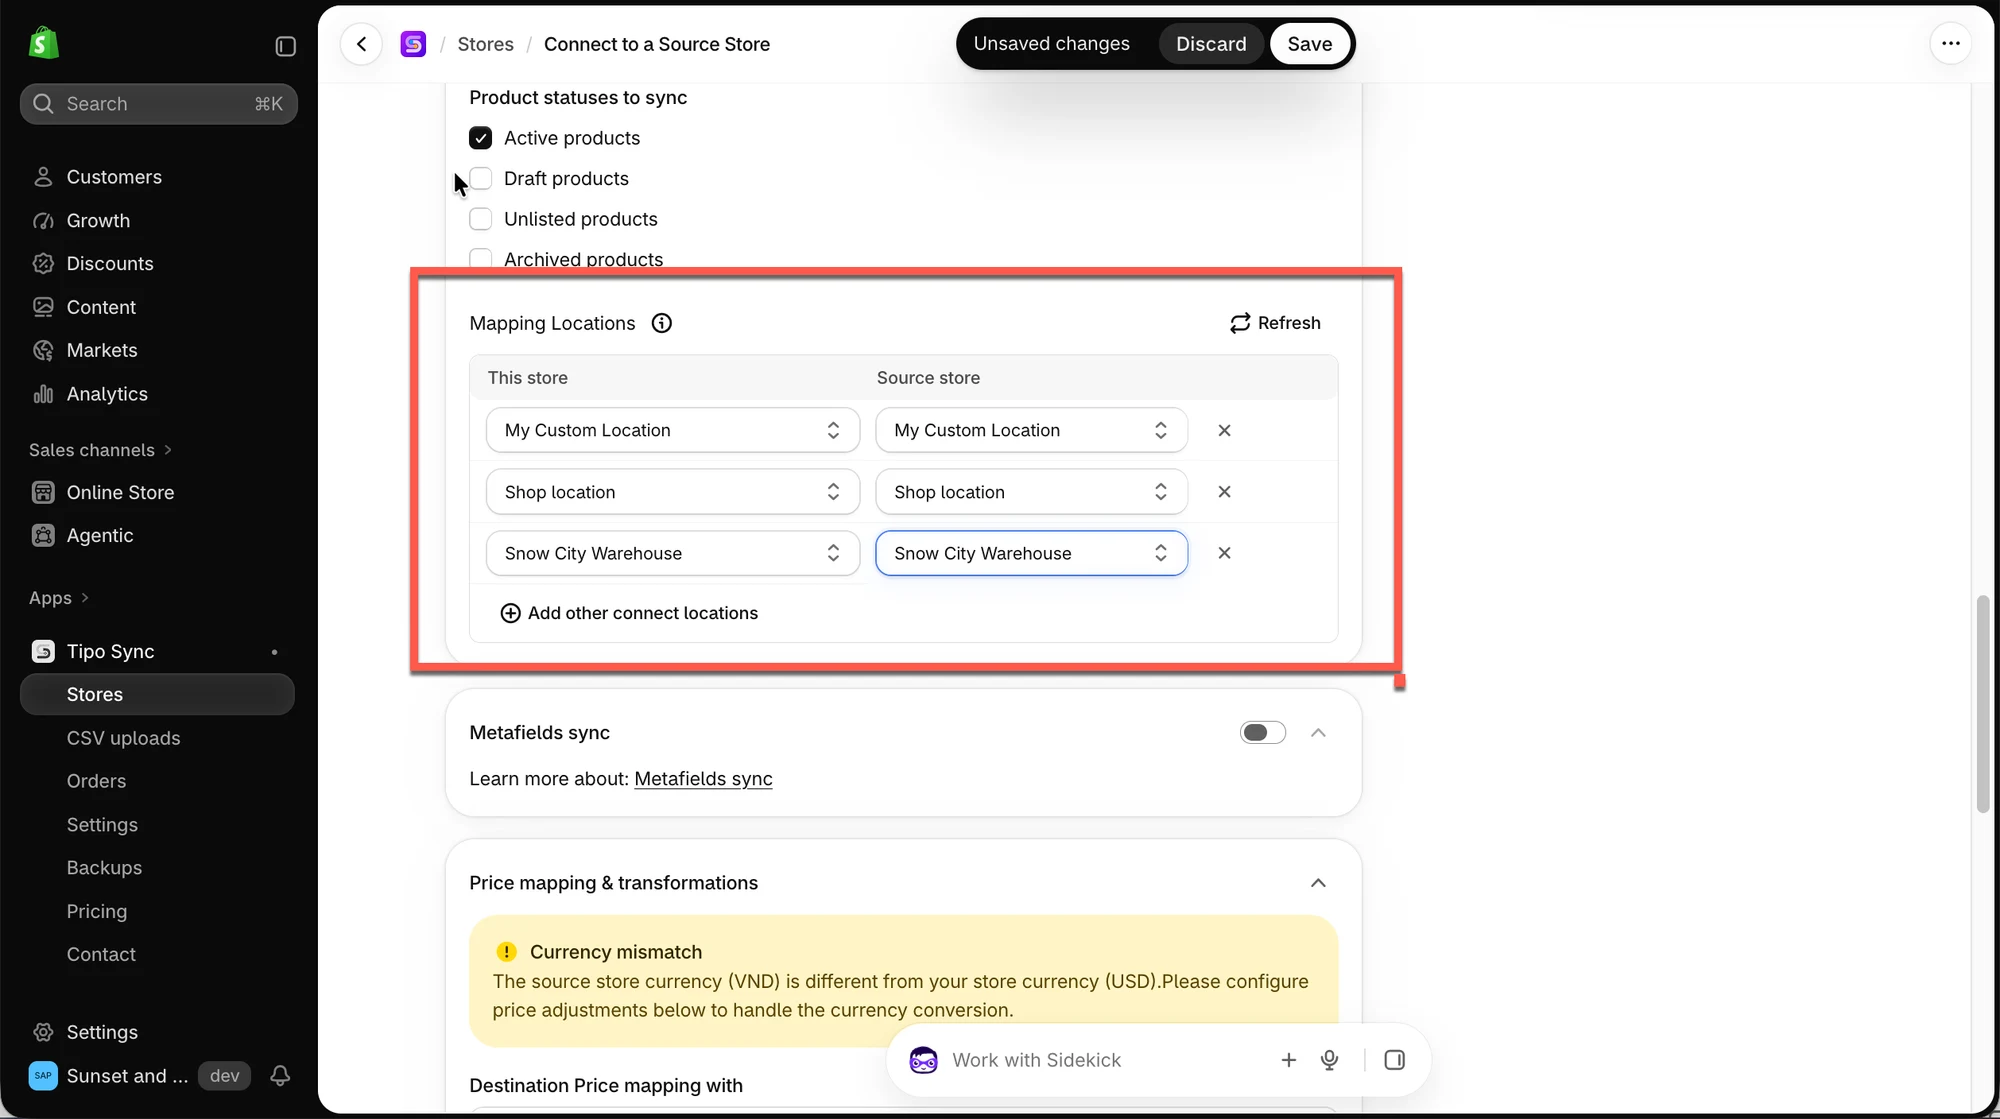
### Locations

選擇要在兩間商店之間對應的 **Locations**。此步驟是庫存同步的必要條件。

<figure><img src="/media/fec188ebf0c7cf9b1a58.webp" alt="" loading="lazy" decoding="async"><figcaption></figcaption></figure>

### Save

點選 **Save**。同步會立即開始。第一次同步可能需要一些時間，視您同步的商品數量而定。

## ✅ 同步之後

連線完成後，Tipo 應用程式會：

* 依據您的設定，將商品從 Source store 同步到 Destination store。
* 如果您開啟該設定，則同步庫存
* 自動讓您的商店保持最新。

**範例：** 您在 Source store 建立了一個名為 *New Shirt* 的商品。Tipo Sync 會自動在 Destination store 建立具有相同 handle 的 *New Shirt*。

***

## ▶️ 教學影片

<iframe class="video-embed" src="https://www.youtube-nocookie.com/embed/KEmewqVFB5Q" title="Video tutorial: Connect stores" loading="lazy" allowfullscreen></iframe>

<iframe class="video-embed" src="https://www.youtube-nocookie.com/embed/EgiEjT17k0U" title="Video tutorial: Connect stores" loading="lazy" allowfullscreen></iframe>

***

**🙋 還需要協助嗎？**

如果您仍需要協助，歡迎隨時寄信至 <hi@tipo.io> 與我們聯繫，我們很樂意為您提供進一步的協助。