# Standorte für die Bestandssynchronisierung zuordnen
Diese Anleitung zeigt, wie Sie Shopify-Standorte zwischen Ihrem Quell-Shop und Ihrem Ziel-Shop zuordnen, damit die Bestandssynchronisierung korrekt funktioniert.
Damit Ihre Bestandsmengen immer stimmen, werden Online-Bestellungen und Verkäufe vor Ort [Standorten](https://help.shopify.com/en/manual/locations) zugewiesen.
### ✅ Warum die Standortzuordnung erforderlich ist
Shopify verwaltet den Bestand pro **Standort** (Lager, Ladengeschäft, Fulfillment-Center).\
Für eine genaue Bestandssynchronisierung muss Tipo Sync wissen:
Welcher **Quellstandort** mit welchem **Zielstandort** synchronisiert werden soll.
Ohne Zuordnung:
* wird der Bestand möglicherweise nicht synchronisiert
* wird der Bestand möglicherweise mit dem falschen Standort synchronisiert
* kann der Bestand im Ziel-Shop falsch aussehen
### 🛠️ **Schritt 1: Standorte für die Synchronisierung im Quell-Shop festlegen**
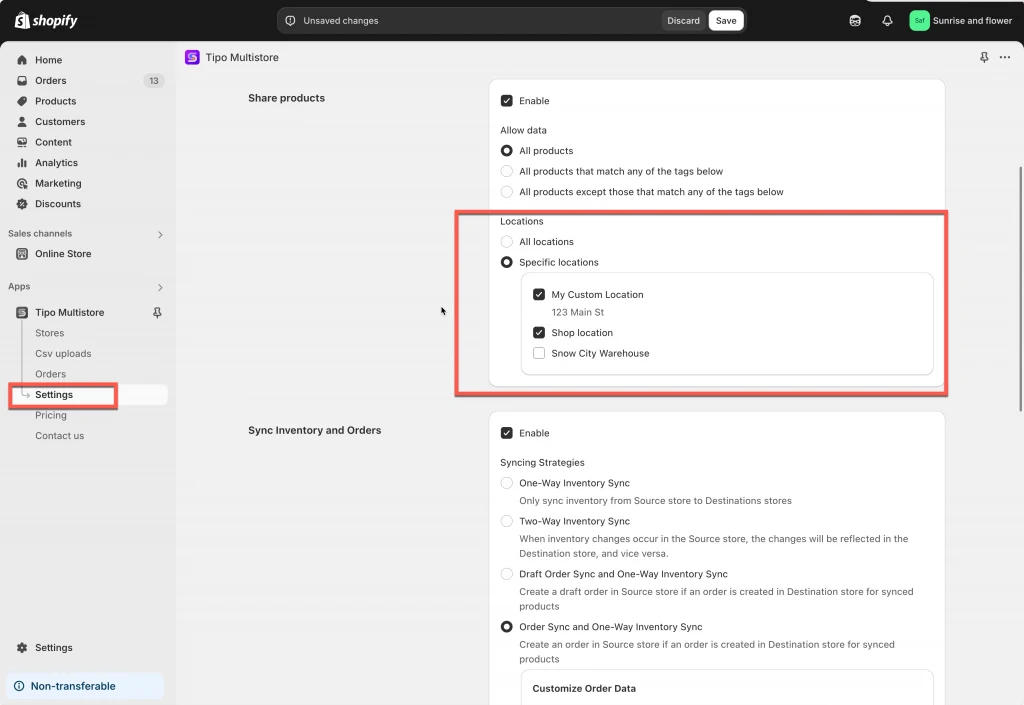
1\. Öffnen Sie die App im **Quell-Shop** > klicken Sie auf **Einstellungen (Settings)**
2\. Scrollen Sie zum Bereich **Standorte (Locations)** und wählen Sie eine der beiden Optionen:
* **Alle Standorte (All locations)**: Produkte, die an allen Standorten Ihres Shops verfügbar sind, werden mit dem Ziel-Shop synchronisiert
* **Bestimmte Standorte (Specific locations)**: Nur die Produkte an den ausgewählten Standorten werden aktualisiert, wenn es Änderungen im Ziel-Shop gibt
3\. Klicken Sie auf **Speichern (Save)**
***
### 🛠️ Schritt 2: Standorte beim Verbinden von 2 Shops zuordnen
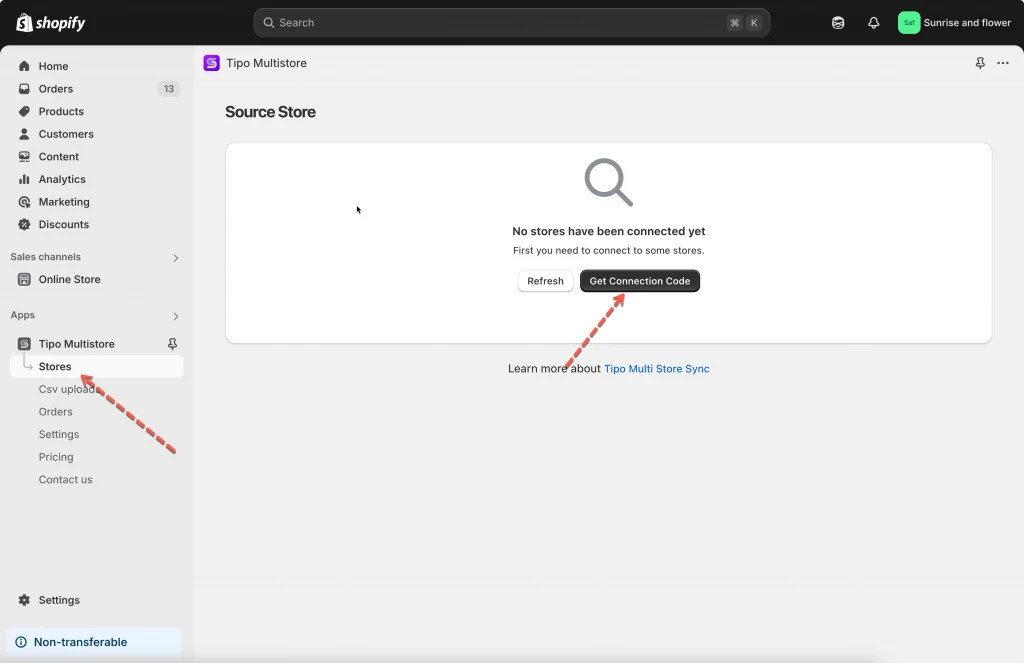
1\. Öffnen Sie die App im Quell-Shop > klicken Sie auf **Shops (Stores)** > klicken Sie auf die Schaltfläche **Verbindungscode abrufen (Get connect code)** > kopieren Sie den Verbindungscode aus dem Popup
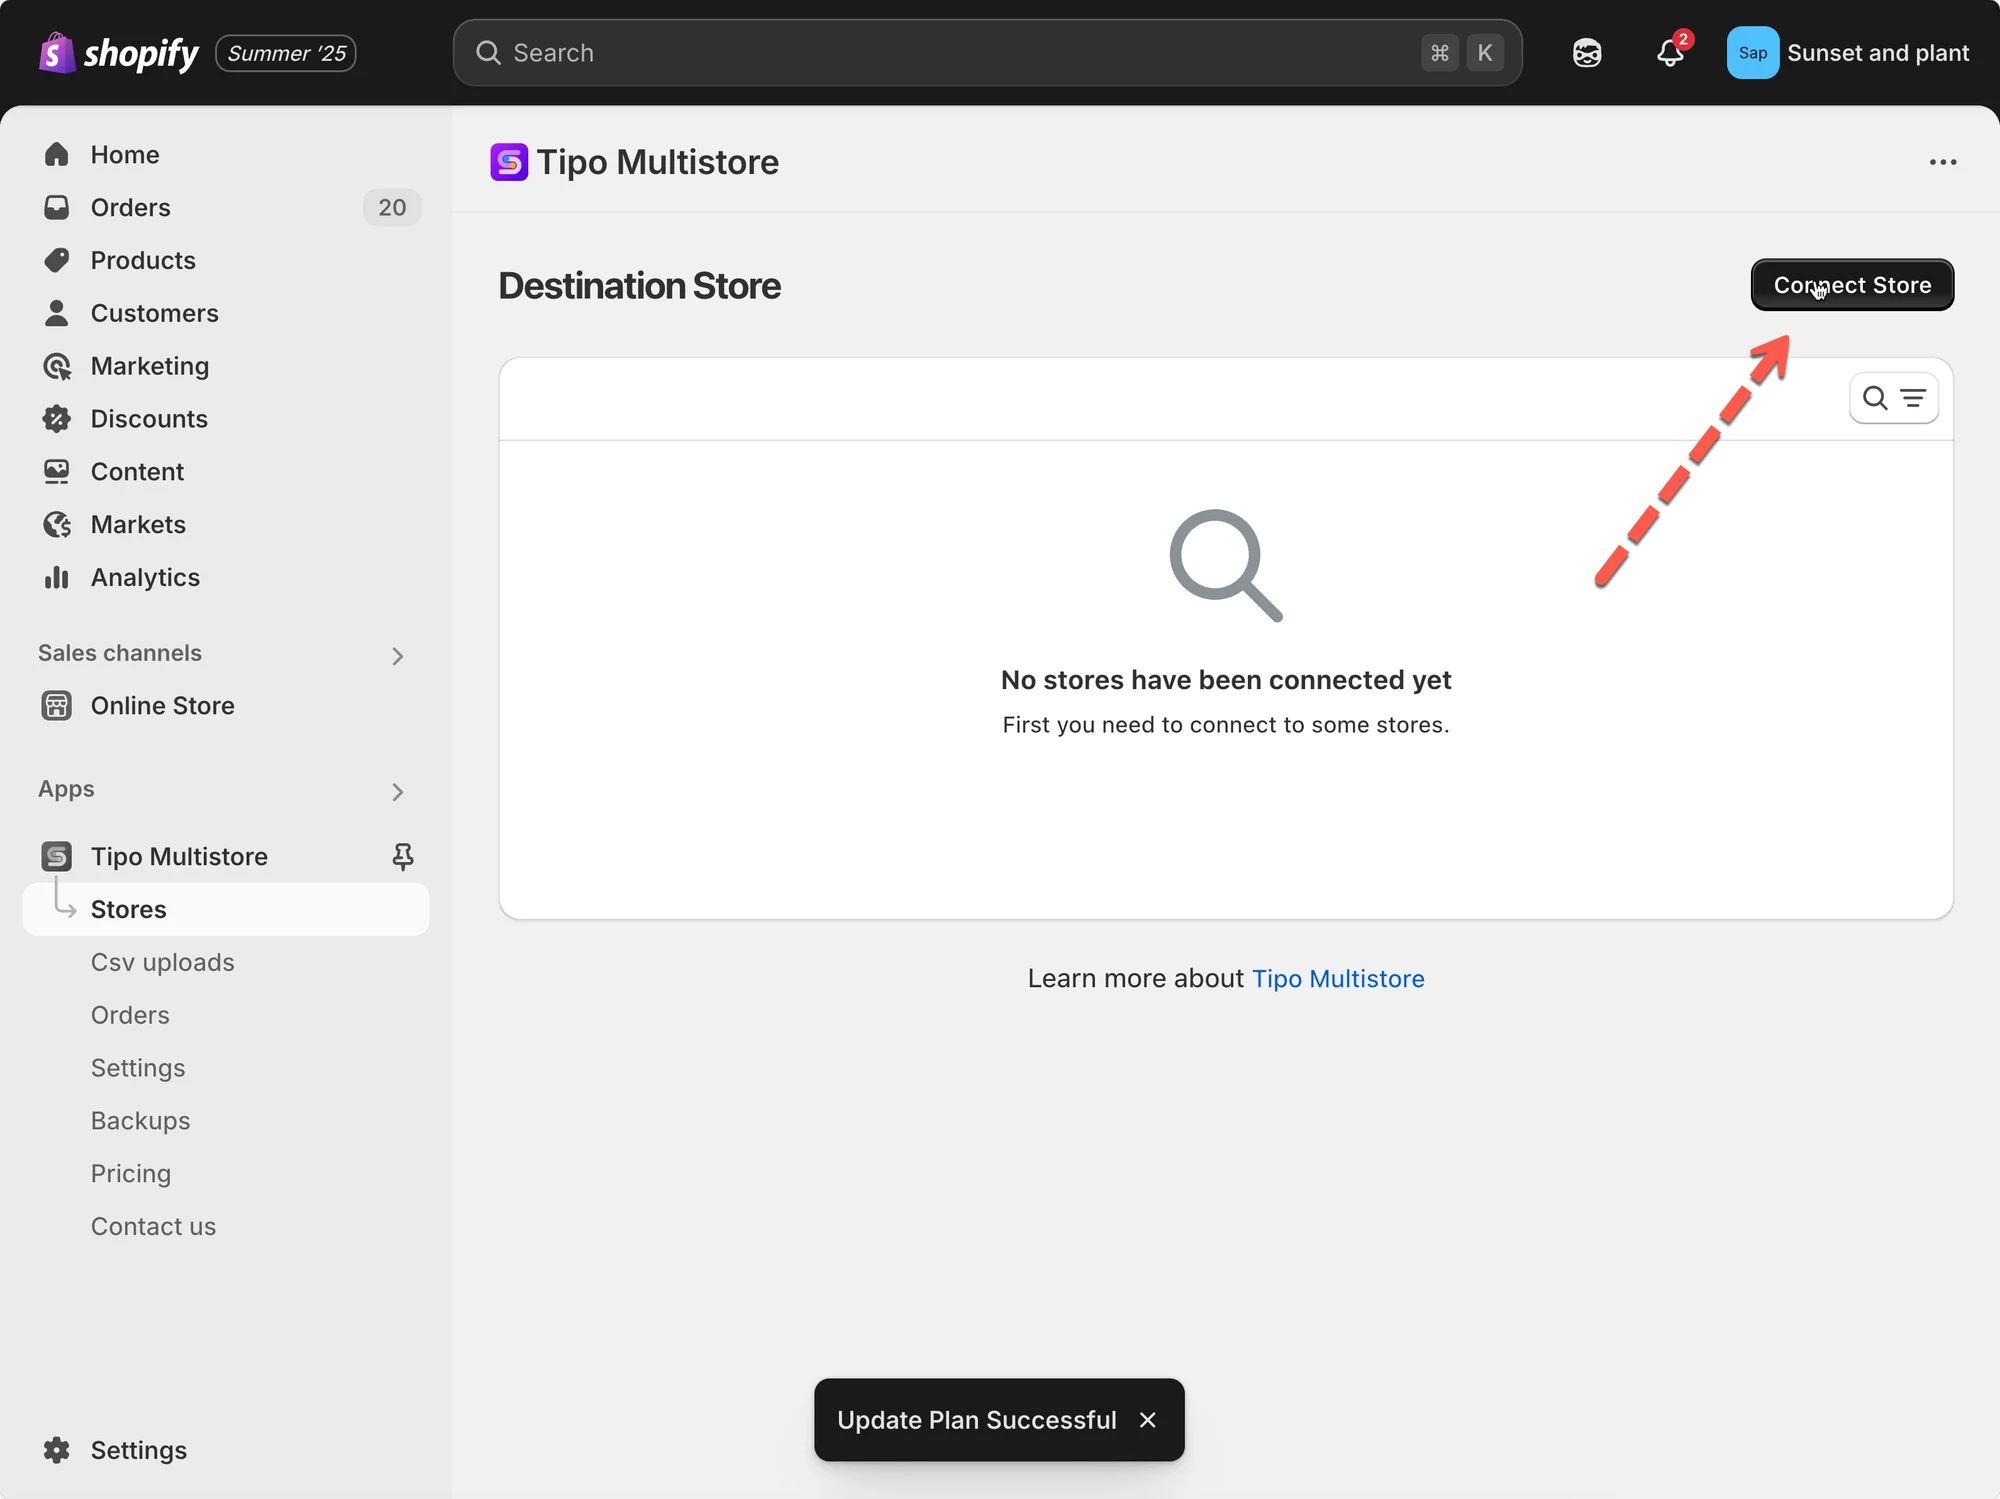
2\. Wechseln Sie zum **Ziel-Shop**, öffnen Sie die App Tipo Multi-store > klicken Sie auf **Shops** > klicken Sie auf die Schaltfläche **Shop verbinden (Connect Store)**
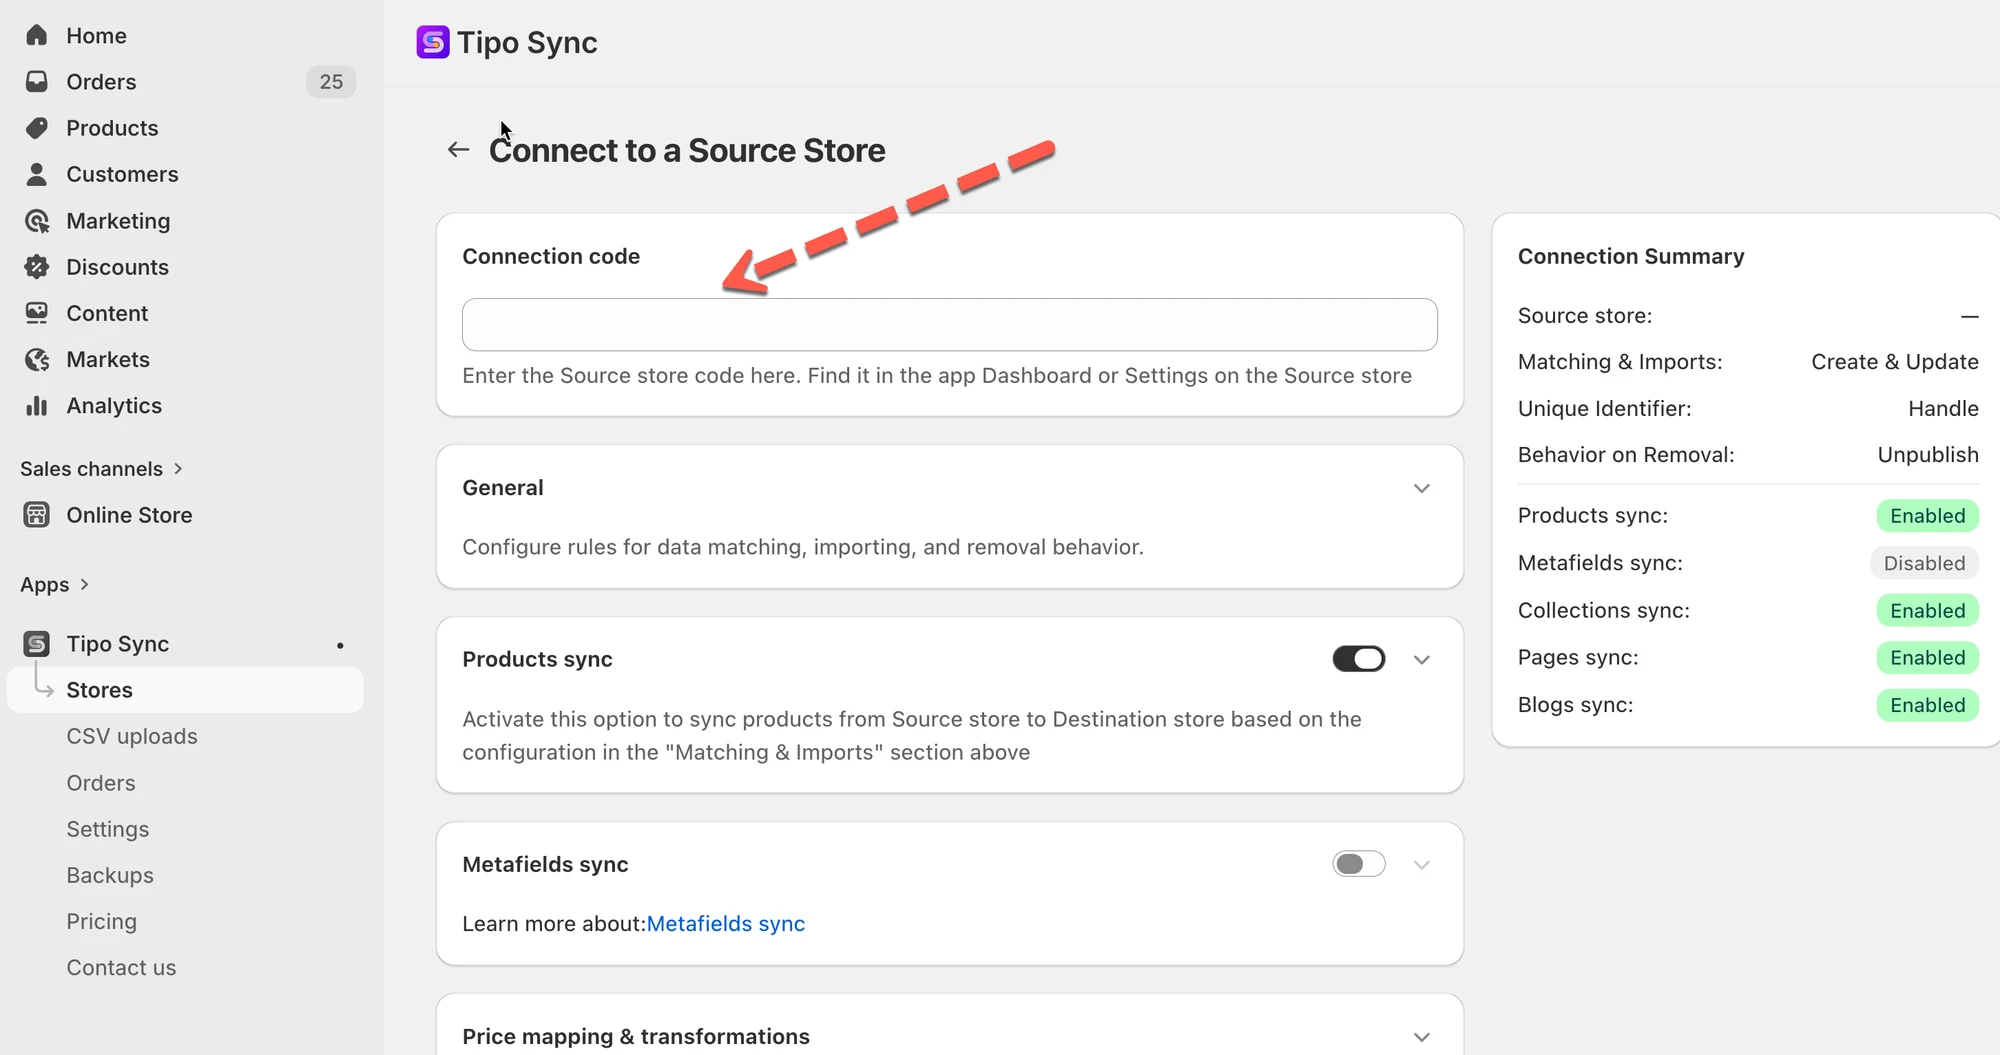
3\. Geben Sie den Verbindungsschlüssel ein (den Schlüssel finden Sie im App-Dashboard des Quell-Shops)
4. Wählen Sie die Produkte aus, die Sie synchronisieren möchten, und schließen Sie die Einstellungen in den Verbindungsdetails ab
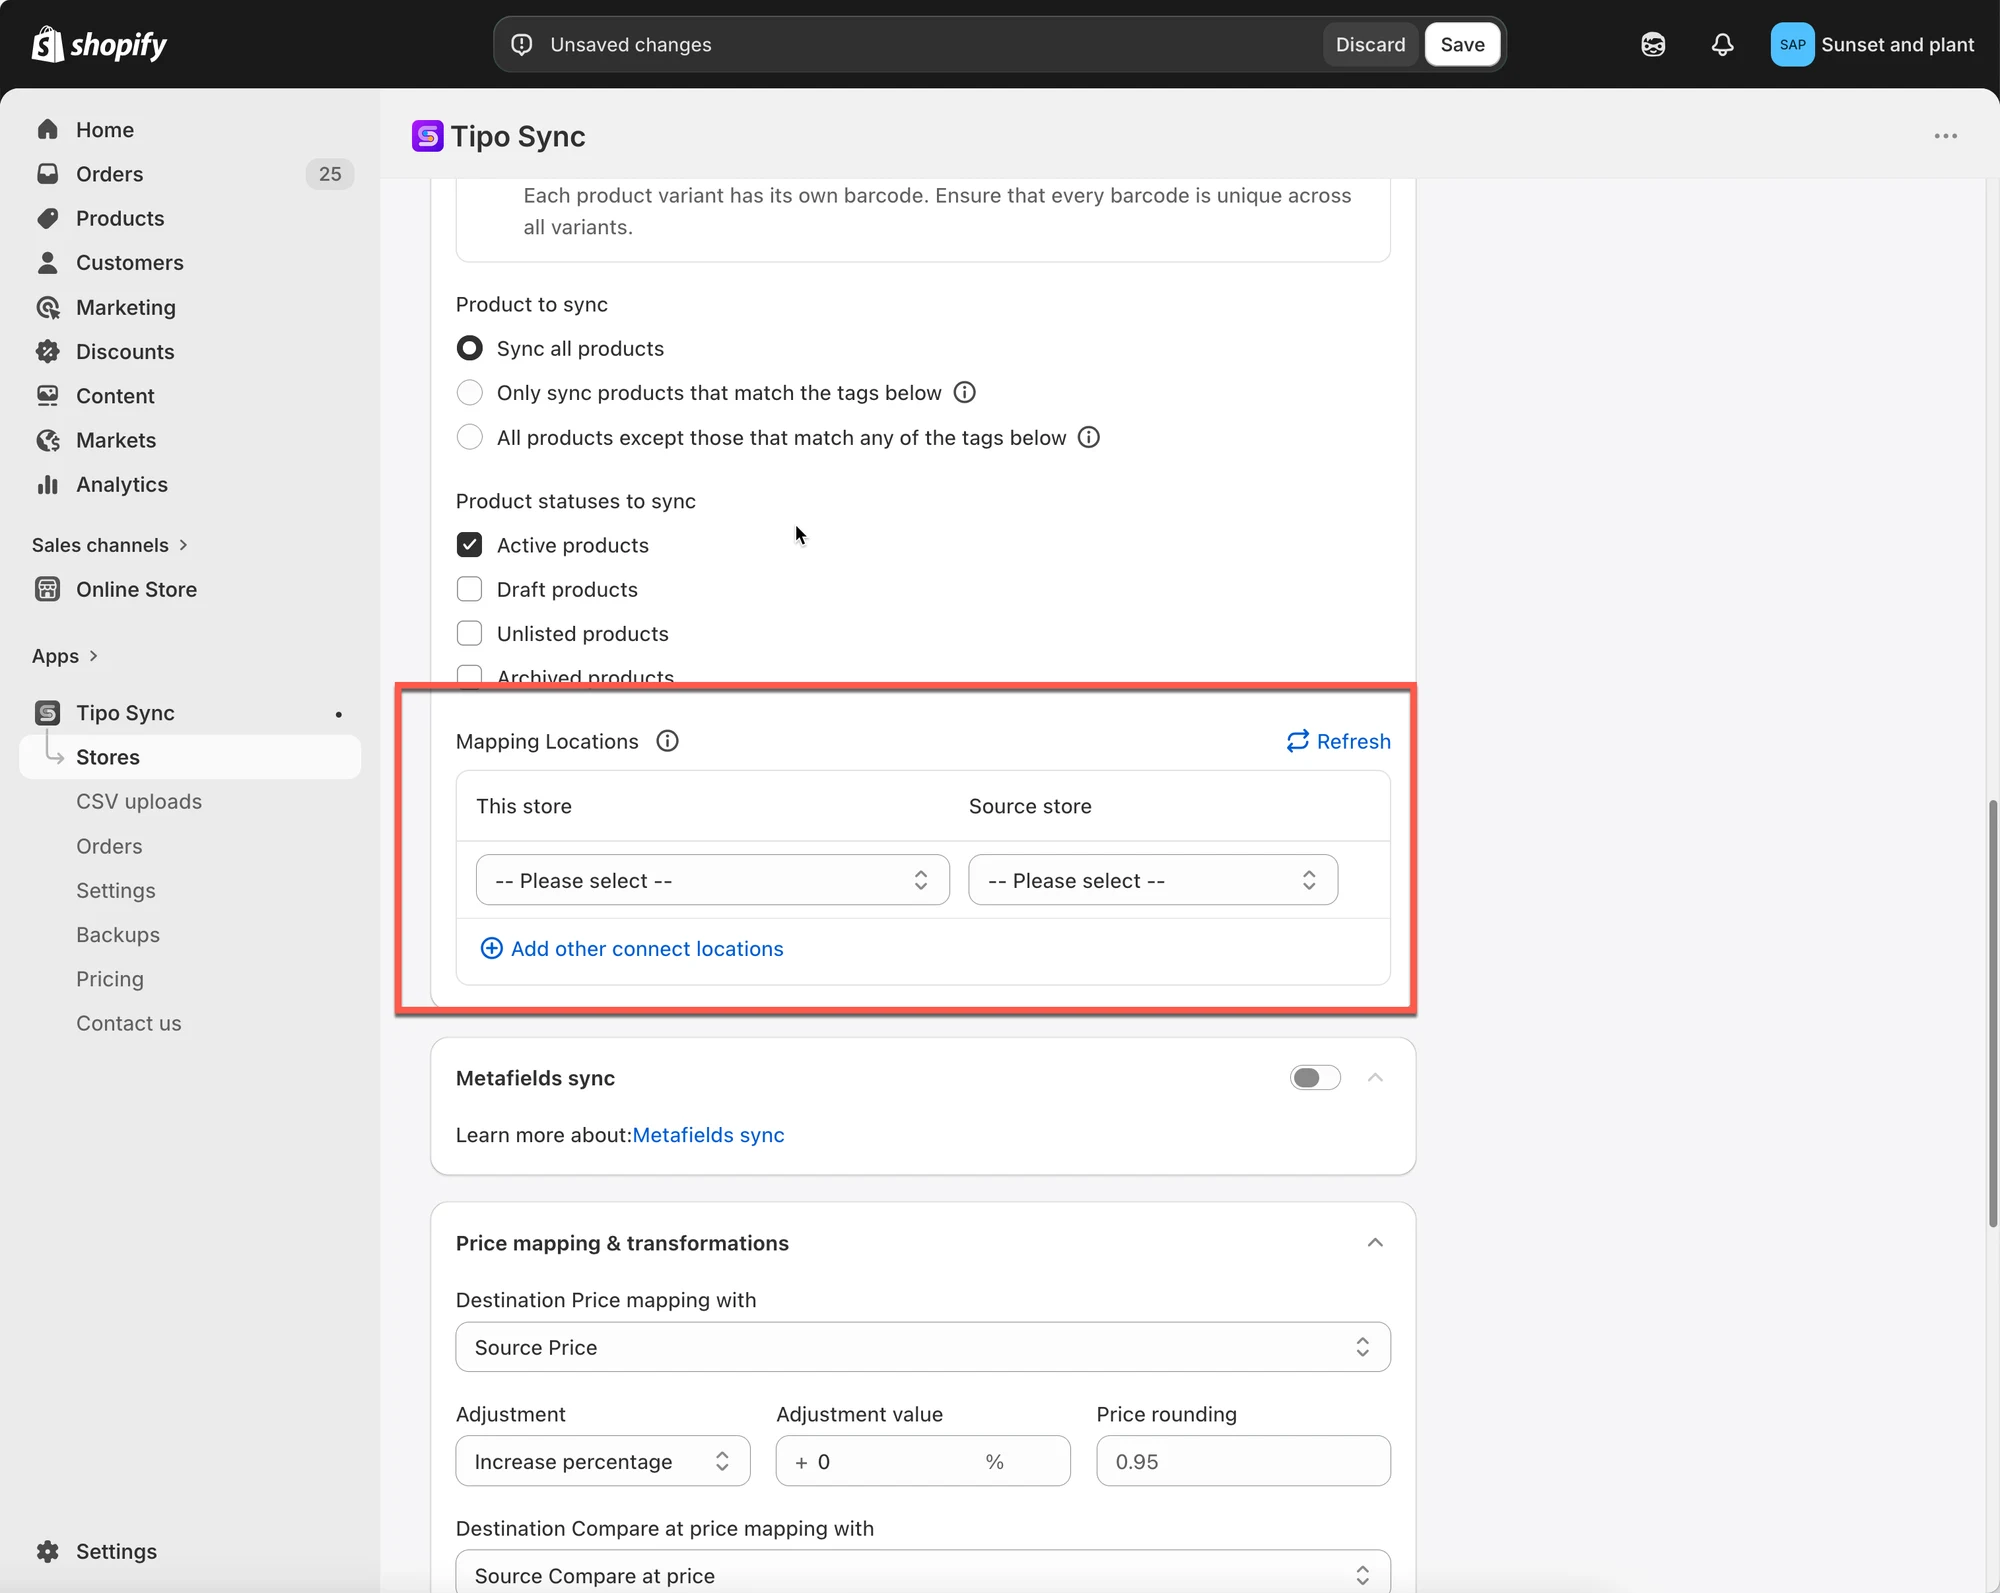
5. Scrollen Sie zum Bereich „Standorte zuordnen (Mapping locations)“ und wählen Sie die Standorte aus, die zwischen den Shops zugeordnet werden sollen
Auf dem Zuordnungsbildschirm sehen Sie:
* Standorte des Quell-Shops (links)
* Standorte des Ziel-Shops (rechts)
**Hinweis**: Derzeit synchronisiert unsere App nur 1 Standort des Quell-Shops mit 1 Standort des Ziel-Shops. Es ist nicht möglich, einen Standort des Quell-Shops 2 Standorten im Ziel-Shop zuzuordnen.
5. Klicken Sie auf **Speichern**
Die Synchronisierung startet sofort. Der Vorgang kann einige Zeit dauern.
***
### ✅ Was nach der Zuordnung passiert
Sobald die Zuordnung gespeichert ist, geht die App wie folgt vor:
* Der Bestand wird nur an den Standorten aktualisiert, die Sie in der Verbindung zugeordnet haben
* Nicht zugeordnete Standorte werden ignoriert
> **Wichtig: 1:1-Zuordnung**
>
> Jeder Standort kann nur einem entsprechenden Standort zugeordnet werden.
✅ Unterstützt:
| Quell-Shop | Ziel-Shop |
| ----------- | ----------- |
| Warehouse A | Warehouse A |
❌ Nicht unterstützt:
| Quell-Shop | Ziel-Shop |
| ----------- | ----------- |
| Warehouse A | Warehouse A |
| Warehouse A | Warehouse B |
Ein einzelner Quellstandort kann den Bestand nicht mit mehreren Zielstandorten synchronisieren.
### **🧪** Beispiel
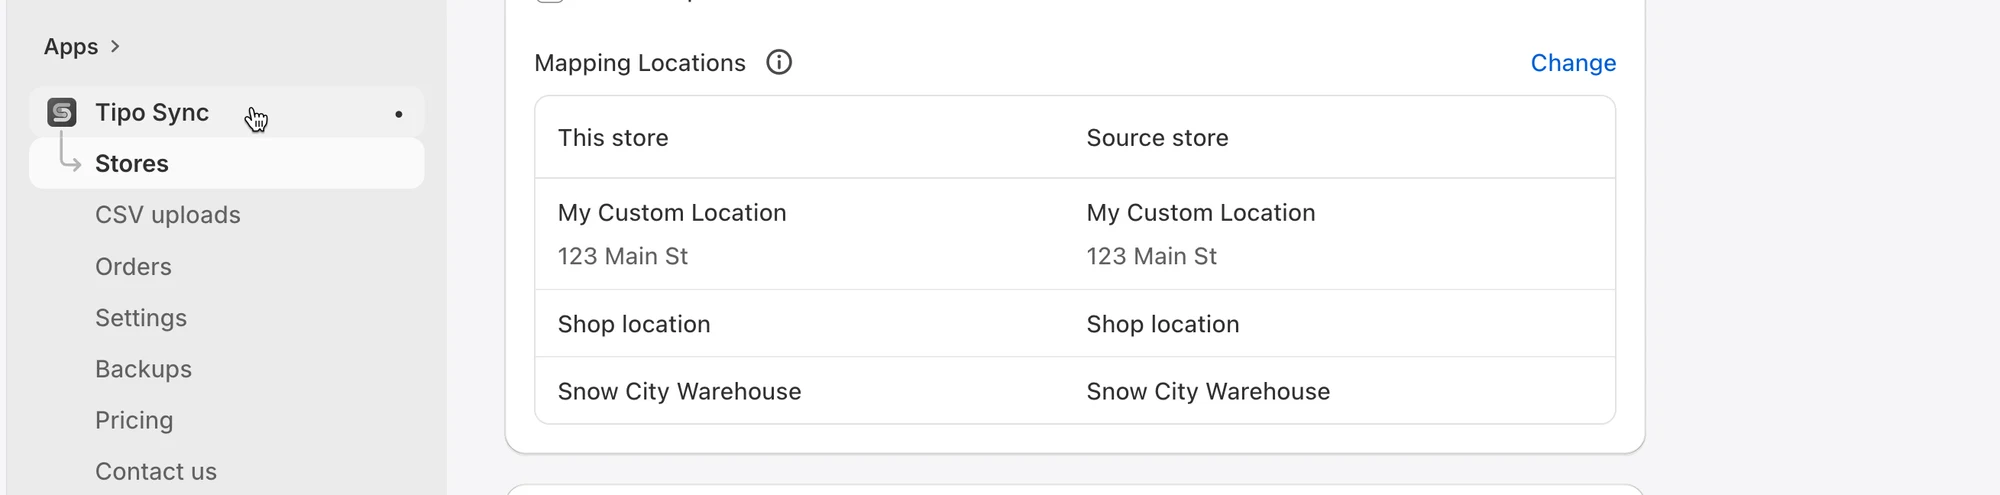
Angenommen, beide Shops haben die folgenden Standorte:
| Quell-Shop | Ziel-Shop |
| ------------------ | ------------------ |
| My Custom Location | My Custom Location |
| Shop location | Shop location |
Und die Zuordnung ist wie folgt konfiguriert:
| Ziel-Shop | Quell-Shop |
| ------------------ | ------------------ |
| My Custom Location | My Custom Location |
| Shop location | Shop location |
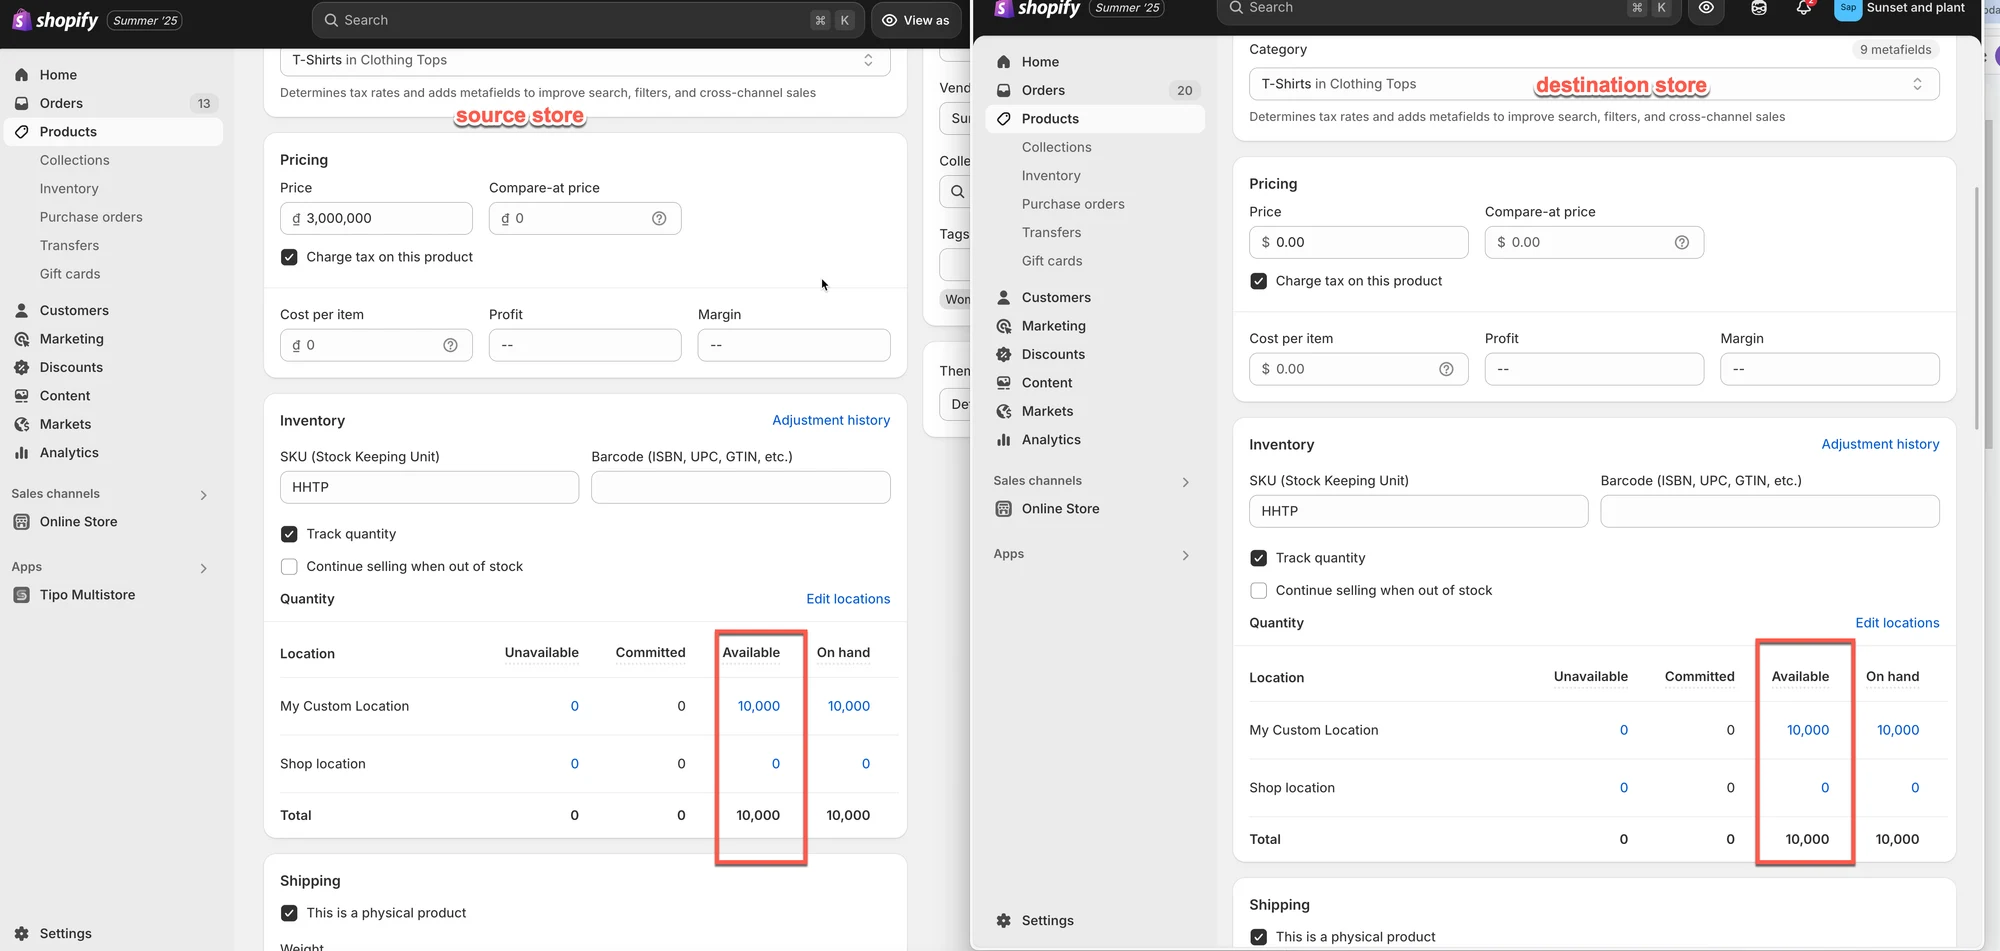
#### Beispiel 1: Einseitige Bestandssynchronisierung
Synchronisierungsrichtung: Quell-Shop → Ziel-Shop
Vor der Synchronisierung
**Quell-Shop**
| Standort | Verfügbar |
| ------------------ | --------- |
| My Custom Location | 10,000 |
| Shop location | 0 |
**Ziel-Shop**
| Standort | Verfügbar |
| ------------------ | --------- |
| My Custom Location | 5 |
| Shop location | 100 |
Nach der Synchronisierung
**Ziel-Shop**
| Standort | Verfügbar |
| ------------------ | --------- |
| My Custom Location | 10,000 |
| Shop location | 0 |
Da der Bestand vom Quell-Shop zum Ziel-Shop synchronisiert wird, wird der Bestand im Ziel-Shop an die zugeordneten Quellstandorte angepasst.
***
#### Beispiel 2: Zweiseitige Bestandssynchronisierung
Synchronisierungsrichtung: Quell-Shop ↔ Ziel-Shop
Angenommen, die Standorte sind wie folgt zugeordnet:
| Ziel-Shop | Quell-Shop |
| ------------------ | ------------------ |
| My Custom Location | My Custom Location |
| Shop location | Shop location |
**Szenario A: Verkauf im Quell-Shop**
Vor dem Verkauf:
| Standort | Quell-Shop | Ziel-Shop |
| ------------------ | ---------- | --------- |
| My Custom Location | 10,000 | 10,000 |
Ein Kunde kauft 1 Artikel im Quell-Shop.
Nachdem Shopify den Bestand aktualisiert hat:
| Standort | Quell-Shop |
| ------------------ | ---------- |
| My Custom Location | 9,999 |
Tipo Sync aktualisiert dann den zugeordneten Standort im Ziel-Shop:
| Standort | Ziel-Shop |
| ------------------ | --------- |
| My Custom Location | 9,999 |
Ergebnis: Beide Shops bleiben synchron.
***
**Szenario B: Verkauf im Ziel-Shop**
Vor dem Verkauf:
| Standort | Quell-Shop | Ziel-Shop |
| ------------------ | ---------- | --------- |
| My Custom Location | 10,000 | 10,000 |
Ein Kunde kauft 1 Artikel im Ziel-Shop.
Nachdem Shopify den Bestand aktualisiert hat:
| Standort | Ziel-Shop |
| ------------------ | --------- |
| My Custom Location | 9,999 |
Tipo Sync aktualisiert dann den zugeordneten Standort im Quell-Shop:
| Standort | Quell-Shop |
| ------------------ | ---------- |
| My Custom Location | 9,999 |
Ergebnis: Beide Shops bleiben synchron.
***
#### Beispiel 3: Nicht zugeordnete Standorte werden ignoriert
Angenommen, nur **My Custom Location** ist zugeordnet.
| Ziel-Shop | Quell-Shop |
| ------------------ | ------------------ |
| My Custom Location | My Custom Location |
**Shop location** ist nicht zugeordnet.
#### Quell-Shop
| Standort | Verfügbar |
| ------------------ | --------- |
| My Custom Location | 10,000 |
| Shop location | 500 |
#### Ziel-Shop
| Standort | Verfügbar |
| ------------------ | --------- |
| My Custom Location | 10,000 |
| Shop location | 100 |
Nach der Bestandssynchronisierung:
| Standort | Ergebnis |
| ------------------ | -------------------- |
| My Custom Location | Synchronisiert |
| Shop location | Nicht synchronisiert |
Der Bestand an **Shop location** bleibt unverändert, da dieser Standort nicht in der Standortzuordnung enthalten ist.
***
### ▶️ Ein Tutorial-Video
***
**🙋 Benötigen Sie weitere Hilfe?**
Wenn Sie weitere Hilfe benötigen, schreiben Sie uns gerne an . Wir unterstützen Sie gerne.