# Single store sync vs Multi-store sync

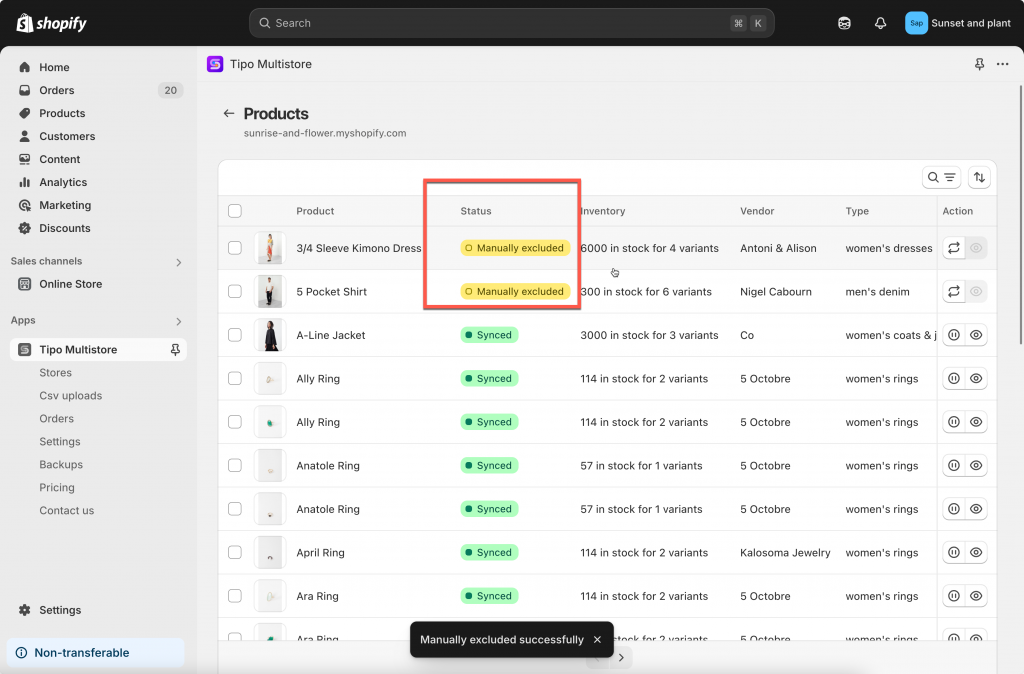
Tipo Sync offers **two sync modes**. Choosing the right one depends on whether you manage **one Shopify store** or **multiple stores**.

### ℹ️ Quick definition

#### 🏪 Single store sync

Sync happens inside one Shopify store to automate how products/inventory are managed within that store.

Typical features in this mode include:

* Inventory Sync Groups
* Bundle Groups
* Reports / analytics for syncing activity

Use it when you have only one store and want to keep inventory or bundles organized automatically.

***

#### 🔁 Between stores sync (Multi-store sync)

Sync happens between two or more Shopify stores.

In this mode you will usually have:

* **Source store** = the main store where you manage products
* **Destination store(s)** = stores that receive synced products/inventory.

Typical features in this mode include:

* Connect stores (Source ↔ Destination)
* Product sync (import new products, sync existing ones, mapping)
* Inventory sync between stores (one-way or two-way)
* Order sync (depending on your setup)
* Email notifications

Use it when you have **multiple Shopify stores** and need to copy/update data across them.

***

### 🕹️ When should I use each mode?

#### Choose **Single store sync** if you:

* have one Shopify store
* want to automate inventory updates and bundle behaviors inside the same store
* don’t need to connect to another store

#### Choose **Between stores sync** if you:

* run multiple Shopify stores (regional stores, wholesale + retail, multiple brands)
* want to push products from one store to another
* want inventory or orders to stay aligned across stores

***

### 🔀 Key differences&#x20;

<table><thead><tr><th width="151.5">Topic</th><th width="247.150146484375">Single store sync</th><th>Between stores sync</th></tr></thead><tbody><tr><td>Number of stores</td><td>1 store</td><td>2+ stores</td></tr><tr><td>Setup</td><td>No store connection needed</td><td>Must connect Source + Destination</td></tr><tr><td>Main goal</td><td>Automate inventory/bundles within one store</td><td>Keep products/inventory/orders synced across stores</td></tr><tr><td>Product creation</td><td>Not focused on cross-store import</td><td>Can import/sync products between stores</td></tr><tr><td>Inventory</td><td>Groups &#x26; automation in the same store</td><td>Location mapping + one-way/two-way sync</td></tr><tr><td>Best for</td><td>One-store merchants</td><td>Multi-store merchants, wholesalers</td></tr></tbody></table>

***

### 📋 Common examples

#### Single store sync examples

* You sell bundles and need inventory to update automatically when components change
* You want to organize inventory logic using “sync groups”
* You want reports about sync activities inside one store

#### Between stores sync examples

* You have a **US store** and an **EU store** and want products synced
* You run a **Retail store** and a **Wholesale store**
* You manage multiple brand stores and want one “master catalog” (Source) to push to others

***

### 🔄 Switch between modes

Yes. You can switch modes when your business changes (for example: you start with one store, then add a second store later).

<figure><img src="/files/VNfjrbf5Uk8GGmnPUIx7" alt=""><figcaption></figcaption></figure>

***

### ✅ Recommendation

* Start with **Single store sync** if you only manage one store today.
* Choose **Between stores sync** if you need a “Source → Destination” workflow or want to keep multiple stores aligned.

***

**🙋 Still need support?**

If you still need help, please feel free to contact us at <hi@tipo.io>. We’ll be happy to assist you further.


# Getting started with Muti-store sync

### 🚀 Getting started with Multi-store sync

Welcome to **Inventory Sync, Multi store TP (Multi-store mode)**, a simple way to sync data between two or more Shopify stores.

Multi-store sync is ideal when you:

* run multiple regional stores (US / EU / AU)
* separate B2C and B2B stores
* want one “main store” to manage products and inventory, and other stores to receive updates

***

### 🔑 Key Features

* **Connect stores**: Link one Source store to one or more Destination stores
* **Inventory** **sync**: Sync inventory across stores (One-way or Two-way)
* **Product** **sync**: Import new products and keep product data updated (title, images, variants, metafields, etc.)
* **Order sync**: When an order is created in a Destination store, it can be created in the Source store
* **Flexible sync options**: Choose what you want to sync (products, price, metafields, inventory, etc.)
* **CSV Import**: Import products/inventory using CSV when needed

***

### 🛠️ Getting Started

#### 1)  Install the App and select Multi-store mode

Install [here](https://apps.shopify.com/multi-store-sync-tipo)&#x20;

**Important**: You must install Tipo Sync in both stores:

* Install in your **Source store**
* Install in your **Destination store**

Select one of store mode you need:&#x20;

* **Single Store**: A single store setup designed to keep products synchronized within the same store. Learn more
* **Multi Store**: A multi store that manages multiple stores.

<figure><img src="/files/qqUtUaLfYSwZ13WkNRYA" alt=""><figcaption></figcaption></figure>

Select the correct store role:

* &#x20;**Source store**: the “main” store where you manage products and inventory
* **Destination store**: the store that receives synced updates

#### 2) Configure app settings (both stores)

After installation, open **Settings** in each store and confirm your sync preferences.

**In the Source store**

* Decide what data you want to sync ( products, pages, collections,etc.)

**In the Destination store**

* Decide what product data you want to sync (example: title, images, price, metafields, etc.)

#### 3) Connect a Destination store to a Source store

Select the products you want to sync and complete the setting in the connection detail. [Lean more](/overview/general-steps-to-connect-stores)

#### 4. Monitor the Sync

Once you've set up the connection between the Source and Destination, check the sync logs regularly to verify that all products and information are being transferred as expected.

***

### 📚 Additional Resources

* Tuto[rial video](https://youtu.be/MqcVsaFUj7o?si=j2E39WosZMzz3GI_)
* [General steps to connect stores](https://docs.tipo.io/overview/general-steps-to-connect-stores)
* [Select products to sync](https://docs.tipo.io/product-syncs/select-products-to-sync)
* [Sync product inventory only](https://docs.tipo.io/inventory-sync/sync-product-inventory-only)
* Contact support team via email <hi@tipo.io>


# Trial & Plan usage

{% hint style="info" %}
Important!

* You get a **7-day free trial** when you install the app. During the trial, there is no limit on variant syncing.
* Choose a plan anytime before the trial expires.
* Need more trial time or help? Contact our support team. &#x20;
* Reinstalling the app will not reset the trial period.
* You only need to pay on the **Destination** store (not the Source store).
* Pricing is based on the total number of variants in the Destination store.
* After the trial ends, you must select a plan to keep syncing.
  {% endhint %}

***

### 💰 How Plans Are Calculated

Tipo Sync plans are based on the total number of product variants in your Destination store, not just the products being synced.

#### What counts as a variant?

A variant is a unique version of a product, such as:

* Size: Small, Medium, Large
* Color: Red, Blue, Black
* Material or Style options

For example:

| Product | Variants                          |
| ------- | --------------------------------- |
| T-Shirt | Small, Medium, Large = 3 variants |
| Hoodie  | Black, Gray = 2 variants          |

Total variants in the store: **5 variants**

***

#### 🤔 Why Are Plans Based on Total Store Variants?

Even if you only sync a portion of your catalog, Tipo Sync still needs to monitor and process product data across the entire Destination store.

This allows the app to:

* Monitor product changes and events
* Match products accurately between stores
* Process updates reliably
* Maintain fast and stable synchronization

Because of this, pricing is based on the overall size of the Destination store rather than the number of products currently being synced.

***

#### 📊 Example

<table><thead><tr><th width="226.60003662109375">Destination Store</th><th width="262.34991455078125" align="right">Variant Count</th></tr></thead><tbody><tr><td>Total variants detected</td><td align="right">7,242</td></tr><tr><td>Current plan limit</td><td align="right">5,000</td></tr><tr><td>Recommended plan</td><td align="right">10,000 variants</td></tr></tbody></table>

**Result:** Upgrade to the 10,000-variant plan to continue syncing products.

This helps users immediately understand the relationship.interruption.

***

### ⏳ 7-day trial & countdown on Dashboard

When you install the app, you will automatically start a **free trial period**. During this time, you can explore all features included in your selected plan without being charged.

You will not be billed during the active trial period.

On the **Dashboard**, you’ll see:

* **Trial status** (Trial / Days left / Trial ended)
* A **countdown bar** so you know exactly how many days remain

<figure><img src="/files/cOA8Y4U4QLR3hsLv17d2" alt=""><figcaption></figcaption></figure>

**When the trial ends**

* The dashboard shows **“Trial ended”**
* You’ll be prompted to **Upgrade / Select a plan**
* Sync will not continue until a plan is selected

<figure><img src="/files/8x02Z4MdCDPoo4E6ha1A" alt=""><figcaption></figcaption></figure>

***

### 📈 Understanding Store Variant Usage

Your subscription plan is based on the total number of product variants detected in your store.

You can view your current usage in the app > **Pricing → Store Variant Usage**.

The usage section shows:

<table><thead><tr><th width="183.14996337890625">Item</th><th>Meaning</th></tr></thead><tbody><tr><td>Current Plan</td><td>Your active subscription</td></tr><tr><td>Current Usage</td><td>Total variants detected</td></tr><tr><td>Exceeded</td><td>Usage is above your plan limit</td></tr><tr><td>Recommended Plan</td><td>Minimum plan required to support current usage</td></tr></tbody></table>

<figure><img src="/files/09WjGRnMsfTzahChFBmh" alt=""><figcaption></figcaption></figure>

***

### ⚠️ When Your Store Exceeds the Plan Limit

If the number of variants in your store exceeds your current plan limit, Tipo Sync will display an **Exceeded** status and highlight the recommended plan needed to support your store.

For example:

* Current plan: **500 variants**
* Current usage: **758 variants**
* Usage: **151.6% of plan capacity**

Because the store contains more variants than the current plan allows, an upgrade is required to continue syncing products.

***

### 💳 How to upgrade your plan

You can upgrade directly from the Dashboard.

1. Open the **Current plan** section
2. Click **Upgrade** > it directs you to the **Pricing** section of the app
3. Select the plan that fits your store size > click **Choose this plan**
4. Approve the Shopify subscription charge.

The new plan will be applied immediately after confirmation.

<figure><img src="/files/mxWJ1oPD9vEaoXvBG3To" alt=""><figcaption></figcaption></figure>

***

### ✅ Which store pays?

You only subscribe on the **Destination store**.

* **Destination store:** choose a plan and pay here
* **Source store:** no payment needed

This makes setup simpler when you connect multiple stores.

***

### ❓ FAQ

#### Why is my usage higher than the number of synced products?

Your plan is calculated using the total number of variants detected in the Destination store, including products that are not currently being synced.

For example:

* Variants being synced: 500
* Total variants in Destination store: 7,242

Plan usage is calculated using 7,242 variants.

#### Do I need to pay for both the Source store and Destination store?

No.

The subscription fee for product syncing is applied to the Destination store only.

#### Can I downgrade my plan later?

Yes.

If your store's total variant count decreases and fits within a lower plan tier, you can select a smaller plan from the Pricing page.

Make sure your total variant count remains within the selected plan's limit before downgrading.


# Source store vs Destination store

When you use **Multi-store sync**, Tipo Sync always works with two store roles:

* &#x20;**Source store** = the “main” store that **sends** data
* **Destination store** = the store that **receives** data

Understanding this difference helps you set up syncing correctly and avoid unexpected changes.

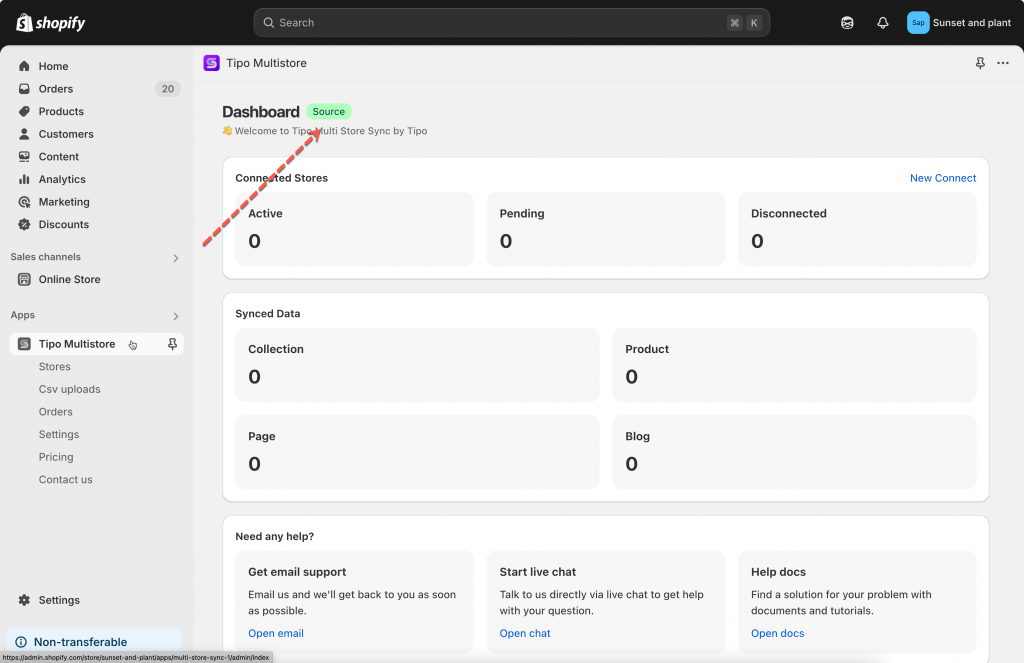
### ℹ️ What is a Source store?

Your main store — where everything starts.

* Manage and update your products, collections, pages, blogs, and inventory here.
* Shares product and inventory data with other connected stores.
* Usually linked to your main warehouse or stock location.
* Receives order information generated from Destination Stores.

<figure><img src="/files/FvKXLUbHd06iKPCmRrZJ" alt=""><figcaption></figcaption></figure>

<figure><img src="https://tipo.io/wp-content/uploads/2025/04/source-1024x663.png" alt=""><figcaption></figcaption></figure>

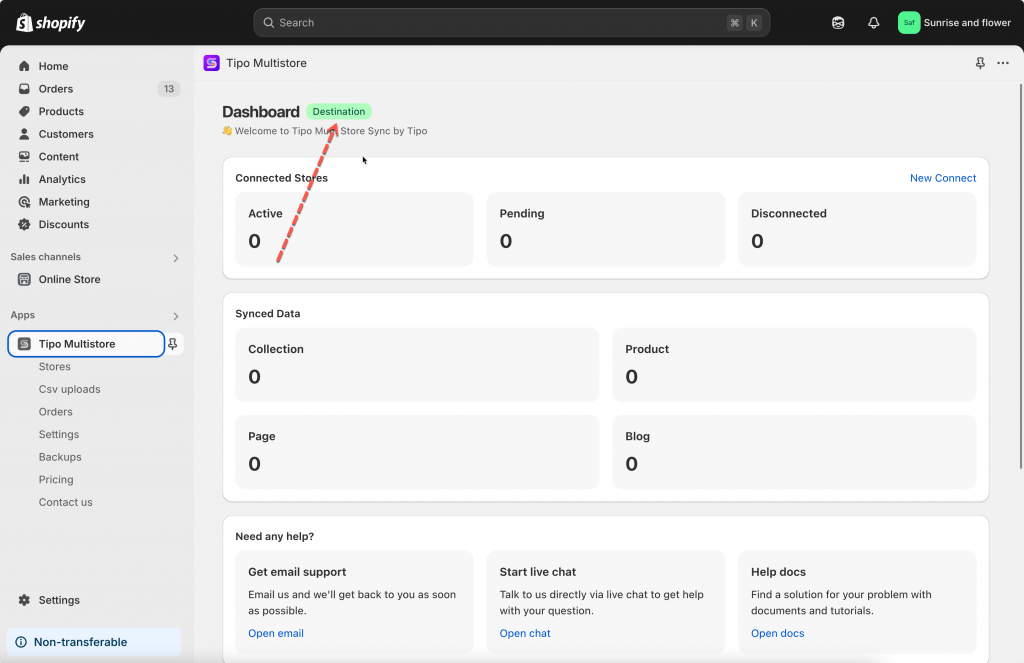
### ℹ️ What is a Destination store?

The **Destination store** is where products and updates are synced **from the Source store**.

* Perfect for retail locations, online storefronts, or dropshipping.
* Automatically receives the latest products, collections, pages, blogs, and inventory.
* Option to adjust prices as needed.
* Where orders are created and then sent to the Source Store for processing.

<figure><img src="/files/rR2IXBzyDCx9Q6P6hIip" alt=""><figcaption></figcaption></figure>

<figure><img src="https://tipo.io/wp-content/uploads/2025/04/destination-1024x663.png" alt=""><figcaption></figcaption></figure>

***

### &#x20;🔁 What can our app do if 2 store are connected?

1. &#x20;**Sync Products**: Automatically update product listings and attributes in your Destination stores when you make changes to the Source store. It sync products based on product [handle](https://tipo.io/index.php/kb/what-is-a-shopify-product-handle/), SKU or barcode.  (1 ways sync)
2. **Real-Time Inventory Sync**: inventory can be synced from Source store to Destination and vice versa.  (1 ways sync and 2 way sync)
3. **Product Attributes Sync**: Sync product titles, descriptions, or other attributes from Source store to Destination stores. You can even set different prices in Destination stores (e.g., add a 10% markup). (1 ways sync)
4. **Sync Collections, Blogs, and Pages:** Any updates to your pages, blog posts, or collections on the Source store will automatically be reflected on the Destination stores. (1 ways sync)
5. **Order Sync:** When an order is placed in a Destination store, the same order is created in the Source store for easy management. (1 ways sync)
6. **Metafield Sync**: Sync product and variant metafields between stores, including custom product information such as materials, specifications and other custom data. (1-way sync)

***

### FAQs

#### ❓ Can I have multiple Destination stores?

Yes. One Source store can connect to **multiple** Destination stores (useful for regional stores).

#### ❓ Can a Destination store also be a Source store?

You can select one store type only. One store can not be a source store and destination store at the same time.&#x20;

#### ❓ Will changes made in the Destination store sync back to the Source store?

Usually **no** for product content (it depends on your sync settings). Best practice is to edit products in the **Source store**.

***

**🙋 Still need support?**

If you still need help, please feel free to contact us at <hi@tipo.io>. We’ll be happy to assist you further.


# General steps to connect stores

This guide shows how to connect two Shopify stores so Tipo Sync can sync products, inventory, and other data between them.

In Multi-store sync, you will connect:

* **Source store** (sends data)
* **Destination store** (receives data)

### 🛠️ Step 1: Install the app and select store types&#x20;

Before connecting, make sure Tipo Sync is installed on **both stores**.

Upon first accessing the app, you’ll be prompted to designate the store as either a Source or Destination. Choose the appropriate type for each store. For more information on store types, refer to [this guide](https://tipo.io/index.php/kb/general-steps-to-connect-stores/).

* Install the app on store 1 > select Source store type
* Install the app on store 2 > select Destination store type

<figure><img src="/files/sNVdAC9xyXL5f5hhRrZR" alt=""><figcaption></figcaption></figure>

<figure><img src="/files/817sq1aGxTuyU2U2os6D" alt=""><figcaption></figcaption></figure>

***

### 🛠️ **Step 2: Configure app settings**

After the app is installed in 2 stores,  check the app **Settings** in the app in both store and configure it to make sure it works as expected.

Source store:&#x20;

<figure><img src="/files/LnNiHnqNbkd8cKknm7sE" alt=""><figcaption></figcaption></figure>

Destination store&#x20;

Decide the product data you want to sync in app **Settings** in Destination store

<figure><img src="/files/BJdkHiJRAeLzwG4M4W6c" alt=""><figcaption></figcaption></figure>

***

### 🛠️ Step 3: Connect a Destination store to a Source store&#x20;

**Note**: Connections are initiated from the Destination store.

#### Get the connect code (in the Source store)

The **Source Store** is the store that sends products, inventory, collections, or other data.

1. Open the app in Source store > click **Stores**
2. Click **Get connect code** button&#x20;
3. Copy the connect code on the popup

<figure><img src="/files/88NnpxyEyMTmNZ62PRAP" alt=""><figcaption></figcaption></figure>

#### Use the connect code (in the Destination store)

The **Destination Store** is the store that receives synced data from the Source store.

1. Go to the **Destination** store > open the app&#x20;
2. Click **Stores** >  click **Connect** **Store** button
3. Paste the connection code from the Source store into the **Connection code** field

<figure><img src="/files/5QCX4nR44P5YtzEAkrUh" alt=""><figcaption></figcaption></figure>

<figure><img src="/files/r3H1JXa584z7erdaCY9P" alt=""><figcaption></figcaption></figure>

4. Configure sync setting details

After connecting the stores, choose how the synchronization should work.

* **Matching & Imports**

> Choose **Create & Update** if you want the Destination store to automatically create missing products and keep existing products updated.
>
> Choose **Update Only** if products already exist in both stores and you only want to sync updates.

* **Behavior on Removal**

> Example:\
> If a product is deleted from the Source store, selecting **Unpublish** will hide the product from the Destination store without permanently deleting it.

<figure><img src="/files/rJNp6rizP7jZU9bdTCzO" alt=""><figcaption></figcaption></figure>

5. Enable product sync option

* &#x20;Turn on the **Products sync** option
* Choose a **Unique Identifier t**o match products between stores

> Example:\
> If both stores already have the same product handles, choose **Handle** for the most accurate matching.\
> Choose **SKU** if your products use unique SKUs across all variants.

* Choose Which Products to sync

> Example:\
> Select **Only sync products that match the tags below** if you only want to sync products tagged `wholesale`.

* Select **Product Statuses** to sync

<figure><img src="/files/4Buprz5luX9k4Yp8P5HH" alt=""><figcaption></figcaption></figure>

5. Select **Locations** you want to map between stores (required)

   <figure><img src="/files/YA0sb29r5bHCit8Y09ql" alt=""><figcaption></figcaption></figure>
6. Click **Save.**

&#x20;The sync will be run immediately. The first sync may take some time depending on how many products you sync.

***

### 🔄 After the sync

Once connected, Tipo Sync can:

* import/sync products from Source to Destination (based on your selection)
* sync inventory (if you mapped locations and enabled inventory sync)
* keep updates running based on your connection settings

For example:

Product New Shirt is created in source store, the app will automatically creates the product New Shirt product on destination store  (same product handle).

***

### ▶️ A Tutorial video

{% embed url="<https://youtu.be/KEmewqVFB5Q>" %}

{% embed url="<https://youtu.be/EgiEjT17k0U>" %}

***

**🙋 Still need support?**

If you still need help, please feel free to contact us at <hi@tipo.io>. We’ll be happy to assist you further.


# Set up connection status

When a Destination store sends a connection request, the Source store decides whether to accept it automatically or review it first. This guide explains each option and how to set it up.

### 🔎 Connection status overview

There are **two connection modes** in Tipo Sync:

#### ✅ Auto-accept

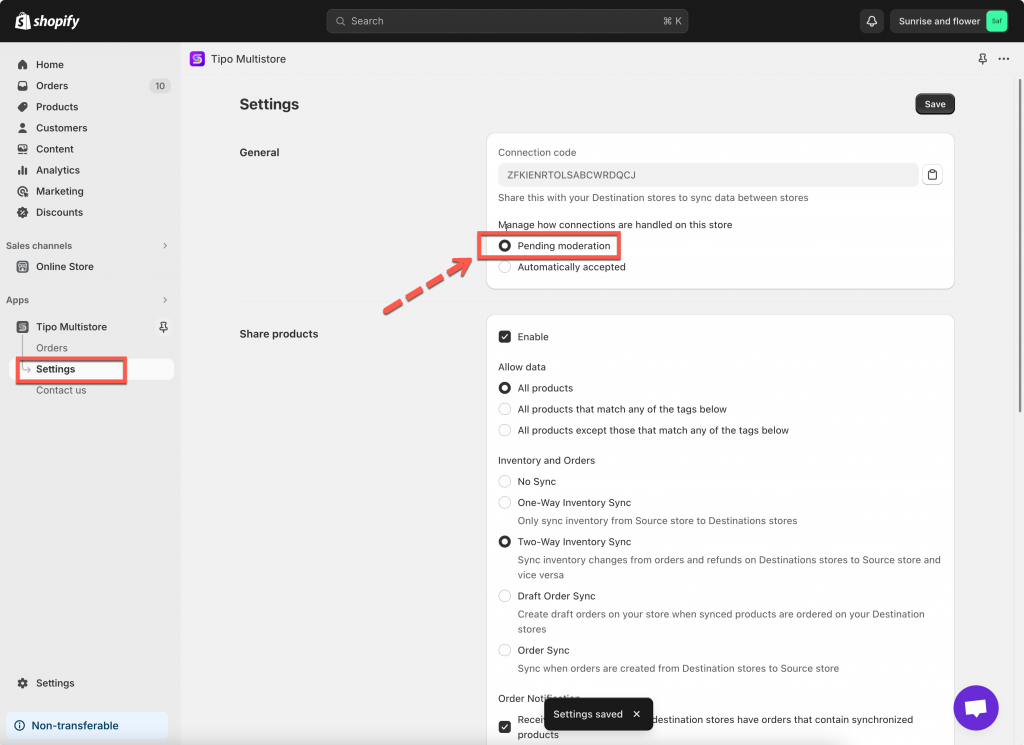
The Source store will automatically accept connection requests from Destination stores.

Use this when:

* you control both stores
* you want the fastest setup
* you don’t need manual review

#### 🛡️ Moderation (Manual approval)

The Source store will review and approve each connection request.

Use this when:

* multiple teams manage different stores
* you only want approved Destination stores to connect
* you need more control

***

### ⚙️ How to set up connection status (in the Source store)

1. Open the **Source** store > open the I**nventory Sync, Multi store TP** app
2. Click app **Settings**&#x20;
3. In the **Connections** part on the right side, select the status of the connect

Choose one option:

* ✅ **Auto-accept**
* 🛡️ **Moderation**

4. Click **Save** to update the changes

<figure><img src="/files/FpiBXONsABuc0TxdBwWp" alt=""><figcaption></figcaption></figure>

***

### &#x20;✅ What happens after you change this setting?

#### If you choose ✅ Auto-accept

* New connection requests are approved automatically
* Your Destination store can start syncing faster

#### If you choose 🛡️ Moderation

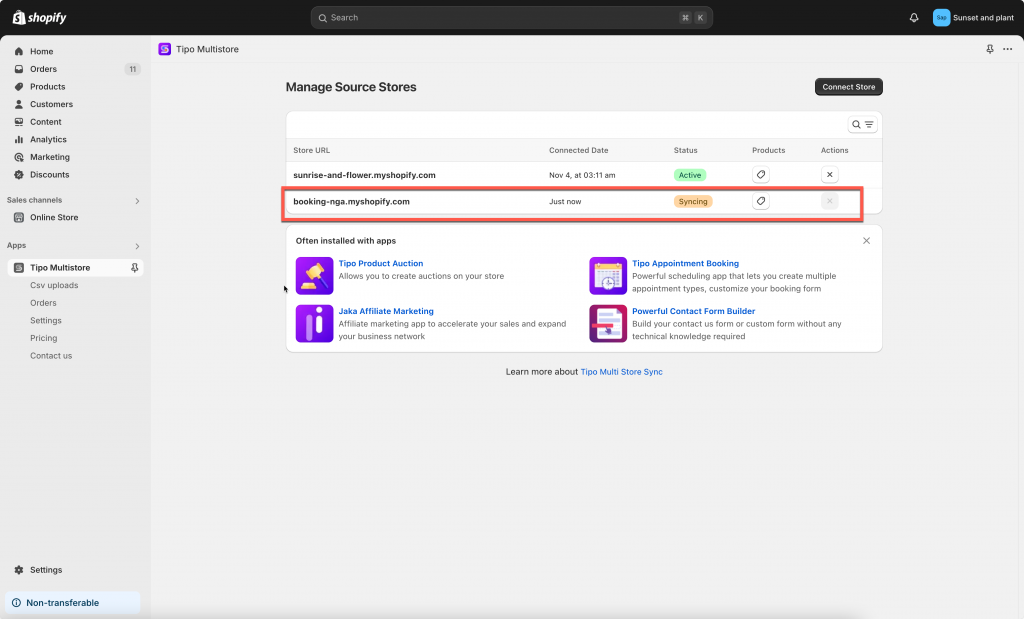
* New connection requests stay in “pending”
* You must approve them in the Source store before syncing starts

<figure><img src="/files/teuS8Ba0szufAI0KGbdb" alt=""><figcaption></figcaption></figure>

<figure><img src="https://tipo.io/wp-content/uploads/2024/11/2024-11-14_17-04-42-1024x619.png" alt=""><figcaption></figcaption></figure>

***

**🙋 Still need support?**

If you still need help, please feel free to contact us at <hi@tipo.io>. We’ll be happy to assist you further.


# Remove connection between stores

If you want to stop the sync between stores like remove the connection completely or removed it to create a new connection, please follow the instruction below.

We need to removed the connection in Muti-store app in both stores:

* remove the connect in Source store
* remove the connect in Destination store.

Removing a connection will:

* stop product/inventory/order syncing for that store pair
* unsync mapped products
* (optionally) unpublish or delete synced products in the Destination store (you choose)

#### **Source store**

Open the app in **Source** store > click **Stores** >  click disconnect icon  here&#x20;

<figure><img src="/files/T2UjcFb8eC16EmiExhxB" alt=""><figcaption></figcaption></figure>

✅ The connection is removed immediately.

***

#### **Destination store**

Open the app in **Destination** store > click **Stores** >  click disconnect icon  here

<figure><img src="/files/WFwUZzelF9NxDzyFvXaL" alt=""><figcaption></figcaption></figure>

The app provides you 4 options to manage the synced products on the Destination store. You can select one of them.

For example, if you want  removed the products that are synced from Source store to this store, select the **Delete** option.

* **Keep (no action) :** Unsync without deleting the product from your destination store
* **Unpublish**: Unsync and unpublish the product from your destination store
* **Unpublish or Delete**: Unsync and unpublish if product has been ordered, delete otherwise
* **Delete**: Unsync and delete the product from your destination store

<figure><img src="/files/VdHYCJdPRVkUf2LMw4tb" alt=""><figcaption></figcaption></figure>

You need to remove the connection on both stores to start a new one.

After the connection is removed, it may take time to process. Please wait for a while to let the app finish it then you can create a new connection.

**🙋 Still need support?**

If you still need help, please feel free to contact us at <hi@tipo.io>. We’ll be happy to assist you further.


# Create & Update Products

### ⚙️ How to enable Create & Update

The **Create & Update** option keeps products synchronized between your Source store and Destination store.

When enabled, Tipo Sync will:

✅ Create products that do not exist in the Destination store

✅ Update products that already exist in the Destination store

✅ Automatically sync new products added to the Source store

This is the recommended option for most stores.

***

### ⚙️ How to Enable Create & Update

#### For a new connection

1. Open the app in Destination store > click Stores > clic**k Connect store** button

<figure><img src="/files/MFtUQTCw1Mr2ECFQIwwd" alt=""><figcaption></figcaption></figure>

2. Enter the Connection Code obtained from the Source Store (found under the app’s Settings in the Source Store).​
3. In the **General** section, locate **Matching & Imports** > select **Create & Update**

<figure><img src="/files/TitmPu4B4ptac6eyqBTJ" alt=""><figcaption></figcaption></figure>

4. Choose your preferred Unique Identifier:

   Handle (recommended)

   SKU (ensure all variants have unique SKUs)

   Barcode (ensure all variants have unique barcodes)
5. Enable the Product sync setting > select the products you want to sync
6. Complete connection and click Save

***

#### **For an running connection**

1\. Go to the **Destinations** store > click **Stores** > click on the store URL of source store to view the connection detail

<figure><img src="/files/JNLFFHjnv08mZjwaAyIO" alt=""><figcaption></figcaption></figure>

2. In **General** > **Matching & Imports** part > select **Create & Update**

<figure><img src="/files/0zPMGotPvKq5BAIHp10Y" alt=""><figcaption></figcaption></figure>

3. Click **Save** to apply the changes.​

**Important Notes:** The app synchronizes products based on one of selected [Identifiers](https://tipo.io/index.php/kb/unique-identifiers/): Handle, SKU, and Barcode

***

### 🔗 How Tipo Sync Matches Products

Before creating or updating a product, Tipo Sync checks whether the product already exists in the Destination store.

To do this, the app compares products using a **Matching Identifier**.

A Matching Identifier is the value used to determine whether two products are the same product across stores.

#### Available Matching Identifiers

| Identifier           | Description                               | Example             |
| -------------------- | ----------------------------------------- | ------------------- |
| Handle (Recommended) | Unique part of the product URL            | /kimono-dress-coral |
| SKU                  | Unique code assigned to a product variant | SKU-12345-CORAL     |
| Barcode              | Global inventory code                     | 8850123456789       |

***

### 🔄 How Create & Update Works

When a product is synced, Tipo Sync first checks the selected **Matching Identifier.**

| Result                    | Action                  |
| ------------------------- | ----------------------- |
| Matching product found    | Update existing product |
| No matching product found | Create new product      |

***

#### 🛍 Example 1: Product Match Found

Source Store

| Product            | Handle             |
| ------------------ | ------------------ |
| Kimono Dress Coral | kimono-dress-coral |

#### Destination Store

| Product            | Handle             |
| ------------------ | ------------------ |
| Kimono Dress Coral | kimono-dress-coral |

Because both products have the same Handle, Tipo Sync recognizes them as the same product.

Result

✅ Product is updated

✅ No duplicate product is created

***

#### 🛍 Example 2: Product Match Not Found

Source Store

| Product           | Handle            |
| ----------------- | ----------------- |
| Linen Shirt Beige | linen-shirt-beige |

#### Destination Store

| Product           | Handle            |
| ----------------- | ----------------- |
| Summer Dress Blue | summer-dress-blue |

No matching Handle is found.

Result

✅ A new product is created in the Destination store

***

#### 🛍 Example 3: Create & Update in Action

Source Store

| Product |
| ------- |
| A       |
| B       |
| C       |

Destination Store

| Product |
| ------- |
| B       |
| C       |

Result After Sync

| Product | Action  |
| ------- | ------- |
| A       | Created |
| B       | Updated |
| C       | Updated |

Product A does not exist in the Destination store, so it is created.

Products B and C already exist, so they are updated.

***

#### 🛍 Example 4: Syncing New Products Automatically

Initial Setup

Source Store contains:

* Product A
* Product B
* Product C

Destination Store contains:

* Product A
* Product B
* Product C

The connection is configured with **Create & Update**.

Later

You add:

* Product D
* Product E
* Product F

to the Source store.

Result

Tipo Sync automatically creates:

* Product D
* Product E
* Product F

in the Destination store.

If any of these products are updated later in the Source store, those changes will also be synced.

***

### ⚖️ Compare Sync Options

| Option          | Create New Products | Update Existing Products | Best For                           |
| --------------- | ------------------- | ------------------------ | ---------------------------------- |
| Create & Update | ✅ Yes               | ✅ Yes                    | Full synchronization               |
| Update Only     | ❌ No                | ✅ Yes                    | Update products that already exist |
| Create Only     | ✅ Yes               | ❌ No                     | Import new products only           |

***

**🙋 Still need support?**

If you still need help, please feel free to contact us at <hi@tipo.io>. We’ll be happy to assist you further.


# Update Products Only

The **Update Only** option updates products that already exist in the Destination store.

When enabled, Tipo Sync will:

✅ Update products that have a matching identifier

❌ Not create new products

❌ Ignore products that do not already exist in the Destination store

This option is useful when you only want to keep existing products updated without importing new products.

***

### ⚙️ How to Enable Update Only

#### **For a New Connection:**

Before connecting, check and select the product information you want to sync [here. ](https://tipo.io/index.php/kb/sync-specific-product-fields/)

1\. Open the app in **Destination** store > click **Connect store** button

<figure><img src="/files/MFtUQTCw1Mr2ECFQIwwd" alt=""><figcaption></figcaption></figure>

2\. Enter the **Connection Code** from your Source Store (found under the app’s Settings).

3\. In **General** > **Matching & Imports** part > select **Update Only**

<figure><img src="/files/Pr4ZE2w1Z44tYG6pOBfO" alt=""><figcaption></figcaption></figure>

4\. Under **Unique Identifier**, choose one:

* **Handle** (recommended)
* **SKU** (ensure all variants have unique SKUs)
* **Barcode** (ensure all variants have unique barcodes)

5. Enable the **Product sync** setting > select the products you want to sync
6. Complete connection and click **Save**

***

#### **For an Existing Connection**

1\. Go to the **Destinations** store > click **Stores** > click on the store URL of source store to view the connection detail

<figure><img src="/files/JNLFFHjnv08mZjwaAyIO" alt=""><figcaption></figcaption></figure>

2\. In **General** > **Matching & Imports** part > select **Update only**

<figure><img src="/files/v6Z8AJuiQFkuBxqHsk4G" alt=""><figcaption></figcaption></figure>

3\. Choose your preferred **Unique Identifier**

Click **Save** to apply the changes.

***

### 🔗 How Tipo Sync Identifies Products

Before updating a product, Tipo Sync checks whether the product already exists in the Destination store.

The app compares products using a **Matching Identifier**.

A Matching Identifier is the value used to determine whether two products are the same product across stores.

| Identifier               | Description                                                              | Example               |
| ------------------------ | ------------------------------------------------------------------------ | --------------------- |
| **Handle (Recommended)** | Unique part of the product URL used to identify a product across stores. | `/kimono-dress-coral` |
| **SKU**                  | Unique code assigned to a product variant.                               | `SKU-12345-CORAL`     |
| **Barcode**              | Global product identification code.                                      | `8850123456789`       |

***

### 🔁 How Update Only Works

When a product is synced, Tipo Sync first checks the selected Matching Identifier.

| Result                    | Action                      |
| ------------------------- | --------------------------- |
| Matching product found    | Update the existing product |
| No matching product found | Ignore the product          |

***

#### 🛍 Example 1: Matching Product Found

Source Store

| Product            | Handle             |
| ------------------ | ------------------ |
| Kimono Dress Coral | kimono-dress-coral |

Destination Store

| Product            | Handle             |
| ------------------ | ------------------ |
| Kimono Dress Coral | kimono-dress-coral |

The Handles match.

Result

✅ Existing product is updated

✅ No duplicate product is created

***

#### 🚫 Example 2: No Matching Product Found

Source Store

| Product           | Handle            |
| ----------------- | ----------------- |
| Linen Shirt Beige | linen-shirt-beige |

Destination Store

| Product           | Handle            |
| ----------------- | ----------------- |
| Summer Dress Blue | summer-dress-blue |

No matching Handle is found.

Result

❌ Product is not created

❌ Product is not synced

The product is ignored because it does not already exist in the Destination store.

***

#### 🛍 Example 3: Update Only in Action

Before Sync

| Source Store | Destination Store |
| ------------ | ----------------- |
| Product A    | Product B         |
| Product B    | Product C         |
| Product C    | <p><br></p>       |

After Sync

| Product   | Result  |
| --------- | ------- |
| Product A | Ignored |
| Product B | Updated |
| Product C | Updated |

Products B and C already exist in the Destination store, so they are updated.

Product A does not exist in the Destination store, so it is ignored.

***

#### 🚫 What Happens When New Products Are Added?

Initial Setup

Source Store:

* Product A
* Product B
* Product C

Destination Store:

* Product A
* Product B
* Product C

The connection is configured with **Update Only**.

Later

You add:

* Product D
* Product E
* Product F

to the Source store.

Result

❌ Product D is not created

❌ Product E is not created

❌ Product F is not created

Because these products do not already exist in the Destination store, they are ignored.

Only products that already exist in both stores can be updated.

***

### 🎯 When Should I Use Update Only?

Use **Update Only** when:

* You already have products in both stores.
* You want to keep product information synchronized.
* You do not want new products to be automatically imported.
* You want full control over which products exist in the Destination store.

Common use cases:

* Managing separate product catalogs.
* Preventing accidental product creation.
* Updating inventory, prices, or descriptions for existing products only.

***

### ⚖️ Compare Sync Options

| Option             | Create New Products | Update Existing Products |
| ------------------ | ------------------- | ------------------------ |
| 🔄 Create & Update | ✅ Yes               | ✅ Yes                    |
| 🔁 Update Only     | ❌ No                | ✅ Yes                    |
| ➕ Create Only      | ✅ Yes               | ❌ No                     |

***

**🙋 Still need support?**

If you still need help, please feel free to contact us at <hi@tipo.io>. We’ll be happy to assist you further.


# Create Only

The **Create Only** option imports new products from the Source store into the Destination store without updating existing products.

When enabled, Tipo Sync will:

✅ Create products that do not exist in the Destination store

✅ Automatically sync new products added to the Source store

❌ Not update existing products

❌ Ignore products that already exist in the Destination store

This option is useful when you want to import new products while keeping existing products in the Destination store unchanged.

***

### ⚙️ How to Enable Create Only

#### **For a new connection**

1. Open the app in Destination store > click Stores > clic**k Connect store** button

<figure><img src="/files/4nz6tkHQlmvwcyftl5uV" alt=""><figcaption></figcaption></figure>

2. Enter the Connection Code obtained from the Source Store (found under the app’s Settings in the Source Store).​
3. In the **General** section, locate **Matching & Imports** > select **Create Only**

<figure><img src="/files/6RZrIDImS5g77YRpd0Kj" alt=""><figcaption></figcaption></figure>

4. Click **Save**

#### **For an running connection**

1\. Go to the **Destinations** store > click **Stores** > click on the store URL of source store to view the connection detail

<figure><img src="/files/JNLFFHjnv08mZjwaAyIO" alt=""><figcaption></figcaption></figure>

2. In **General** > **Matching & Imports** part > select **Create only**

<figure><img src="/files/wKbqNKRzWnyv8ktQnAxe" alt=""><figcaption></figcaption></figure>

3. Click **Save**

***

### 🔗 How Tipo Sync Identifies Products

Before creating a product, Tipo Sync checks whether the product already exists in the Destination store.

The app compares products using a **Matching Identifier**.

A Matching Identifier is the value used to determine whether two products are the same product across stores.

| Identifier               | Description                               | Example               |
| ------------------------ | ----------------------------------------- | --------------------- |
| **Handle (Recommended)** | Unique part of the product URL            | `/kimono-dress-coral` |
| **SKU**                  | Unique code assigned to a product variant | `SKU-12345-CORAL`     |
| **Barcode**              | Global inventory code                     | `8850123456789`       |

***

### ➕ How Create Only Works

When a product is synced, Tipo Sync first checks the selected Matching Identifier.

| Result                    | Action               |
| ------------------------- | -------------------- |
| Matching product found    | Ignore the product   |
| No matching product found | Create a new product |

***

#### 🛍 Example 1: Product Already Exists

Source Store

| Product            | Handle             |
| ------------------ | ------------------ |
| Kimono Dress Coral | kimono-dress-coral |

Destination Store

| Product            | Handle             |
| ------------------ | ------------------ |
| Kimono Dress Coral | kimono-dress-coral |

The Handles match.

Result

❌ Product is not updated

❌ No duplicate product is created

The product is ignored because it already exists in the Destination store.

***

#### ➕ Example 2: Product Does Not Exist

Source Store

| Product           | Handle            |
| ----------------- | ----------------- |
| Linen Shirt Beige | linen-shirt-beige |

Destination Store

| Product           | Handle            |
| ----------------- | ----------------- |
| Summer Dress Blue | summer-dress-blue |

No matching Handle is found.

#### Result

✅ A new product is created in the Destination store

***

#### 🛍 Example 3: Create Only in Action

Before Sync

**Source Store**

* Product A
* Product B
* Product C

**Destination Store**

(No products)

After Sync

| Product   | Result  |
| --------- | ------- |
| Product A | Created |
| Product B | Created |
| Product C | Created |

Because these products do not exist in the Destination store, Tipo Sync creates all of them.

***

#### 🚀 New Products Are Synced Automatically

Initial Setup

Source Store:

* Product A
* Product B
* Product C

Destination Store:

* Product A
* Product B
* Product C

The connection is configured with **Create Only**.

Later

You add:

* Product D
* Product E
* Product F

to the Source store.

#### Result

✅ Product D is created

✅ Product E is created

✅ Product F is created

Because these products do not already exist in the Destination store, Tipo Sync imports them automatically.

***

### ⚠️ Important Note

If a product already exists in the Destination store before the connection is created, it will not be updated.

For example:

#### Source Store

* Product A
* Product B
* Product C

#### Destination Store

* Product A
* Product B

#### Result

| Product   | Action  |
| --------- | ------- |
| Product A | Ignored |
| Product B | Ignored |
| Product C | Created |

Only products that are missing from the Destination store will be created.

Existing products remain unchanged.

***

### 🎯 When Should I Use Create Only?

Use **Create Only** when:

* You want to import new products automatically.
* You do not want existing products to be modified.
* You manage product information separately in each store.
* You want full control over updates in the Destination store.

Common use cases:

* Expanding a catalog without affecting existing products.
* Importing new arrivals automatically.
* Maintaining independent product data between stores.

***

### ⚖️ Compare Sync Options

| Option             | Create New Products | Update Existing Products |
| ------------------ | ------------------- | ------------------------ |
| 🔄 Create & Update | ✅ Yes               | ✅ Yes                    |
| 🔁 Update Only     | ❌ No                | ✅ Yes                    |
| ➕ Create Only      | ✅ Yes               | ❌ No                     |


# Compare Product Sync Modes

When connecting two stores, Tipo Sync offers three product sync modes in **Matching & Imports** section:

* **Create & Update**
* **Update Only**
* **Create Only**

Each mode determines what happens when Tipo Sync finds (or does not find) a matching product in the Destination store.

<figure><img src="/files/JNLFFHjnv08mZjwaAyIO" alt=""><figcaption></figcaption></figure>

<figure><img src="/files/v6Z8AJuiQFkuBxqHsk4G" alt=""><figcaption></figcaption></figure>

***

### 🚀 Quick Recommendation

| If you want to...                   | Recommended Option |
| ----------------------------------- | ------------------ |
| Keep both stores fully synchronized | 🔄 Create & Update |
| Update existing products only       | 🔁 Update Only     |
| Import new products only            | ➕ Create Only      |

***

### 🔗 How Product Matching Works

Before syncing a product, Tipo Sync checks whether the product already exists in the Destination store.

The app compares products using the selected Matching Identifier:

* Handle (Recommended)
* SKU
* Barcode

After checking for a match, Tipo Sync follows the selected sync mode.

***

### 📊 Quick Comparison

This table explains the core difference between all three modes.

| Sync Mode           | Matching Product Found | No Matching Product Found |
| ------------------- | ---------------------- | ------------------------- |
| **Create & Update** | Update Product         | Create Product            |
| **Update Only**     | Update Product         | Ignore Product            |
| **Create Only**     | Ignore Product         | Create Product            |

***

### 🔄 Create & Update

#### How it works

* Updates products that already exist in the Destination store.
* Creates products that do not exist in the Destination store.
* Automatically syncs new products added later.

#### Example

**Source Store**

* Product A
* Product B
* Product C

**Destination Store**

* Product B
* Product C

#### Result

| Product   | Action  |
| --------- | ------- |
| Product A | Created |
| Product B | Updated |
| Product C | Updated |

***

### 🔁 Update Only

#### How it works

* Updates products that already exist in the Destination store.
* Does not create new products.
* Ignores products that do not already exist.

#### Example

**Source Store**

* Product A
* Product B
* Product C

**Destination Store**

* Product B
* Product C

#### Result

| Product   | Action  |
| --------- | ------- |
| Product A | Ignored |
| Product B | Updated |
| Product C | Updated |

***

### ➕ Create Only

#### How it works

* Creates products that do not exist in the Destination store.
* Does not update existing products.
* Automatically imports new products added later.

#### Example

**Source Store**

* Product A
* Product B
* Product C

**Destination Store**

* Product A
* Product B

#### Result

| Product   | Action  |
| --------- | ------- |
| Product A | Ignored |
| Product B | Ignored |
| Product C | Created |

### 📚 Learn More

For detailed setup instructions and examples:

* [Create & Update Products](https://docs.tipo.io/product-syncs/create-and-update-products)
* [Update Products](https://docs.tipo.io/product-syncs/update-products-only) [Only ](https://docs.tipo.io/product-syncs/update-products-only)
* [Create Products Only](https://docs.tipo.io/product-syncs/create-only)


# Select products to sync

The app lets you control which products are synchronized between your stores. You can sync **all products**, or only products that match specific **tags**, or exclude products based on tags.

Before connecting, check and select the product information you want to sync [here. ](https://tipo.io/index.php/kb/sync-specific-product-fields/)

***

### ⚙️ **In Source store**

1 . In **Source store**, open the app > click **Settings**

2\. In **Share products** part, toggle it on

3\. In **Product to sync** field,  select one of the options

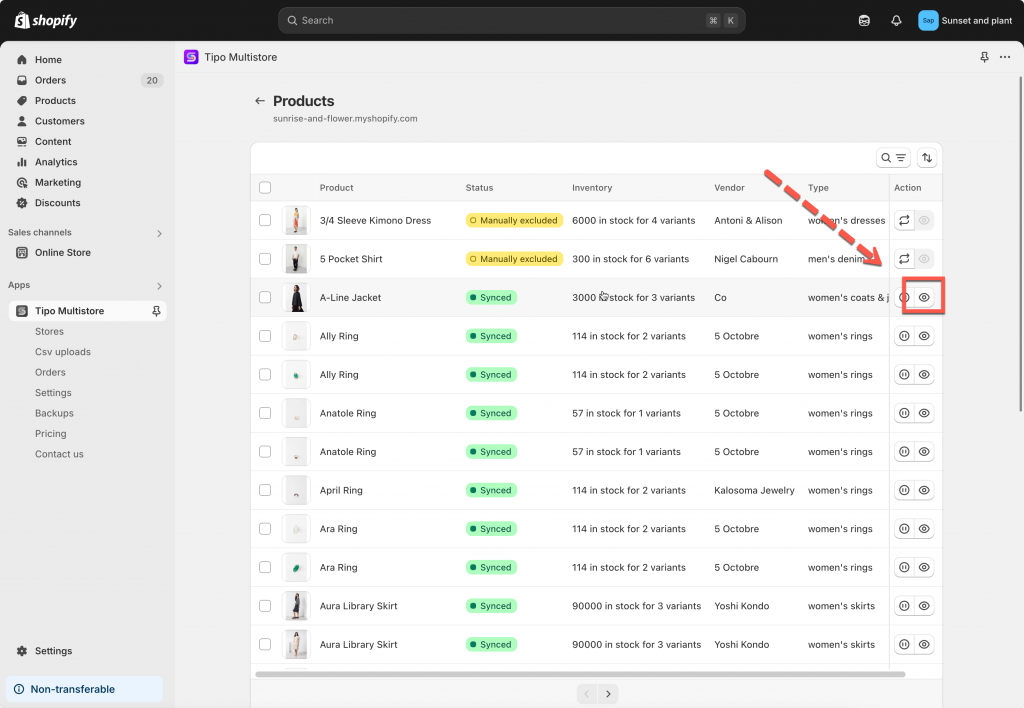
* **All products**: All products in the Source store will be shared with connected Destination stores.
* **Include by tags:** Only products that contain at least one of the specified tags will be shared.
* **Exclude by tags**: All products will be shared except products that contain any of the specified tags.

4\. Click **Save** to update the change

<figure><img src="/files/MsGGXL24OgqESK8wkK9N" alt=""><figcaption></figcaption></figure>

> **Tip:** Use specific tags to organize the products you want to share.

For example, enter:

```
Sync1
```

Only products tagged `Sync1` will be shared.

***

### ⚙️ **In Destinations store**

#### **New connection:**&#x20;

Before connecting, check and select the product information you want to sync [here. ](https://tipo.io/index.php/kb/sync-specific-product-fields/)

1. Open the app in **Destination** store > click **Stores** >  click **Connect store** button

<figure><img src="/files/c8B1RiiZtAoscnmWFzLD" alt=""><figcaption></figcaption></figure>

2. Add the **Connection code** of the Source store  you want to connect
3. Turn on **Products sync** option
4. In **Product to sync** field,  select one of the options
   * **All products**: All products in the Source store will be shared with connected Destination stores.
   * **Include by tags:** Only products that contain at least one of the specified tags will be shared.
   * **Exclude by tags**: All products will be shared except products that contain any of the specified tags.

<figure><img src="/files/zb8Xcad7N57rr8wRY9iM" alt=""><figcaption></figcaption></figure>

4\. Click **Save** to update the change

***

#### **For an running connection:**

1\. Go to the **Destinations** store, open the app **Dashboard** > click on the store URL of the source store to open the connection detail

<figure><img src="/files/JNLFFHjnv08mZjwaAyIO" alt=""><figcaption></figcaption></figure>

2\. In **Product to sync** field,  select one of the options

* **All products**: All products in the Source store will be shared with connected Destination stores.
* **Include by tags:** Only products that contain at least one of the specified tags will be shared.
* **Exclude by tags**: All products will be shared except products that contain any of the specified tags.

<figure><img src="/files/uaUhb8qHUULrU0SkbVGI" alt=""><figcaption></figcaption></figure>

3\. Select an option to sync products. For example: select **All products that match any of the tags below** > add the product you want

4\. Click **Save** to update the change

***

### ✅ Recommended first-time workflow

If you’re setting up syncing for the first time:

1. Choose **Specific products**
2. Select 1–5 test products
3. Run sync
4. Confirm results in Destination
5. Then expand the list (or switch to “All products”) when you’re confident

***

### 🧪 **Example**

Let’s say you want to sync only your **pet-related** items.\
You can enter tags like:

`pet_food, pet_accessory, pet_toy`

⇒ Now, only products with one of these tags will sync to your destination store.

If you choose “Sync all products except those that match the tags below” and enter:

`sale, clearance`

⇒ Then any product tagged as *sale* or *clearance* will be **excluded** from syncing.

***

### Important Note: Use Distinct and Descriptive Tags

To ensure accurate filtering and prevent unexpected matches:

✅ Use **specific tags** that describe exactly what you want to sync, for example:

```
fish_only, pet_fish, fish_food
```

🚫 Avoid **general tags** like:

```
fish, food
```

General or overlapping tags can cause unrelated products to sync unintentionally.&#x20;

For example, a “cat food” product might sync if you only used the tag “food.”

Using clear, distinct tags helps your filters work exactly as expected.

***

### 🔁 What happens during sync

**Goal:** Sync only products with the tag `SYNC`

1. In the **Source store**, add the tag **SYNC** to 12 products
2. In Tipo Sync, select: **Sync only products that match these tags**
3. Enter tag: `SYNC`
4. Run sync

✅ **Result after first sync:**

* Tipo Sync imports those **12 products** into the Destination store.

✅ **Result after future changes:**

* If you update any of those `SYNC` products in the Source store, the Destination store product with the **same handle** will be updated (based on enabled sync fields).

<figure><img src="/files/kVWPxkAxceN1jAcrQfiD" alt=""><figcaption></figcaption></figure>

If I added tag “SYNC”  to a new product, it is created and synced to Destinations store too.

Note: the products are synced based on the **Matching & Imports** setting too.

<figure><img src="/files/55jesNXEi2k543HtGBJM" alt=""><figcaption></figcaption></figure>

***

### ▶️ Tutorial video

{% embed url="<https://youtu.be/7nuH3o16fIQ?si=MUjM9j63qyOXQtqO>" %}

***

**🙋 Still need support?**

If you still need help, please feel free to contact us at <hi@tipo.io>. We’ll be happy to assist you further.


# Select which product information to sync

Tipo app allows you to choose which product information should be synchronized from the Source store to the Destination store.

This gives you full control over what data is updated across stores.

* **Product Fields** – Title, Description, Status, SEO fields, Images, Tags, Vendor, Category, and more.
* **Variant Fields** – Variant title, Barcode, Weight, Tax settings, Inventory tracking, and more.
* **Price Fields** – Price, Unit price, Cost per item.

***

### 🛠️ **How to set**

1\. Open the app in **Destination** store > click **Settings > Product Fields to Synchronize**

3\. Select one option for each product field. There are 3 options for you:

* **Sync** – Create and update
* **Create only** – Only set the value when creating a new product
* **Ignore** – Never sync this field

<figure><img src="/files/08b3YJIWD0XTLwMqDNmW" alt=""><figcaption></figcaption></figure>

<figure><img src="/files/0MK0z5eGK4TODiVCdO0u" alt=""><figcaption></figcaption></figure>

4\. Click **Save** to finish

For example:

* If you want to sync product title from Source store to Destination store, select **Sync** option
* If you do not want to sync product price from Source store to Destination store, select **Ignore** option

> Note: **Product Title** and **Variant Title** are required fields when you sync a new product from source store. The **Ignore** option is not available for them.

***

### Example

#### 🔄 Sync

| Stage              | Source Store               | Destination Store          |
| ------------------ | -------------------------- | -------------------------- |
| Initial sync       | Summer Linen Shirt         | Summer Linen Shirt         |
| After title change | Premium Summer Linen Shirt | Premium Summer Linen Shirt |

**Result:** The field stays synchronized. Changes made in the Source Store are automatically updated in the Destination Store.

#### 📝 Create only

| Stage              | Source Store               | Destination Store  |
| ------------------ | -------------------------- | ------------------ |
| Initial sync       | Summer Linen Shirt         | Summer Linen Shirt |
| After title change | Premium Summer Linen Shirt | Summer Linen Shirt |

**Result:** The field is copied when the product is created, but future changes are not synchronized.

#### 🚫 Ignore

| Stage              | Source Store               | Destination Store  |
| ------------------ | -------------------------- | ------------------ |
| Initial sync       | Summer Linen Shirt         | Custom Store Title |
| After title change | Premium Summer Linen Shirt | Custom Store Title |

**Result:** The field is never synchronized. Changes in the Source Store do not affect the Destination Store.

***

### 🔗 How Product Matching Works

Before syncing a product, Tipo Sync checks whether the product already exists in the Destination store.

<figure><img src="/files/90yNRC2221UxGywuCa9B" alt=""><figcaption></figcaption></figure>

The app compares products using the selected Matching Identifier:

* Handle (Recommended)
* SKU
* Barcode

After checking for a match, Tipo Sync follows the selected sync mode.

***

### 📊 Quick Comparison

<figure><img src="/files/byYAcUaQvybUKw5WTHAT" alt=""><figcaption></figcaption></figure>

| Sync Mode          | Matching Product Found | No Matching Product Found |
| ------------------ | ---------------------- | ------------------------- |
| 🔄 Create & Update | Update Product         | Create Product            |
| 🔁 Update Only     | Update Product         | Ignore Product            |
| ➕ Create Only      | Ignore Product         | Create Product            |

This table explains the core difference between all three modes.

***

**🙋 Still need support?**

If you still need help, please feel free to contact us at <hi@tipo.io>. We’ll be happy to assist you further.


# Sync products based on unique Identifiers

The app allows you to sync products from a source store to a destination store using one of the following unique identifiers:

* **Handle** (Recommended)
* **SKU**
* **Barcode**

A **unique identifier** is a product value that is the same in both stores and can be used to match products correctly.

Once products are matched, the Tipo app can sync updates (price, title, images, etc.) based on your settings.

### ✅ Which identifier should I use?

#### 1. Handle (Recommended)

**What it is:**\
The handle is a unique string used in the URL of each product. It’s automatically generated from the product title but can be manually edited in Shopify.

<figure><img src="/files/krjGACmSMWWl29VjBWMs" alt=""><figcaption></figcaption></figure>

**Sync logic:**\
If a product in the source store has the same handle as a product in the destination store, the app considers them the same product and syncs the data.

**Example:**

| Source Store               | Destination Store          |
| -------------------------- | -------------------------- |
| Product Title: "Red Shirt" | Product Title: "Red Shirt" |
| Handle: `red-shirt`        | Handle: `red-shirt`        |

This product **will sync correctly** because the handles match.

❗**Tip:** Always use handle sync if your stores have identical product structures.

***

#### 2. SKU (Stock Keeping Unit)

**What it is:**\
The SKU is a code you assign to each product variant to track inventory.

<figure><img src="/files/4kQOU1MJZ2zJfYhGSM84" alt=""><figcaption></figcaption></figure>

**Sync logic:**\
The app will match product variants based on the same SKU in both stores.

**Example:**

| Source Store                     | Destination Store                |
| -------------------------------- | -------------------------------- |
| Product: "Sneakers"              | Product: "Sneakers"              |
| Variant: Size 42 - SKU: `SNK-42` | Variant: Size 42 - SKU: `SNK-42` |

This variant will sync because the SKUs match.

❗**Warning:** If multiple products share the same SKU across variants, it may lead to incorrect matching.

***

#### 3. Barcode

**What it is:**\
The **barcode** is a globally unique product identifier, usually used for retail scanning systems.

<figure><img src="/files/Kgyv66qElNxLe7tccdeb" alt=""><figcaption></figcaption></figure>

**Sync logic:**\
The app will match **product variants** based on the barcode field in Shopify.

**Example:**

| Source Store                              | Destination Store                         |
| ----------------------------------------- | ----------------------------------------- |
| Product: "Water Bottle"                   | Product: "Water Bottle"                   |
| Variant: 500ml - Barcode: `1234567890123` | Variant: 500ml - Barcode: `1234567890123` |

This product will sync correctly using the barcode.

❗**Note:**&#x20;

Only use this option if all variants across stores use unique barcodes.

***

### ⚙️ **Steps to select Identifiers**

#### **For a new connection:**

Before connecting, check and select the product information you want to sync [here](https://docs.tipo.io/product-syncs/select-products-to-sync).

1\. Open the app in **Destination** store > click **Stores** > click **Connect store** button

<figure><img src="https://docs.tipo.io/~gitbook/image?url=https%3A%2F%2F2618001169-files.gitbook.io%2F%7E%2Ffiles%2Fv0%2Fb%2Fgitbook-x-prod.appspot.com%2Fo%2Fspaces%252FQFJLe0hkcyiradJOCgpx%252Fuploads%252FKA9Iw1olUwDiYuVhoAFW%252F2025-08-04_10-45-58.png%3Falt%3Dmedia%26token%3Dfaf97f06-bef5-4fe1-bbbf-1dad70f3748d&#x26;width=768&#x26;dpr=4&#x26;quality=100&#x26;sign=cd147ba2&#x26;sv=2" alt=""><figcaption></figcaption></figure>

2\. Enter the **Connection Code** obtained from the Source Store (found under the app’s Settings in the Source Store).​

3\. In **General** > **Matching & Imports** part > select **Create new items if not exist and update current items that have the same handle**

<figure><img src="/files/X4UgMYf1S9ckmCmMg33Z" alt=""><figcaption></figcaption></figure>

4\. Enable the **Product sync** setting > select **Unique Identifier** to sync product based on it

For example: If the handle is selected, the products that have the same handle will be synced between stores.&#x20;

<figure><img src="/files/GZXVPdq4N4zdSxNSLH8o" alt=""><figcaption></figcaption></figure>

5. Save to start the connection

#### **For an running connection**

1\. Go to the **Destinations** store > click **Stores** > click on the store URL of source store to view the connection detail

<figure><img src="/files/JNLFFHjnv08mZjwaAyIO" alt=""><figcaption></figcaption></figure>

2\. Select a unique identifiers to sync products based on it

<figure><img src="/files/GZXVPdq4N4zdSxNSLH8o" alt=""><figcaption></figcaption></figure>

3. Click **Save** to apply the changes.

***

### 🔄 What Happens During Sync?

🧪 Example (Handle matching)

**Source store product**

* Product: Ceramic Table Lamp
* Handle: `ceramic-table-lamp`

**Destination store**

* If a product with handle `ceramic-table-lamp` exists → it gets updated
* If not → it gets imported (if enabled)

**⚙️ How matching works during sync**

When sync runs:

1. Tipo Sync reads products from the Source store
2. It searches the Destination store for a product with the same identifier
3. Then it decides:
   * &#x20;**Match found** → update existing product fields (based on your sync selections)
   * &#x20;**No match found** → import/create new product (if your import mode allows)

***

### 🌟 Best Practices

* **Use Handle** if product structures are identical between stores.
* **Use SKU** only if every variant has a **unique SKU**.
* **Use Barcode** for retail environments where barcodes are consistently used.

***

**🙋 Still need support?**

If you still need help, please feel free to contact us at <hi@tipo.io>. We’ll be happy to assist you further.


# How product sync settings work together

When products are synchronized between stores, the result is affected by several settings working together.

If a product is not created, updated, or synchronized as expected, reviewing these settings is a good place to start.

***

### ⚙️ The 4 Settings That Control Product Sync

Product synchronization is affected by:

1. &#x20;Products Selected for Sync
2. Product Matching Identifier
3. Product Sync Mode
4. Product Information to Sync

Each setting controls a different part of the synchronization process.

***

### 🎯 Products Selected for Sync

This setting determines which products are eligible for synchronization.

If a product is not selected, Tipo Sync will ignore it completely.

#### Example

Selected products:

✅ Product A

✅ Product B

Not selected:

❌ Product C

#### Result

Only Product A and Product B can be synchronized.

<figure><img src="/files/uaUhb8qHUULrU0SkbVGI" alt=""><figcaption></figcaption></figure>

***

### 🔗 Product Matching Identifier

Tipo Sync uses a matching identifier to determine whether products in two stores are the same product.

Available identifiers:

| Identifier           | Example       |
| -------------------- | ------------- |
| Handle (Recommended) | /summer-shirt |
| SKU                  | SKU-12345     |
| Barcode              | 8850123456789 |

#### Example

Source Store:

Handle: `summer-shirt`

Destination Store:

Handle: `summer-shirt`

#### Result

✅ Product match found

Tipo Sync recognizes both products as the same product.

<figure><img src="/files/90yNRC2221UxGywuCa9B" alt=""><figcaption></figcaption></figure>

***

### 🔄 Product Sync Mode

The selected sync mode determines what happens when a matching product is found (or not found).

| Sync Mode           | Matching Product Found | No Matching Product Found |
| ------------------- | ---------------------- | ------------------------- |
| **Create & Update** | Update Product         | Create Product            |
| **Update Only**     | Update Product         | Ignore Product            |
| **Create Only**     | Ignore Product         | Create Product            |

#### Example

If Product A does not exist in the Destination store:

* Create & Update → Product is created
* Update Only → Product is ignored
* Create Only → Product is created

<figure><img src="/files/wKbqNKRzWnyv8ktQnAxe" alt=""><figcaption></figcaption></figure>

***

### 📝 Product Information to Sync

You can choose which product fields should be synchronized.

Common fields include:

* Title
* Description
* Images
* Price
* Inventory
* Collections
* Tags

#### Example

| Field  | Sync Setting |
| ------ | ------------ |
| Title  | Sync         |
| Price  | Don't Sync   |
| Images | Sync         |

#### Result

✅ Title updated

✅ Images updated

❌ Price not updated

***

### 🛍 Example: How All Settings Work Together

#### Source Store

| Field  | Value              |
| ------ | ------------------ |
| Handle | summer-shirt       |
| Title  | Summer Linen Shirt |
| Price  | $20                |

#### Destination Store

| Field  | Value        |
| ------ | ------------ |
| Handle | summer-shirt |
| Title  | Old Shirt    |
| Price  | $25          |

#### Configuration

| Setting             | Value           |
| ------------------- | --------------- |
| Product Selected    | Yes             |
| Matching Identifier | Handle          |
| Sync Mode           | Create & Update |
| Title               | Sync            |
| Price               | Don't Sync      |

#### Result

| Field | Final Value        |
| ----- | ------------------ |
| Title | Summer Linen Shirt |
| Price | $25                |

The product was matched successfully and updated.

However, the price remained unchanged because the Price field was configured as **Don't Sync**.

***

#### 📚 Learn More <a href="#learn-more" id="learn-more"></a>

For detailed setup instructions and examples:

* [Create & Update Products](https://docs.tipo.io/product-syncs/create-and-update-products)
* [Update Products](https://docs.tipo.io/product-syncs/update-products-only) [Only ](https://docs.tipo.io/product-syncs/update-products-only)
* [Create Products Only](https://docs.tipo.io/product-syncs/create-only)
* [Select products to sync](https://docs.tipo.io/product-syncs/select-products-to-sync)
* [Select which product information to sync](https://docs.tipo.io/product-syncs/select-which-product-information-to-sync)

***

**🙋 Still need support?**

If you still need help, please feel free to contact us at <hi@tipo.io>. We’ll be happy to assist you further.


# Sync products by SKU

Please view this video to know more how to set up the connection to sync products by SKU.&#x20;

{% embed url="<https://youtu.be/B7pfYmxU8ig>" %}

**🙋 Still need support?**

If you still need help, please feel free to contact us at <hi@tipo.io>. We’ll be happy to assist you further.


# Sync Metafields

This guide explains how to sync metafields from your Source store to your Destination store in Tipo app.

### ℹ️ What are metafields?

* **Product metafields**
* **Variant metafields** (if you enable it)

Tipo app can sync metafields for:

* material, size chart, specifications
* custom badges (e.g. “best\_seller”)
* extra product details used by themes/apps

Metafields are custom fields in Shopify used to store extra product data, such as:

***

### ✅ **Supported metafield types**

* Multi-line text
* Rich text
* Integer
* Decimal
* Date and time
* Date
* Dimension
* Volume
* Weight
* True or false
* Rating
* URL
* Money
* Link
* JSON

🚫 **Not supported yet:**\
Reference types (e.g. product reference, collection reference) are not currently supported.

***

### 🛠️ Step 1: Configure Metafields on the Source Store

1. Open the app > click **Settings** > turn on **Share Metafields**
2. Choose the resource you want to share:
   * **Product resource** – Share product metafields.
   * **Variant resource** – Share variant metafields.
3. Add specific metafield definitions to limit which metafields are shared.
   * Click the **Browse metafields** icon, or
   * Enter the metafield definition in the format:

     ```
     namespace.key
     ```

     For example:

     ```
     custom.materialseo.titlespecifications.weight
     ```
4. Click **Save** to update the changes

<figure><img src="/files/d4wYceEbE0jJdsE3XJU0" alt=""><figcaption></figcaption></figure>

<figure><img src="/files/E86vC0LeypyuSdrMttNK" alt=""><figcaption></figcaption></figure>

***

### 🛠️ Step 2: Configure Metafields on the Destination Store

1. Open the app > click **Stores** > click on the source store URL to open the connection detail

<figure><img src="/files/JNLFFHjnv08mZjwaAyIO" alt=""><figcaption></figcaption></figure>

2. Turn on **Metafields sync**
3. Choose what to sync

   Under **Allow data**, select one or both:

   * **Product Resource** → sync product metafields
   * **Variant Resource** → sync variant metafields
4. Click on the search icon on the right to see all the supported metafields > click **Select valid metafield to sync** button&#x20;

<figure><img src="/files/d4wYceEbE0jJdsE3XJU0" alt=""><figcaption></figcaption></figure>

<figure><img src="/files/E86vC0LeypyuSdrMttNK" alt=""><figcaption></figcaption></figure>

5. Click **Save** to update the changes

***

### &#x20;🔄 What Happens During Sync

#### **1) If the Destination store doesn’t have the metafield definition**

The app will automatically create the metafield definition in the Destination store (when needed).

After it’s created, the synced metafield values will appear on the product/variant in the Destination store.

#### **2) If metafields exist but are not “structured” (Unstructured metafields)**

In some cases, metafields may sync even if they haven’t been fully defined/structured in the Destination store.

To review them in Shopify Admin:

* **ope**n stor**e Settings → Metafields and metaobjects**
* Choose **Product** (or **Variant**)
* Open **View unstructured metafields**

💡 Tip: You can manually define/structure these metafields later to keep your store data clean and consistent.

<figure><img src="/files/5DpufxoQzWAGszaxAY9a" alt=""><figcaption></figcaption></figure>

#### **3) If the Source store has no value, Destination won’t be overwritten**

If a metafield exists in Destination but the Source value is empty, Tipo Sync will not overwrite the Destination value.

#### **4) Data types must match (very important)**

Metafield data types must match exactly between Source and Destination.

Examples of data type mismatches:

* `single_line_text_field` vs `multi_line_text_field`
* `number_integer` vs `number_decimal`
* `product_reference` vs `text`

⚠️ If the data types don’t match, the sync may fail or skip that metafield.

***

### 📌 Example: Syncing a Product Metafield – “Material”

You want to sync a **custom product metafield** called **Material** (e.g., “Cotton”, “Leather”, “Wool”) from your **Source Store** to your **Destination Store** using our app.

#### **Step 1: Define the Metafield in Shopify**

In your **Source Store**:

1. Go to **Shopify Admin >** open store **Settings > Metafields and metaobjects** > choose **Product** (or **Variant**)
2. Click **Add definition** (if it’s not already created) > fill out the metafield definition:
   * **Name**: Material
   * **Namespace**: `custom`
   * **Key**: `material`
   * **Type**: Single line text

\=>  This gives you the full metafield key: `custom.material`

Repeat this step in your **Destination Store** (must match the same key and type).

<figure><img src="/files/CTeDe2tG4mV1DBdUmcdS" alt=""><figcaption></figcaption></figure>

#### **Step 2: Add Metafield Data to Products**

In your **Source Store**, go to a product and scroll down to **Metafields**  > Under **Material**, enter: `Cotton`

This product now has the metafield `custom.material = "Cotton"`.

<figure><img src="/files/rFlIETlV60q6MrMtzPOn" alt=""><figcaption></figcaption></figure>

#### **Step 3: Configure Sync in Tipo app**&#x20;

* Open our app in the **Destination Store** > go to Connect Configuration **> Metafield Sync**
* Choose **Specific Metafields > e**nter the metafield key exactly: `custom.material`&#x20;

<figure><img src="/files/E86vC0LeypyuSdrMttNK" alt=""><figcaption></figcaption></figure>

**Result**

* Our app will find `custom.material` in the Source Store
* If it does **not exist** in the Destination product, the app will **create it**\
  \=>   Result: `custom.material = "Cotton"` in both stores
* If it exists in Destination but Source is empty, we **do not override** the value

***

### ❓FAQs

#### Q1: How to Set `namespace.key` in your store?

To sync a specific metafield, you’ll need to enter the **metafield definition key** in this format: `namespace.key` (for example: `custom.color`).

Here’s how to find it in your Shopify admin:

1. Go to your Shopify Admin >cavigate to **Settings > Custom Data > Products**
2. Click on the metafield you want to sync\
   → You’ll see the **Namespace** and **Key** values
3. Combine them in this format: `namespace.key`\
   → Example: `custom.description`

#### Q2: Why are my metafields not syncing?

If your metafields are not syncing correctly, it could be due to one of the following reasons:

1. **Metafield sync is not enabled**\
   Make sure metafield syncing is turned on for both stores:
   * Enable **Share Metafields** in the **Source Store**.
   * Enable **Receive Metafields** in the **Destination Store**.

<figure><img src="/files/d4wYceEbE0jJdsE3XJU0" alt=""><figcaption></figcaption></figure>

2. **Metafield definition key is not added**

Besides enabling metafield sync, you must also add the **metafield definition key (namespace.key)** that you want to sync.

* Go to **Settings → Share Metafields**
* Make sure **Enable** is checked
* Under **Allow data**, add the metafield definition in this format:\
  `namespace.key`\
  Example: `custom.material`&#x20;

<figure><img src="/files/8XwBS1uNZXujYvKS82qS" alt=""><figcaption></figcaption></figure>

3. **Unsupported metafield types**\
   Some metafield data types are not supported, such as **Reference types** or **MetaObjects**.

Red: Unsupported metafields that cannot be synced by the app

<figure><img src="/files/xSiwGg1eNEG9byCJQvq2" alt=""><figcaption></figcaption></figure>

4. **Mismatched metafield types between stores**\
   The metafield in your Source and Destination must have **the same data type and structure**.\
   Common mismatches include:

* One metafield is **Single line text**, while the other is **Multi-line text**.
* One metafield uses **Single value**, while the other uses **List of values**.

To fix these issues, confirm that metafields in both stores have the same **namespace**, **key**, and **data type**, then try syncing again.

***

**🙋 Still need support?**

If you still need help, please feel free to contact us at <hi@tipo.io>. We’ll be happy to assist you further.


# Price sync & adjustments

The app allows you sync products and product price from Source store to Destination store.

### ✅ When should you use price adjustment?

Use this feature if you want the Destination store price to be **different from Source**, for example:

* Different countries / markets need different pricing
* Extra shipping/taxes in one store
* Different margin for wholesale vs retail
* Currency differences (when you manage pricing by rules)

***

#### 🛠️ **Step to manage**

**New connection:**

Before connecting, check and select the product information you want to sync [here. ](https://tipo.io/index.php/kb/sync-specific-product-fields/)

1. &#x20;Open the app in **Destination** store  > click **Settings** > **Product Fields to Synchronize** > select **Sync** option for **Price**

<figure><img src="/files/Wnq6JtbSi3KI6iN3Kqqz" alt=""><figcaption></figcaption></figure>

2. Click **Stores** on the left menu of the app > click **Connect store** button

<figure><img src="/files/yolZ0fjY9Xfa1uVAQt6u" alt=""><figcaption></figcaption></figure>

3. Enter the **Connection Code** obtained from the **Source Store** (found under the app’s **Settings** in the Source Store)

<figure><img src="/files/mcZ1Ql7wUreWKNoKgS9F" alt=""><figcaption></figcaption></figure>

**For an running connection:** Go to the **Destinations** store, open the app > click **Stores** >  > click on the source store URL to open the connect detail

4. &#x20;Scroll down to **Price mapping & transformations** > set up the price and the **Adjustment value** if you need (optional)

<figure><img src="/files/XAiO6UAKyFNeBzZ99a9P" alt=""><figcaption></figcaption></figure>

5. Click **Save**

After the sync runs, please review the results to ensure prices are updated correctly.

If you make any changes to the price transformation rate in the connection settings, kindly let us know. Our development team will then recheck and re-run the sync to ensure your changes are properly applied.

***

### 🔄 Example 1: Increase Product Prices by 20%

<figure><img src="/files/xwwmYEB3N6CKAP2Vlepd" alt=""><figcaption></figcaption></figure>

#### Settings

<table><thead><tr><th width="285">Option</th><th>Value</th></tr></thead><tbody><tr><td>Destination Price mapping with</td><td>Source Price</td></tr><tr><td>Adjustment</td><td>Increase percentage</td></tr><tr><td>Adjustment value</td><td>20%</td></tr></tbody></table>

#### Source Store

| Product      | Price |
| ------------ | ----- |
| Summer Shirt | $100  |

#### Result

| Product      | Destination Price |
| ------------ | ----------------- |
| Summer Shirt | $120              |

Calculation:

```
$100 + (20% × $100)= $120
```

***

### 🔻 Example 2: Reduce Prices by 10%

<figure><img src="/files/Ug43jmtjOde4D0dqtgZL" alt=""><figcaption></figcaption></figure>

#### Settings

| Option                         | Value               |
| ------------------------------ | ------------------- |
| Destination Price mapping with | Source Price        |
| Adjustment                     | Decrease percentage |
| Adjustment value               | 10%                 |

#### Source Store

| Product      | Price |
| ------------ | ----- |
| Summer Shirt | $100  |

#### Result

| Product      | Destination Price |
| ------------ | ----------------- |
| Summer Shirt | $90               |

Calculation:

```
$100 - (10% × $100)= $90
```

***

### 💵 Example 3: Add a Fixed Amount

<figure><img src="/files/ZNXxaIfIVpNdVysux5pG" alt=""><figcaption></figcaption></figure>

#### Settings

| Option                         | Value                 |
| ------------------------------ | --------------------- |
| Destination Price mapping with | Source Price          |
| Adjustment                     | Increase fixed amount |
| Adjustment value               | $15                   |

#### Source Store

| Product      | Price |
| ------------ | ----- |
| Summer Shirt | $100  |

#### Result

| Product      | Destination Price |
| ------------ | ----------------- |
| Summer Shirt | $115              |

This is useful when every product needs the same additional fee, such as shipping or handling costs.

***

### 💵 Example 4: Currency Conversion

<figure><img src="/files/0ORCXtGXvlB017Ugdf0u" alt=""><figcaption></figcaption></figure>

Suppose:

| Store             | Currency |
| ----------------- | -------- |
| Source Store      | GBP      |
| Destination Store | USD      |

Exchange Rate:

```
1 GBP = 1.25 USD
```

#### Settings

| Option                         | Value               |
| ------------------------------ | ------------------- |
| Destination Price mapping with | Source Price        |
| Adjustment                     | Increase percentage |
| Adjustment value               | 25%                 |

#### Source Product

| Price |
| ----- |
| £80   |

#### Result

| Destination Price |
| ----------------- |
| $100              |

Calculation:

```
£80 × 1.25= $100
```

This helps maintain similar pricing value between stores using different currencies.

***

### 💵 Example 5: Price Rounding

Price rounding adjusts the final price after calculations.

#### Settings

| Price Rounding |
| -------------- |
| 0.95           |

#### Before Rounding

```
$125.27
```

#### After Rounding

```
$124.95
```

This is commonly used to create cleaner retail pricing.

***

### 📊 Example: Complete Price Transformation

#### Source Store

| Price | Compare-at Price | Cost |
| ----- | ---------------- | ---- |
| $100  | $120             | $60  |

#### Settings

| Field            | Adjustment    |
| ---------------- | ------------- |
| Price            | Increase 20%  |
| Compare-at Price | No Adjustment |
| Cost             | Increase 10%  |

#### Result

| Field            | Destination Value |
| ---------------- | ----------------- |
| Price            | $120              |
| Compare-at Price | $120              |
| Cost             | $66               |

**🙋 Still need support?**

If you still need help, please feel free to contact us at <hi@tipo.io>. We’ll be happy to assist you further.

&#x20;


# Manually push sync

Manual push is helpful when you don’t want to wait for the next automatic sync or when you just changed settings and want to test immediately.

### ✅ When should you use “Manual push”?

* want to test sync with a few products right away
* &#x20;just edited product data in the Source store and want updates immediately
* &#x20;just changed sync settings (price rules, metafields, product selection…)
* need to re-run sync after fixing an issue

***

⏱️ How long does sync take?

Tipo app doesn’t sync instantly. It runs on a schedule:

* The app syncs in **30-minute blocks**
* Any products created or updated during that time will be included in the next sync run

#### Example

If you update a product title in the Source store:

1. Save the change in Shopify
2. Wait up to 30 minutes
3. Check the same product in the Destination store to see the updated title

✅ Tip: If you need changes to appear sooner, use Manual push sync to run sync immediately.

***

### 🛠️ Steps to manually sync again

1\. Go to the **Destinations** store, open the app Dashboard > click **Stores** > click **Products** icon to see the synced product list of the connection

<figure><img src="/files/MWBCDRb2n5FXJ2ytfeUI" alt=""><figcaption></figcaption></figure>

2\. Select the products you want to sync. Select **Select all 25+ products** if you want to select all products in the list

3\. Click **Sync** button on the right side

<figure><img src="/files/6ZcQdKUFkrxGsT4Ofh3B" alt=""><figcaption></figcaption></figure>

Then the sync is running again. Check again if the changes you made is updated on the Destination store.

**Note**: if you make any change to the app settings (like change to another setting option in the app settings), please contact the support team and we will help you push sync or make sure the setting is applied correctly

***

**🙋 Still need support?**

If you still need help, please feel free to contact us at <hi@tipo.io>. We’ll be happy to assist you further.


# View detail of map products

This guide explains how to view **mapped products** in Tipo app, so you can confirm which Source product is linked to which Destination product, and quickly troubleshoot sync issues (wrong match, duplicates, missing updates).

### 📍 Where to find “Mapped products”

Go to the **Destinations** store, open the app > click **Stores** > click **Products** to see the synced product list of the connection

Click the eye icon to view the sync detail of the product

<figure><img src="/files/MWBCDRb2n5FXJ2ytfeUI" alt=""><figcaption></figcaption></figure>

<figure><img src="/files/7yAINdSsZ1pnSINt1g4U" alt=""><figcaption></figcaption></figure>

<figure><img src="/files/SIIMvcaji0Atfpit0sCo" alt=""><figcaption></figcaption></figure>

<figure><img src="https://tipo.io/wp-content/uploads/2022/12/2025-04-16_17-05-25-1024x708.png" alt=""><figcaption></figcaption></figure>

In the mapped products list, you can verify:

* Which Source product is linked to which Destination product
* &#x20;Mapping status (mapped / not mapped / error)
* 🔎 Search specific products to confirm they are linked correctly

***

**🙋 Still need support?**

If you still need help, please feel free to contact us at <hi@tipo.io>. We’ll be happy to assist you further.


# Check current sync status

This guide shows how to check whether sync is running correctly and what each sync status means so you can quickly confirm if products are syncing from Source → Destination.

The sync product list shows in the app in both Source store and Destination store.

#### **In Source store**

Open the app **Dashboard** > click **Stores** > Click **Products** icon to see the synced product list of the connection.

You can search products based on the product title, vendor or type. Filter  by the newest or oldest created/update.

<figure><img src="/files/6EmPtUJ8B4N5UDASdKnE" alt=""><figcaption></figcaption></figure>

<figure><img src="/files/WThb675NllgmM9vwh9Ed" alt=""><figcaption></figcaption></figure>

***

#### **In Destination store**

Open the app Dashboard > click **Products** to see the synced product list of the connection.

<figure><img src="/files/MWBCDRb2n5FXJ2ytfeUI" alt=""><figcaption></figcaption></figure>

In Destinations store, you can view the mapping detail by clicking the **eye** icon. The product title and inventory are available here

<figure><img src="/files/7yAINdSsZ1pnSINt1g4U" alt=""><figcaption></figcaption></figure>

\
**🙋 Still need support?**

If you still need help, please feel free to contact us at <hi@tipo.io>. We’ll be happy to assist you further.


# Unsync products

This guide explains how to **unsync** products between your **Source store** and **Destination store**. Unsyncing removes the link (mapping) so the product will no longer receive updates from the Source store.

### ❓ What happens when you unsync?

When you unsync a product:

* The mapping between Source and Destination is removed
* Future updates from Source will no longer apply to that product in Destination
* The product may remain in the Destination store

***

### 🛠️ **Steps to unsync specific product**&#x20;

1\. Go to the **Destinations** store, open the app Dashboard > click **Stores** > click **Products** to see the synced product list of the connection

<figure><img src="/files/MWBCDRb2n5FXJ2ytfeUI" alt=""><figcaption></figcaption></figure>

2\. Click this icon to  stop sync for each product

<figure><img src="/files/c4SnxxR3lccsZOSiXWhb" alt=""><figcaption></figcaption></figure>

3\. For bulk action: select the products you want to sync. Select **Select all 25+ products** if you want to select all products in the list > click **Unsync** button on the right side

<figure><img src="/files/zjCpnPrnMXgDLX3vBu5t" alt=""><figcaption></figcaption></figure>

After unsyncing, these products will be marked as **Manually Excluded**, indicating they are no longer synchronized with the Source Store.​

<figure><img src="/files/UtewojW6Z2lcnLsxGuix" alt=""><figcaption></figcaption></figure>

<figure><img src="https://tipo.io/wp-content/uploads/2024/11/2025-04-11_16-22-46-1024x674.png" alt=""><figcaption></figcaption></figure>

If you want to continue the sync again,  select the products again and click **Sync** button instead of **Unsync** button.

**📝 Note**

> **Unsyncing does not delete the product.**\
> It only stops future updates from the **Source store** from syncing to the **Destination store**. The product will still remain in your Destination store unless you manually delete it.

***

#### 🙋 Still need support?

If you still need help, please feel free to contact us at **\[your support email or link]**. We’ll be happy to assist you further.


# Map locations for inventory sync

This guide shows you how to map Shopify locations between your Source and Destination stores so inventory sync works correctly.

To make sure your inventory quantities are always accurate, online orders and in-person sales are assigned to [locations](https://help.shopify.com/en/manual/locations).

### ✅ Why location mapping is required

Shopify tracks inventory by **location** (warehouse, retail store, fulfillment center).\
To sync inventory accurately, Tipo Sync needs to know:

Which **Source location** should sync to which **Destination location**.

Without mapping:

* inventory may not sync
* inventory may sync to the wrong location
* stock can look incorrect in the Destination store

### 🛠️ **Step 1: Decide locations to sync for Source store**&#x20;

1\. Open the app in **Source** store > click **Settings**

2\. Scroll down to **Locations** part, and select one of the 2 options below:

* **All locations**: products available in all locations of your store will be synced with the Destination store
* **Specific locations**: only the products in the selected location(s) is updated when there are changes in the Destination store

3\. Click **Save**

<figure><img src="/files/Zaqs29WS6az2cZsXnnKN" alt=""><figcaption></figcaption></figure>

***

### 🛠️ Step 2: Map locations when connecting 2 stores

1\. Open the app in Source store > click **Stores** > click **Get connect code** button  > copy the connect code on the popup

<figure><img src="/files/4nz6tkHQlmvwcyftl5uV" alt=""><figcaption></figcaption></figure>

2\. Go to the **Destination** store open the Tipo Multi-store app > click **Stores** >  click **Connect** **Store** button

3\. Enter the connect key (get the key from app Dashboard in Source store)

<figure><img src="/files/raQf7Wz1rqkD3lffGpdi" alt=""><figcaption></figcaption></figure>

4. Select the products you want to sync and complete the setting in the connection detail
5. Scroll down to Mapping **locations** section and select locations to map between stores

On the mapping screen, you’ll see:

* Source store locations (left)
* Destination store locations (right)

<figure><img src="/files/pb2QpafDov7vDCaQbXW7" alt=""><figcaption></figcaption></figure>

<figure><img src="/files/71zIOuqSxwl6NQNf5nZ0" alt=""><figcaption></figcaption></figure>

**Note**: Currently our app only syncs 1 location from to Source store to 1 location from Destination store.  It is not possible to map one location from Source store to 2 locations in Destination store

5. &#x20;Click **Save**&#x20;

The sync will be run immediately. It may take for while to complete.

***

### ✅ What happens after mapping

Once mapping is saved, the app will

* Update inventory only at the locations you mapped in the connection
* Ignore locations that are not mapped

<figure><img src="/files/2e3jkHf1C5rs9uHZLEe5" alt=""><figcaption></figcaption></figure>

> **Important: One-to-One Mapping**
>
> Each location can only be mapped to one corresponding location.

✅ Supported:

| Source store | Destination store |
| ------------ | ----------------- |
| Warehouse A  | Warehouse A       |

❌ Not supported:

| Source store | Destination store |
| ------------ | ----------------- |
| Warehouse A  | Warehouse A       |
| Warehouse A  | Warehouse B       |

A single source location cannot sync inventory to multiple destination locations.

### **🧪** Example

Suppose both stores have the following locations:

| Source Store       | Destination Store  |
| ------------------ | ------------------ |
| My Custom Location | My Custom Location |
| Shop location      | Shop location      |

And the mapping is configured as:

| Destination Store  | Source Store       |
| ------------------ | ------------------ |
| My Custom Location | My Custom Location |
| Shop location      | Shop location      |

<figure><img src="/files/4H5odTEuiUEh92JxAqcU" alt=""><figcaption></figcaption></figure>

#### Example 1: One-Way Inventory Sync

Sync direction: Source Store → Destination Store

Before sync

**Source Store**

| Location           | Available |
| ------------------ | --------- |
| My Custom Location | 10,000    |
| Shop location      | 0         |

**Destination Store**

| Location           | Available |
| ------------------ | --------- |
| My Custom Location | 5         |
| Shop location      | 100       |

After sync

**Destination Store**

| Location           | Available |
| ------------------ | --------- |
| My Custom Location | 10,000    |
| Shop location      | 0         |

Because inventory is synced from the Source Store to the Destination Store, the destination inventory is updated to match the mapped source locations.

***

#### Example 2: Two-Way Inventory Sync

Sync direction: Source Store ↔ Destination Store

Assume the locations are mapped as:

| Destination Store  | Source Store       |
| ------------------ | ------------------ |
| My Custom Location | My Custom Location |
| Shop location      | Shop location      |

**Scenario A: Sale in Source Store**

Before sale:

| Location           | Source Store | Destination Store |
| ------------------ | ------------ | ----------------- |
| My Custom Location | 10,000       | 10,000            |

A customer purchases 1 item in the Source Store.

After Shopify updates inventory:

| Location           | Source Store |
| ------------------ | ------------ |
| My Custom Location | 9,999        |

Tipo Sync then updates the mapped location in the Destination Store:

| Location           | Destination Store |
| ------------------ | ----------------- |
| My Custom Location | 9,999             |

Result: Both stores remain synchronized.

***

**Scenario B: Sale in Destination Store**

Before sale:

| Location           | Source Store | Destination Store |
| ------------------ | ------------ | ----------------- |
| My Custom Location | 10,000       | 10,000            |

A customer purchases 1 item in the Destination Store.

After Shopify updates inventory:

| Location           | Destination Store |
| ------------------ | ----------------- |
| My Custom Location | 9,999             |

Tipo Sync then updates the mapped location in the Source Store:

| Location           | Source Store |
| ------------------ | ------------ |
| My Custom Location | 9,999        |

Result: Both stores remain synchronized.

***

#### Example 3: Unmapped Locations Are Ignored

Suppose only **My Custom Location** is mapped.

| Destination Store  | Source Store       |
| ------------------ | ------------------ |
| My Custom Location | My Custom Location |

**Shop location** is not mapped.

#### Source Store

| Location           | Available |
| ------------------ | --------- |
| My Custom Location | 10,000    |
| Shop location      | 500       |

#### Destination Store

| Location           | Available |
| ------------------ | --------- |
| My Custom Location | 10,000    |
| Shop location      | 100       |

After inventory sync:

| Location           | Result     |
| ------------------ | ---------- |
| My Custom Location | Synced     |
| Shop location      | Not synced |

The inventory at **Shop location** remains unchanged because it is not included in the location mapping.

***

### ▶️ A Tutorial video <a href="#a-tutorial-video" id="a-tutorial-video"></a>

{% embed url="<https://youtu.be/VH43AzCzmJ8>" %}

***

**🙋 Still need support?**

If you still need help, please feel free to contact us at <hi@tipo.io>. We’ll be happy to assist you further.


# Sync product inventory only

This guide explains how to sync inventory quantity only from your Source store to your Destination store without changing other product data like price, images, or description.

### ✅ What does “Inventory only sync” mean?

Tipo Sync will:

* Update stock quantity (available units) in your stores
* Sync inventory based on your location mapping
* ❌ Not update product content  (description, images)
* ❌ Not update pricing (unless you enable price sync separately)

This is ideal if your stores share the same products, but you only want to keep stock levels consistent.

***

### 🛠️ Select which product information to sync

1. Open the app S**ettings** on destination store > **Product Fields to Synchronize**
2. Select option **Ignore** for the product data you do not want to sync

**Ignore**: The field will not be synchronized; it remains independent in the Destination Store.

3. Click **Save**

<figure><img src="/files/JIwkcy27yDuO4KoGLEKK" alt=""><figcaption></figcaption></figure>

> Select option **Create only** for product **title** and **variant title**&#x20;
>
> Reason: Product title and variant title are required when syncing a new product from the Source Store to the Destination Store for the first time.

***

### 🛠️ **Enable inventory sync**

#### **In Source store:**&#x20;

Open the app in **Source** store > click **Settings** > select one of the 2 inventory settings > **Save**

* **One-Way Inventory Sync**: Syncs inventory changes from the Source Store to the Destination Store only.​
* **Two-Way Inventory Sync**: Allows inventory changes from both stores to sync with each other.

<figure><img src="/files/1VY6SoV8gRkgHXQuBZ2c" alt=""><figcaption></figcaption></figure>

#### **In Destination store:**

1\. Open the app in Destination store > create a new connection or check the current connection

<figure><img src="/files/JokLKDGBjML49dFePwiI" alt=""><figcaption></figcaption></figure>

2\. In **Matching & Imports** part, select one of the product sync rules

| If you want to...                   | Recommended Option |
| ----------------------------------- | ------------------ |
| Keep both stores fully synchronized | 🔄 Create & Update |
| Update existing products only       | 🔁 Update Only     |
| Import new products only            | ➕ Create Only      |

<figure><img src="/files/byYAcUaQvybUKw5WTHAT" alt=""><figcaption></figcaption></figure>

3\. Move to the **Products sync** setting in the connection detail,  select products need for syncing inventory and complete the connection.

<figure><img src="/files/uaUhb8qHUULrU0SkbVGI" alt=""><figcaption></figcaption></figure>

4. Click Save

***

### **🧪 Example: Syncing Product Inventory Only**

Stores:

* Source Store: `https://urbanwear-eu.myshopify.com`
* Destination Store: `https://urbanwear-us.myshopify.com`

Product Being Synced:

* Product Name: `Slim Fit Denim Jacket`
* Handle: `slim-fit-denim-jacket`
* This product **already exists** in both stores with the same handle and variants.

What is being synced?

✅ Only the inventory level is synced.

❌ Product details like title, description, price, images, etc. are NOT synced.

❌ No new product is created.

Before the Sync

| Store             | Product Handle        | Inventory Level |
| ----------------- | --------------------- | --------------- |
| Source Store      | slim-fit-denim-jacket | 50              |
| Destination Store | slim-fit-denim-jacket | 30              |

After an Order in the Source Store

* A customer buys 5 jackets from the Source Store
* New inventory in Source Store: 45

After the sync runs:

| Store             | Inventory Level |
| ----------------- | --------------- |
| Source Store      | 45              |
| Destination Store | **45** ✅        |

The inventory is updated in the Destination Store to match the Source.

***

### 🎬 Tutorial video

{% embed url="<https://youtu.be/H9GhYnRknXU>" %}

**🙋 Still need support?**

If you still need help, please feel free to contact us at <hi@tipo.io>. We’ll be happy to assist you further.


# Two-way inventory sync

This guide explains how Two-way Inventory Sync works in Tipo app  so inventory changes in either store can update the other store.

### ✅ What is Two-way Inventory Sync?

With **Two-way sync**, inventory can flow in both directions:

* If inventory changes in the **Source store** → it updates the **Destination store**
* If inventory changes in the **Destination store** → it updates the **Source store**

This helps keep stock consistent when you sell the same products in multiple stores.

***

### 🎯 When should you use it?

Use Two-way Inventory Sync if:

* you sell the same products in multiple stores
* both stores can create sales (or stock adjustments)
* you want inventory to stay aligned automatically

⚠️ If you want only one “master” store controlling inventory, use **One-way Inventory Sync** instead.

***

### 🛠️ **Steps to Set Up Two-Way Inventory Sync**

1\. Open the app in **Source** store > click **Settings >** turn on **Sync inventory and orders**

2. Select **Two-Way Inventory Sync**

3\. Click **Save**

<figure><img src="/files/1VY6SoV8gRkgHXQuBZ2c" alt=""><figcaption></figcaption></figure>

***

### ✅ How "Two-Way Inventory Sync" Works

#### ✅ What triggers a sync?

* **Sale** (order created)
* **Refund / cancellation**
* **Restock or manual adjustment**

A sync is triggered when inventory changes due to:

#### 🔗 How products are matched

**Stores**

* Source: `urbanwear-eu.myshopify.com`
* Destination: `urbanwear-us.myshopify.com`

**Product**

* Name: Slim Fit Denim Jacket
* Handle: `slim-fit-denim-jacket`

#### Scenario 1:  Sale in Destination store

**Before sale**

* Source: 50 units
* Destination: 50 units

Customer buys **5 units** in Destination.

**After sync**

* Source: ✅ 45 units
* Destination: ✅ 45 units

➡️ The decrease in Destination is reflected in Source.

***

#### Scenario 2: Restock in Source store

You restock **10 units** in Source.

**After sync**

* Source: ✅ 55 units
* Destination: ✅ 55 units

➡️ The increase in Source is reflected in Destination.&#x20;

***

### 🎬 Tutorial video

How to set:

{% embed url="<https://www.youtube.com/watch?v=3DGIp9wEgtg>" %}

How it works:

{% embed url="<https://youtu.be/b4gp_fQJh44>" %}

**🙋 Still need support?**

If you still need help, please feel free to contact us at <hi@tipo.io>. We’ll be happy to assist you further.


# One-Way Inventory Sync

One-Way Inventory Sync keeps inventory updated in **one direction only**:

&#x20;**Source store controls inventory** → **Destination store follows**

This is the safest option if you want one “master” store to manage stock.

### ✅ When should you use One-Way Sync?

Use this mode if:

* you manage inventory in one main store (Source)
* you want Destination stores to always match Source stock
* you don’t want Destination store sales/adjustments to change Source inventory

***

### ⚙️ **Steps to Set Up One-Way Inventory Sync**

#### **In Source store**

1\. Open the app in Source store > click **Settings** >  turn on **Sync inventory and orders**

2. Select **One-Way Inventory Sync**

3\. Click **Save**

<figure><img src="/files/5QyaL99g4TZFqKVn6GxI" alt=""><figcaption></figcaption></figure>

***

### ✅ How One-Way Inventory Sync works

When inventory changes in the **Source store** (sale, restock, manual adjustment), the app will:

1. Find the same product in Destination (matched by handle or SKU or barcode)
2. Apply the inventory update to the mapped Destination location
3. Update inventory in Destination to match Source

⇒ Destination can receive updates\
&#x20;⇒ Destination changes do **not** update Source

***

### 🧪 Example: Source updates Destination

&#x20;**One-Way Inventory Sync (Based on Product Handle)**

Let’s say you have two Shopify stores connected:

* ```
  Source Store: https://furniture-eu.myshopify.com
  ```
* ```
  Destination Store: https://furniture-us.myshopify.com
  ```

You are syncing a product called:

Product Name: Modern Oak Bookshelf\
Handle: `modern-oak-bookshelf`

| Store             | Inventory Before | Inventory After |
| ----------------- | ---------------- | --------------- |
| Source Store      | 20               | 15              |
| Destination Store | 20               | **15** ✅        |

When someone buys 5 units in the Source Store, the inventory in the Destination Store is automatically updated to match (15 left).

✅ This works because both products have the same handle: `modern-oak-bookshelf`.

&#x20;

**What Happens if Inventory Changes in the Destination Store?**

Let’s say a customer buys 2 units from the Destination Store.

| Store             | Inventory Before | Inventory After |
| ----------------- | ---------------- | --------------- |
| Destination Store | 15               | 13              |
| Source Store      | 15               | **15** ❌        |

In One-Way Sync, the Source Store is not affected. Inventory changes in the Destination Store do not sync back.

<br>

***

**🙋 Still need support?**

If you still need help, please feel free to contact us at <hi@tipo.io>. We’ll be happy to assist you further.


# Order sync

The **Inventory Sync, Multi store TP** app enables seamless synchronization of orders from your Destination Stores to your Source Store.

When **Order Sync** is enabled:

1. A customer places an order in the **Destination store**
2. Tipo app creates a matching order in the **Source store**

### ✅ What information is synced to the Source order

The order created in the Source store includes:

* &#x20;**Order number**
* **Customer information**
* **Product details** (only for products that are already synced/mapped)
* **Order tag** showing where it came from (example: `From: urbanwear-us`)

📌 **Note:** The tag helps you quickly identify which Destination store created the order.

***

#### ⚠️ Important considerations

**Product matching (required)**

For accurate order sync:

* Products should have consistent handles across stores
* Only synced products in the order will be synced

**Inventory behavior**

* Orders are synced to the Source store
* Inventory is typically synced **one-way: Source → Destination**\
  (So Destination sales may not reduce Source inventory automatically unless your inventory setup supports it.)

**Fulfillment & order updates (one-time sync)**

The app syncs the order only when it’s newly created.\
After the first sync:

* changes like fulfillment status or order status updates are not synced
* example: if you update the order status in Destination, it won’t update in Source

Payments & discounts (not synced)

* Payment/charge stays in the Destination store
* Discount information is not currently synced

***

Destination store:&#x20;

Order is created

<figure><img src="/files/1aIOlun74FyKTKqtt3sp" alt=""><figcaption></figcaption></figure>

Source store

A new order with the same information (customer, product) is automatically created too.  Our app adds custom tag to the synced order that includes: order ID from Destination store,  app name (multi\_store\_sync), destination store URL (xxx.myshopify.com)

Email notification is sent to admin of Source store.

<figure><img src="/files/npWBHcuejgY3p0kEHfBO" alt=""><figcaption></figcaption></figure>

***

### 🛠️ Setting up Order sync in Source store

1\. In **Source** stores, open the app > click **Settings** > turn on **Sync inventory and orders**

2\.  Select **Order Sync and One-Way Inventory Sync**

<figure><img src="/files/ahaTyQRUEEwTmrkiVov9" alt=""><figcaption></figcaption></figure>

3\. Control how the order data display in Source store: select Payment status, edit Order name, The behaviors to use when updating inventory

4\. Scroll to **Email notifications** part > turn on Order Notification (optional)

<figure><img src="/files/srPmaf7GvREinXIYud7s" alt=""><figcaption></figcaption></figure>

5\. Click **Save**

***

### 🛠️ Create connection in Destination store

Guide [here](https://tipo.io/index.php/kb/general-steps-to-connect-stores/)

***

### 🧪 Example Scenario

Stores:

* Source Store: `https://urbanwear-eu.myshopify.com`
* Destination Store: `https://urbanwear-us.myshopify.com`

**Process**:

1. A customer places an order for a “Slim Fit Denim Jacket” in the Destination Store.​
2. Tipo automatically creates a corresponding order in the Source Store, tagged as “From: urbanwear-us”.​

***

**🙋 Still need support?**

If you still need help, please feel free to contact us at <hi@tipo.io>. We’ll be happy to assist you further.<br>


# Draft order sync

Draft Order Sync helps you keep draft orders aligned between stores. When enabled, draft order information created in a **Destination store** can be synced to the **Source store** (based on your settings), so your team can review/manage orders centrally.

### 🔄 How Draft Order Sync works

When Draft Order Sync is enabled:

1. A draft order is created/updated in the **Destination store**
2. Tipo app syncs the draft order information to the **Source store**
3. The synced record may include a tag showing where it came from (so you can identify the origin store)

This helps you keep Source store updated without manually copying draft order details.

***

### ✅ What information is synced

Typically synced draft order data includes:

* Customer information
* Products and quantities
* Draft order notes / tags (origin tag if enabled)

#### Requirements

* Products must be mapped between the source and destination stores.
* Draft order sync option must be enabled in app settings.

***

### ⚙️ How to enable Draft Order Sync

1. Open the app in Source store > click **Settings >** turn on **Sync Inventory and Orders**
2. Select **Draft Order Sync and One-Way Inventory Sync**&#x20;
3. Select **Yes** to send an invoice of the draft order **(optional)**
4. Click **Save**

<figure><img src="/files/NUgv2YVjamEjR6e5qAoR" alt=""><figcaption></figcaption></figure>

***

### 🧪 Example

You have two stores:

* **Source store**: `mainbrand.myshopify.com`
* **Destination store**: `eu-brand.myshopify.com`

A customer orders in store `eu-brand.myshopify.com`:

* 1x "Red T-Shirt"
* 2x "Blue Hoodie"

If both products exist and are mapped in the source store, the app will:

* Create a draft order in `mainbrand.myshopify.com`
* Include "Red T-Shirt" and "Blue Hoodie" with the correct quantities

***

**🙋 Still need support?**

If you still need help, please feel free to contact us at <hi@tipo.io>. We’ll be happy to assist you further.


# Map locations for inventory sync

This guide shows you how to map Shopify locations between your Source and Destination stores so inventory sync works correctly.

To make sure your inventory quantities are always accurate, online orders and in-person sales are assigned to [locations](https://help.shopify.com/en/manual/locations).

### ✅ Why location mapping is required

Shopify tracks inventory by **location** (warehouse, retail store, fulfillment center).\
To sync inventory accurately, Tipo Sync needs to know:

Which **Source location** should sync to which **Destination location**.

Without mapping:

* inventory may not sync
* inventory may sync to the wrong location
* stock can look incorrect in the Destination store

### 🛠️ **Step 1: Decide locations to sync for Source store**&#x20;

1\. Open the app in **Source** store > click **Settings**

2\. Scroll down to **Locations** part, and select one of the 2 options below:

* **All locations**: products available in all locations of your store will be synced with the Destination store
* **Specific locations**: only the products in the selected location(s) is updated when there are changes in the Destination store

3\. Click **Save**

<figure><img src="/files/UJQ7lnUEO3C26BzXmdOh" alt=""><figcaption></figcaption></figure>

***

### 🛠️ Step 2: Map locations when connecting 2 stores

1\. Open the app in Source store > click **Stores** > click **Get connect code** button  > copy the connect code on the popup

<figure><img src="/files/Z8RQZDZ7CgnYztTObbUS" alt=""><figcaption></figcaption></figure>

2\. Go to the **Destination** store open the Tipo Multi-store app > click **Stores** >  click **Connect** **Store** button

<figure><img src="/files/yolZ0fjY9Xfa1uVAQt6u" alt=""><figcaption></figcaption></figure>

3\. Enter the connect key (get the key from app Dashboard in Source store)

<figure><img src="/files/raQf7Wz1rqkD3lffGpdi" alt=""><figcaption></figcaption></figure>

4. Select the products you want to sync and complete the setting in the connection detail
5. Scroll down to Mapping **locations** section and select locations to map between stores

On the mapping screen, you’ll see:

* Source store locations (left)
* Destination store locations (right)

<figure><img src="/files/pb2QpafDov7vDCaQbXW7" alt=""><figcaption></figcaption></figure>

<figure><img src="/files/71zIOuqSxwl6NQNf5nZ0" alt=""><figcaption></figcaption></figure>

**Note**: Currently our app only syncs 1 location from to Source store to 1 location from Destination store.  It is not possible to map one location from Source store to 2 locations in Destination store

5. &#x20;Click **Save**&#x20;

The sync will be run immediately. It may take for while to complete.

***

### ✅ What happens after mapping

Once mapping is saved, the app will

* Update inventory only at the locations you mapped in the connection
* Ignore locations that are not mapped

<figure><img src="/files/2e3jkHf1C5rs9uHZLEe5" alt=""><figcaption></figcaption></figure>

> **Important: One-to-One Mapping**
>
> Each location can only be mapped to one corresponding location.

✅ Supported:

| Source store | Destination store |
| ------------ | ----------------- |
| Warehouse A  | Warehouse A       |

❌ Not supported:

| Source store | Destination store |
| ------------ | ----------------- |
| Warehouse A  | Warehouse A       |
| Warehouse A  | Warehouse B       |

A single source location cannot sync inventory to multiple destination locations.

### **🧪** Example

Suppose both stores have the following locations:

| Source Store       | Destination Store  |
| ------------------ | ------------------ |
| My Custom Location | My Custom Location |
| Shop location      | Shop location      |

And the mapping is configured as:

| Destination Store  | Source Store       |
| ------------------ | ------------------ |
| My Custom Location | My Custom Location |
| Shop location      | Shop location      |

<figure><img src="/files/4H5odTEuiUEh92JxAqcU" alt=""><figcaption></figcaption></figure>

#### Example 1: One-Way Inventory Sync

Sync direction: Source Store → Destination Store

Before sync

**Source Store**

| Location           | Available |
| ------------------ | --------- |
| My Custom Location | 10,000    |
| Shop location      | 0         |

**Destination Store**

| Location           | Available |
| ------------------ | --------- |
| My Custom Location | 5         |
| Shop location      | 100       |

After sync

**Destination Store**

| Location           | Available |
| ------------------ | --------- |
| My Custom Location | 10,000    |
| Shop location      | 0         |

Because inventory is synced from the Source Store to the Destination Store, the destination inventory is updated to match the mapped source locations.

***

#### Example 2: Two-Way Inventory Sync

Sync direction: Source Store ↔ Destination Store

Assume the locations are mapped as:

| Destination Store  | Source Store       |
| ------------------ | ------------------ |
| My Custom Location | My Custom Location |
| Shop location      | Shop location      |

**Scenario A: Sale in Source Store**

Before sale:

| Location           | Source Store | Destination Store |
| ------------------ | ------------ | ----------------- |
| My Custom Location | 10,000       | 10,000            |

A customer purchases 1 item in the Source Store.

After Shopify updates inventory:

| Location           | Source Store |
| ------------------ | ------------ |
| My Custom Location | 9,999        |

Tipo Sync then updates the mapped location in the Destination Store:

| Location           | Destination Store |
| ------------------ | ----------------- |
| My Custom Location | 9,999             |

Result: Both stores remain synchronized.

***

**Scenario B: Sale in Destination Store**

Before sale:

| Location           | Source Store | Destination Store |
| ------------------ | ------------ | ----------------- |
| My Custom Location | 10,000       | 10,000            |

A customer purchases 1 item in the Destination Store.

After Shopify updates inventory:

| Location           | Destination Store |
| ------------------ | ----------------- |
| My Custom Location | 9,999             |

Tipo Sync then updates the mapped location in the Source Store:

| Location           | Source Store |
| ------------------ | ------------ |
| My Custom Location | 9,999        |

Result: Both stores remain synchronized.

***

#### Example 3: Unmapped Locations Are Ignored

Suppose only **My Custom Location** is mapped.

| Destination Store  | Source Store       |
| ------------------ | ------------------ |
| My Custom Location | My Custom Location |

**Shop location** is not mapped.

#### Source Store

| Location           | Available |
| ------------------ | --------- |
| My Custom Location | 10,000    |
| Shop location      | 500       |

#### Destination Store

| Location           | Available |
| ------------------ | --------- |
| My Custom Location | 10,000    |
| Shop location      | 100       |

After inventory sync:

| Location           | Result     |
| ------------------ | ---------- |
| My Custom Location | Synced     |
| Shop location      | Not synced |

The inventory at **Shop location** remains unchanged because it is not included in the location mapping.

***

### ▶️ A Tutorial video <a href="#a-tutorial-video" id="a-tutorial-video"></a>

{% embed url="<https://youtu.be/VH43AzCzmJ8>" %}

***

**🙋 Still need support?**

If you still need help, please feel free to contact us at <hi@tipo.io>. We’ll be happy to assist you further.


# Manage Destination stores

This guide shows how to view and manage all Destination stores connected to your Source store in Tipo app.

### ✅ Check destination store list

Open the app in Source store > app Dashboard > you will see the list of Destination stores that are connected to your Source store.

Click **Products** to view the synced products

<figure><img src="/files/ypboBaySMN4JTRgf0vW8" alt=""><figcaption></figcaption></figure>

<figure><img src="/files/bIA3Sqno7saZCNy3KcOk" alt=""><figcaption></figcaption></figure>

***

### 🚫 Disconnect a destination store

Open the app in **Source** store > click **Stores** >  click disconnect icon next to the store you want > The connect is removed immediately.

<figure><img src="/files/USuTgpmNeLaFDvANkxPo" alt=""><figcaption></figcaption></figure>

Then do the same in the app on Destination store.

**🙋 Still need support?**

If you still need help, please feel free to contact us at <hi@tipo.io>. We’ll be happy to assist you further.


# Order sync

The **Inventory Sync, Multi store TP** app enables seamless synchronization of orders from your Destination Stores to your Source Store.

When **Order Sync** is enabled:

1. A customer places an order in the **Destination store**
2. Tipo app creates a matching order in the **Source store**

### ✅ What information is synced to the Source order

The order created in the Source store includes:

* &#x20;**Order number**
* **Customer information**
* **Product details** (only for products that are already synced/mapped)
* **Order tag** showing where it came from (example: `From: urbanwear-us`)

📌 **Note:** The tag helps you quickly identify which Destination store created the order.

***

#### ⚠️ Important considerations

**Product matching (required)**

For accurate order sync:

* Products should have consistent handles across stores
* Only synced products in the order will be synced

**Inventory behavior**

* Orders are synced to the Source store
* Inventory is typically synced **one-way: Source → Destination**\
  (So Destination sales may not reduce Source inventory automatically unless your inventory setup supports it.)

**Fulfillment & order updates (one-time sync)**

The app syncs the order only when it’s newly created.\
After the first sync:

* changes like fulfillment status or order status updates are not synced
* example: if you update the order status in Destination, it won’t update in Source

Payments & discounts (not synced)

* Payment/charge stays in the Destination store
* Discount information is not currently synced

***

Destination store:&#x20;

Order is created

<figure><img src="/files/1aIOlun74FyKTKqtt3sp" alt=""><figcaption></figcaption></figure>

Source store

A new order with the same information (customer, product) is automatically created too.  Our app adds custom tag to the synced order that includes: order ID from Destination store,  app name (multi\_store\_sync), destination store URL (xxx.myshopify.com)

Email notification is sent to admin of Source store.

<figure><img src="/files/npWBHcuejgY3p0kEHfBO" alt=""><figcaption></figcaption></figure>

***

### 🛠️ Setting up Order sync in Source store

1\. In **Source** stores, open the app > click **Settings** > turn on **Sync inventory and orders**

2\.  Select **Order Sync and One-Way Inventory Sync**

<figure><img src="/files/ahaTyQRUEEwTmrkiVov9" alt=""><figcaption></figcaption></figure>

3\. Control how the order data display in Source store: select Payment status, edit Order name, The behaviors to use when updating inventory

4\. Scroll to **Email notifications** part > turn on Order Notification (optional)

<figure><img src="/files/srPmaf7GvREinXIYud7s" alt=""><figcaption></figcaption></figure>

5\. Click **Save**

***

### 🛠️ Create connection in Destination store

Guide [here](https://tipo.io/index.php/kb/general-steps-to-connect-stores/)

***

### 🧪 Example Scenario

Stores:

* Source Store: `https://urbanwear-eu.myshopify.com`
* Destination Store: `https://urbanwear-us.myshopify.com`

**Process**:

1. A customer places an order for a “Slim Fit Denim Jacket” in the Destination Store.​
2. Tipo automatically creates a corresponding order in the Source Store, tagged as “From: urbanwear-us”.​

***

**🙋 Still need support?**

If you still need help, please feel free to contact us at <hi@tipo.io>. We’ll be happy to assist you further.<br>


# Manually approve Destination store

If your Source store uses **Moderation mode**, connection requests from Destination stores will not be accepted automatically. This guide shows how to review and approve a Destination store connection manually.

### 🔎 When do I need to approve a request?

You need to approve a connection when:

* the Source store connection status is set to **Moderation.** Go to **Source** store > open the app > go to app **Settings**
* a Destination store has sent a connection request
* the request is waiting in **Pending** state

✅ If your Source store is set to **Auto-accept**, you do not need this step.

<figure><img src="/files/FpiBXONsABuc0TxdBwWp" alt=""><figcaption></figcaption></figure>

<figure><img src="https://tipo.io/wp-content/uploads/2024/04/2024-04-08_16-51-44-1024x745.png" alt=""><figcaption></figcaption></figure>

***

### 📍 Where to find and approve the connection requests

1. Open Shopify Admin in the **Source store** > open the Tipo app
2. Go to **Stores** section of the app > new connection requests stay in “pending”
3. You must approve them in the Source store before syncing starts

<figure><img src="/files/oZhIOqY8wrxIyLssEhE0" alt=""><figcaption></figcaption></figure>

&#x20;

***

**🙋 Still need support?**

If you still need help, please feel free to contact us at <hi@tipo.io>. We’ll be happy to assist you further.


# Set up inventory and order sync

* Inventory syncing rules
* Order syncing behavior (Destination → Source)

Use these settings when you want the Source store to control:

This guide explains where to enable and manage **Inventory Sync** and **Order Sync** from the **Source store** settings.

#### 🛠️ Set up inventory & order sync in Source store <a href="#step-1-install-the-app-and-select-store-types" id="step-1-install-the-app-and-select-store-types"></a>

1. Open the app in **Source** store > click **Settings**
2. In **Sync Inventory and Orders**, enable the section and select **one** strategy

* ➡️ One-Way Inventory Sync\
  Sync inventory from Source → Destination store(s) only.
* **🔁 Two-Way Inventory Syn**c\
  Sync inventory both ways. Changes in either store update the other store.
* 🧾 **Draft Order Sync + One-Way Inventory Sync**\
  If an order is created in a Destination store (for synced products), the app will create a draft order in the Source store.\
  Inventory still syncs Source → Destination.
* 🛒 **Order Sync + One-Way Inventory Sync**\
  If an order is created in a Destination store (for synced products), the app will create a real order in the Source store.\
  Inventory still syncs Source → Destination.

<figure><img src="/files/S9Vak7KwPUOv48rrNFhe" alt=""><figcaption></figcaption></figure>

3. Click **Save**

***

### 🔄 How synchronization works

#### Inventory synchronization

* **Product matching:** The app matches products using the identifier you selected (for example: Handle, SKU, or Barcode).\
  Make sure that identifier is the same in every store.
* **Location sync:** Inventory is updated based on your location setup.\
  Best practice: use the same location names in Source and Destination, or map locations if your setup supports it.
* **Sync direction:**
  * ➡️ **One-way:** Source → Destination only
  * 🔁 **Two-way:** Source ↔ Destination (updates from either side)

#### Order synchronization

* **Order importing:** Orders placed in Destination store(s) can be imported into the Source store (as a draft order or a real order, depending on the option you choose).
* **Important:** Order sync usually happens only when the order is created. Later status changes (fulfillment/payment updates) is not sync.

#### **Reference:**&#x20;

[Two-way inventory sync](https://docs.tipo.io/inventory-sync/two-way-inventory-sync)

[One-Way Inventory Sync](https://docs.tipo.io/inventory-sync/one-way-inventory-sync)

[Order sync](https://docs.tipo.io/order-sync/order-sync)

[Draft order sync ](https://docs.tipo.io/order-sync/draft-order-sync)

***

**🙋 Still need support?**

If you still need help, please feel free to contact us at <hi@tipo.io>. We’ll be happy to assist you further.


# Email notification (Source store)

This guide explains how to set up email notifications for the Source store, so you (or your team) can receive alerts about sync activity and important events.

**Steps to manage**

1\. Open the app in Source store > click **Settings**

2\. Scroll down to **Email Notifications** > tick checkbox to set up email notification

* **Store Connected:**  Receive an email notification when a new store connects to your store
* **Store Disconnected:** Receive an email notification when a connected store disconnects from your store
* **Order Notification:** Receive an email notification when a destination store creates an order containing synchronized products

3\. Click **Save**

<figure><img src="/files/WrlasiA5ZgJnnIzge8eL" alt=""><figcaption></figcaption></figure>

Below is an example of a email sent from  the app.&#x20;

<figure><img src="/files/mXyDYrj9ADYpZ4nD2bWF" alt=""><figcaption></figcaption></figure>

***

**🙋 Still need support?**

If you still need help, please feel free to contact us at <hi@tipo.io>. We’ll be happy to assist you further.


# Sync pages and blogs

This guide explains how to allow **Destination stores** to sync content from your **Source store**, including:

* 📄 Pages
* ✍️ Blog posts (Articles)
* 🗂️ Blogs

***

### ✅ What this setting does

When enabled, Destination stores can pull content from the Source store so your storefront content stays consistent across stores.

Examples of content you may want to sync:

* About Us page
* Shipping / Returns pages
* Blog posts and announcements

***

### ⚙️ **Enable sync setting in Source store**

1. Open the app in **Source** store > click **Settings**
2. Scroll down to the bottom > turn on **Pages sync** and **Blogs sync**
3. Click save

<figure><img src="/files/QO14QfBg0031kQUocnPb" alt=""><figcaption></figcaption></figure>

After saving, Destination stores can start syncing the selected content types (based on your connection/setup).

***

### 🔄 How it works&#x20;

* The app copies the selected content from the **Source store** to the **Destination store(s)**
* Synced content is usually matched by a unique identifier (such as handle) so updates can be applied correctly
* If the Destination store doesn’t have the content yet, it may be created automatically (depending on the sync rules)

#### Matching & Imports

This setting controls how pages, blogs, and articles are imported and updated between connected stores.

<figure><img src="/files/byYAcUaQvybUKw5WTHAT" alt=""><figcaption></figcaption></figure>

#### **Option 1: Create & Update**

Create new items and update existing items with matching identifiers.

Use this option when you want to:

* Sync new pages, blogs, and articles to the destination store.
* Keep previously synced items up to date.

**Example**

Source Store:

* About Us
* Contact Us

Destination Store:

* About Us

Result:

* About Us is updated.
* Contact Us is created.

#### **Option2:  Update Only**

Only update existing items with matching identifiers.

Use this option when you want to:

* Update content that already exists in the destination store.
* Prevent new pages, blogs, or articles from being created.

**Example**

Source Store:

* About Us
* Contact Us

Destination Store:

* About Us

Result:

* About Us is updated.
* Contact Us is ignored because it does not already exist in the destination store.

***

#### **Create Only**

Only sync new items created after the connection setup.

Use this option when you want to:

* Automatically sync newly created pages, blogs, and articles.
* Leave existing content unchanged.

**Example**

Connection created on January 1.

Source Store:

* About Us (created before January 1)
* Summer Collection (created after January 1)

Result:

* Summer Collection is synced.
* About Us is ignored.
* Existing synced items are not updated.

***

### ⚠️ Important notes

* Content sync does not always include theme layout or styling, this depends on Shopify theme setup.
* If the Destination store already has a page/blog/article with the same handle, the app may update it to match Source (depending on sync settings).
* For best results, keep handles consistent across stores.

***

**🙋 Still need support?**

If you still need help, please feel free to contact us at <hi@tipo.io>. We’ll be happy to assist you further.&#x20;


# Collection sync

This guide explains how to enable **Collection Sync** so your **Destination store(s)** can receive collections from your **Source store**.

### ✅ What Collection Sync does

Note: this setting syncs the collection, not the products in the collection

* create collections that don’t exist in the Destination store
* update collections to match the Source store

***

### ⚙️ Enable collection sync in app Settings

1\. Open the app in Source store > click **Settings**

2\. Turn on **Share collections**

3\. Select collections you want to sync

* **All collections**: all products of all collections in your store will be synced with Destination store
* **Specific collections**: only products of selected collection(s) will be synced with Destination store

4\. Click **Save**

<figure><img src="/files/1mI8APMG8S6stYwsHDmf" alt=""><figcaption></figcaption></figure>

***

### ⚙️ Create connection in Destination store

Guide [here](https://tipo.io/index.php/kb/general-steps-to-connect-stores/)

***

### ✅ How the sync works?

Collection Sync follows the same logic as product sync:

1. The app checks collections in the Source store
2. It syncs those collections to the Destination store(s)
3. It includes products in the collection only if those products are synced/matched (based on your connection settings)

#### Matching & Imports

This setting controls how collections are synced between the Source Store and the Destination Store.

| Option          | Create New Collections   | Update Existing Collections |
| --------------- | ------------------------ | --------------------------- |
| Create & Update | ✅                        | ✅                           |
| Update Only     | ❌                        | ✅                           |
| Create Only     | ✅ (new collections only) | ❌                           |

#### Option 1: Create & Update

The app will:

* Create collections on the Destination store if they don’t already exist.
* Automatically update existing collections that share the same **handle** (URL path) as the Source.

**Example**

* Source collection: **Summer 2024**\
  Handle: `/collections/summer-2024`
* The app will:
  * Create the **Summer 2024** collection on the Destination store.
  * Keep syncing changes (e.g., title, description, products inside) from Source to Destination automatically.

Note: Any future updates you make to the "Summer 2024" collection in the Source store will also appear in the Destination store.

<figure><img src="/files/yDGhXAlh6l7bqxiHxsVP" alt=""><figcaption></figcaption></figure>

#### Option 2: Update Only

The app will:

* Not create new collections.
* Only update collections in the Destination store that already share the same handle with the Source.

**Example**

* Source collection: `/collections/summer-2024`
* Destination also has `/collections/summer-2024`\
  →  Updates will sync.
* Source has `/collections/spring-2025`, but Destination does **not**\
  →  No collection will be created or synced.

#### Option 3: Create Only

The app will:

* Only create and sync new collections that are added to the Source after the store connection was established.
* Existing collections in the destination store store will not be synced.

**Example**

| Collection        | Exists in Destination Store | Sync Result |
| ----------------- | --------------------------- | ----------- |
| Summer Collection | Yes                         | Ignored     |

***

<figure><img src="https://tipo.io/wp-content/uploads/2022/11/2024-04-11_15-46-01-1-1024x675.png" alt=""><figcaption></figcaption></figure>

**🙋 Still need support?**

If you still need help, please feel free to contact us at <hi@tipo.io>. We’ll be happy to assist you further. <br>


# General steps to connect stores

This guide shows how to connect two Shopify stores so Tipo Sync can sync products, inventory, and other data between them.

In Multi-store sync, you will connect:

* **Source store** (sends data)
* **Destination store** (receives data)

### 🛠️ Step 1: Install the app and select store types&#x20;

Before connecting, make sure Tipo Sync is installed on **both stores**.

Upon first accessing the app, you’ll be prompted to designate the store as either a Source or Destination. Choose the appropriate type for each store. For more information on store types, refer to [this guide](https://tipo.io/index.php/kb/general-steps-to-connect-stores/).

* Install the app on store 1 > select Source store type
* Install the app on store 2 > select Destination store type

<figure><img src="/files/sNVdAC9xyXL5f5hhRrZR" alt=""><figcaption></figcaption></figure>

<figure><img src="/files/817sq1aGxTuyU2U2os6D" alt=""><figcaption></figcaption></figure>

***

### 🛠️ **Step 2: Configure app settings**

After the app is installed in 2 stores,  check the app **Settings** in the app in both store and configure it to make sure it works as expected.

Source store:&#x20;

<figure><img src="/files/LnNiHnqNbkd8cKknm7sE" alt=""><figcaption></figcaption></figure>

Destination store&#x20;

Decide the product data you want to sync in app **Settings** in Destination store

<figure><img src="/files/BJdkHiJRAeLzwG4M4W6c" alt=""><figcaption></figcaption></figure>

***

### 🛠️ Step 3: Connect a Destination store to a Source store&#x20;

**Note**: Connections are initiated from the Destination store.

#### Get the connect code (in the Source store)

The **Source Store** is the store that sends products, inventory, collections, or other data.

1. Open the app in Source store > click **Stores**
2. Click **Get connect code** button&#x20;
3. Copy the connect code on the popup

<figure><img src="/files/88NnpxyEyMTmNZ62PRAP" alt=""><figcaption></figcaption></figure>

#### Use the connect code (in the Destination store)

The **Destination Store** is the store that receives synced data from the Source store.

1. Go to the **Destination** store > open the app&#x20;
2. Click **Stores** >  click **Connect** **Store** button
3. Paste the connection code from the Source store into the **Connection code** field

<figure><img src="/files/5QCX4nR44P5YtzEAkrUh" alt=""><figcaption></figcaption></figure>

<figure><img src="/files/r3H1JXa584z7erdaCY9P" alt=""><figcaption></figcaption></figure>

4. Configure sync setting details

After connecting the stores, choose how the synchronization should work.

* **Matching & Imports**

> Choose **Create & Update** if you want the Destination store to automatically create missing products and keep existing products updated.
>
> Choose **Update Only** if products already exist in both stores and you only want to sync updates.

* **Behavior on Removal**

> Example:\
> If a product is deleted from the Source store, selecting **Unpublish** will hide the product from the Destination store without permanently deleting it.

<figure><img src="/files/rJNp6rizP7jZU9bdTCzO" alt=""><figcaption></figcaption></figure>

5. Enable product sync option

* &#x20;Turn on the **Products sync** option
* Choose a **Unique Identifier t**o match products between stores

> Example:\
> If both stores already have the same product handles, choose **Handle** for the most accurate matching.\
> Choose **SKU** if your products use unique SKUs across all variants.

* Choose Which Products to sync

> Example:\
> Select **Only sync products that match the tags below** if you only want to sync products tagged `wholesale`.

* Select **Product Statuses** to sync

<figure><img src="/files/4Buprz5luX9k4Yp8P5HH" alt=""><figcaption></figcaption></figure>

5. Select **Locations** you want to map between stores (required)

   <figure><img src="/files/YA0sb29r5bHCit8Y09ql" alt=""><figcaption></figcaption></figure>
6. Click **Save.**

&#x20;The sync will be run immediately. The first sync may take some time depending on how many products you sync.

***

### 🔄 After the sync

Once connected, Tipo Sync can:

* import/sync products from Source to Destination (based on your selection)
* sync inventory (if you mapped locations and enabled inventory sync)
* keep updates running based on your connection settings

For example:

Product New Shirt is created in source store, the app will automatically creates the product New Shirt product on destination store  (same product handle).

***

### ▶️ A Tutorial video

{% embed url="<https://youtu.be/MqcVsaFUj7o?si=zYNJuZIxxd3uRm0o>" %}

{% embed url="<https://youtu.be/EgiEjT17k0U>" %}

***

**🙋 Still need support?**

If you still need help, please feel free to contact us at <hi@tipo.io>. We’ll be happy to assist you further.


# Mange Source stores

This guide shows how to view and manage all **Source stores** connected to your **Destination store** in Tipo app.

From this page, you can check which Source store is connected, review connection status, and open the connection settings.

### ✅ Check Source store list

Open the app in Destination store > click **Stores** > you will see the source store that are connected to your destination store

🔎 What you can do on this page

On the “Manage Source stores” page, you can:

* View the list of connected Source stores
* Check connection status (Active / Pending / Disconnected)
* &#x20;Open a Source store connection to review sync settings
* Disconnect from a Source store (if needed)

***

### ✏️ Edit connection to a source store

After your Destination store is connected, you can adjust how syncing works (products, pricing, inventory locations, metafields, and more).

1\. Open the app in Destination store > click **Stores** > click on the store URL you want

<figure><img src="/files/ycp0F2sKKTx1yyza9TVF" alt=""><figcaption></figcaption></figure>

2\. Change the configuration of the connection

You can

* Change the matching imports option
* Select the products to sync by tags or exclude products by tag
* Change the Price mapping & transformations
* Enable /disable Collections sync, page sync, blog sync

3\. Click **Save** to update the changes

<figure><img src="/files/JNLFFHjnv08mZjwaAyIO" alt=""><figcaption></figcaption></figure>

&#x20;The connection details include some settings below.

#### 🔁 Matching & Imports

Choose how the app handles products when syncing from the **Source store** to this **Destination store**.

<figure><img src="/files/byYAcUaQvybUKw5WTHAT" alt=""><figcaption></figcaption></figure>

* **Matching & Imports**

> Choose **Create & Update** if you want the Destination store to automatically create missing products and keep existing products updated.
>
> Choose **Update Only** if products already exist in both stores and you only want to sync updates.
>
> Choose **Create** **only** of you want to add new products from source store to destination store, keep existing products on the destination store unchanged.

📌 *Tip:* “Identifier” depends on your setup (commonly **Handle**, or your selected matching rule).

### 🔗 Behavior on Removal

Choose what should happen in the Destination store when a product is removed from syncing (or removed from the Source sync set).

* Unpublish Recommended\
  Unpublish the product on the Destination store when it’s deleted from the Source store.
* Unpublish or Delete\
  If sold before, Unpublish. If never sold, delete it from the Destination store
* Delete\
  Remove the product completely from the Destination store.
* No action\
  Leave the product unchanged on the destination store.

#### 🛍️ Products sync settings

Enable product sync option

* Turn on the **Products sync** option
* Choose a **Unique Identifier t**o match products between stores

> Example: If both stores already have the same product handles, choose **Handle** for the most accurate matching. Choose **SKU** if your products use unique SKUs across all variants.

* Choose Which Products to sync

> Example: Select **Only sync products that match the tags below** if you only want to sync products tagged `wholesale`.

* Select **Product Statuses** to sync

<img src="https://docs.tipo.io/~gitbook/image?url=https%3A%2F%2F2618001169-files.gitbook.io%2F%7E%2Ffiles%2Fv0%2Fb%2Fgitbook-x-prod.appspot.com%2Fo%2Fspaces%252FQFJLe0hkcyiradJOCgpx%252Fuploads%252FhV6HtgkSw74vWUNRgkxF%252F2026-05-29_16-34-01.png%3Falt%3Dmedia%26token%3D292fd991-b371-4be1-98f7-757b06fd993a&#x26;width=768&#x26;dpr=3&#x26;quality=100&#x26;sign=ffebae5&#x26;sv=2" alt="" height="1634" width="1844">

***

#### 📍 Mapped Locations

This part depends on the setting in Source store. [Learn more](https://tipo.io/index.php/kb/set-up-location-to-sync/)

#### 💰Price mapping & transformations
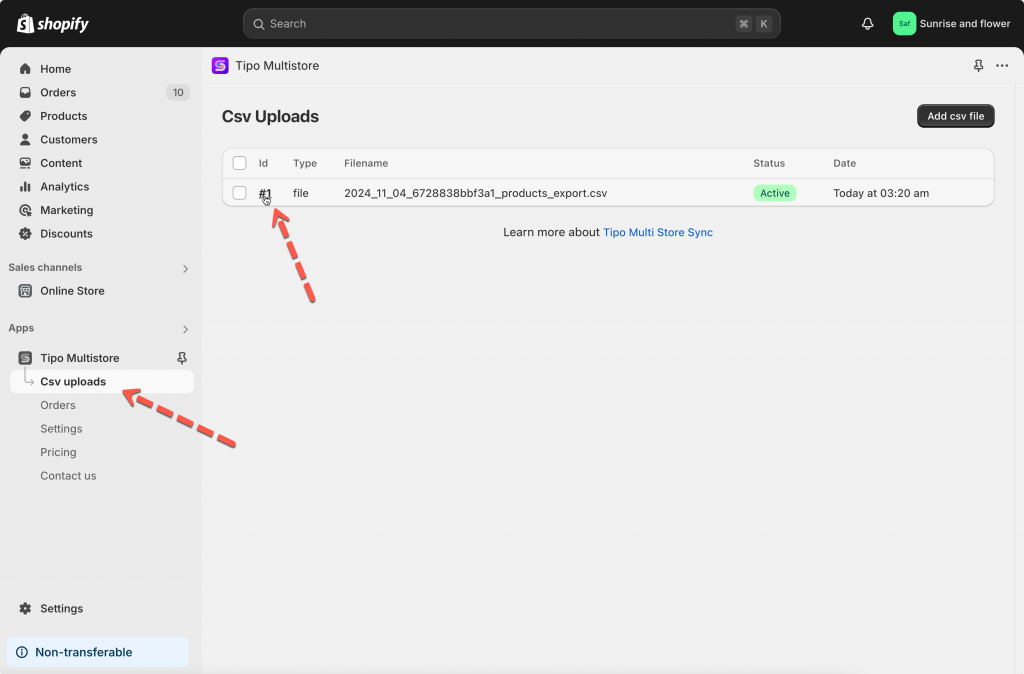
<figure><img src="/files/kFQvgD3dYBR4DJ0RlPKE" alt=""><figcaption></figcaption></figure>

Use this section if you want prices in the Destination store to be adjusted during sync.

Examples:

* Increase/decrease by %
* Increase/decrease by fixed amount
* Optional rounding rules (like ending prices in `.95`)

Learn more [here](/product-syncs/price-sync-and-adjustments)

#### 🧾 Metafield sync

Enable this if you want to sync metafields from Source → Destination.

* You may need to add metafield definitions (namespace.key)
* Data types must match

Learn more [here](/product-syncs/sync-metafields)&#x20;

#### 📄 Collection, Pages and Blogs sync settings

Enable these options if you want the Source store to sync additional content to this Destination store, such as:

* Collections
* Pages
* Blogs & Articles

Turn on the setting(s) you need, then click **Save**.

<figure><img src="/files/QO14QfBg0031kQUocnPb" alt=""><figcaption></figcaption></figure>

***

### **🚫** Disconnect to a Source store

1\. Open the app in Destination store > click **Stores**

2\. Click (x) icon on the right of the store you want to remove

The app provides you 4 options to manage the synced products on the Destination store. You can select one of them.

For example, if you want  removed the products that are synced from Source store to this store, select the **Delete** option.

* **Keep (no action) :**&#x55;nsync without deleting the product from your destination store
* **Unpublish**: Unsync and unpublish the product from your destination store
* **Unpublish or Delete**:Unsync and unpublish if product has been ordered, delete otherwise
* **Delete**:Unsync and delete the product from your destination store

<figure><img src="/files/sVMMorY1qkoBJ2VExQm6" alt=""><figcaption></figcaption></figure>

<figure><img src="/files/dzseNKxIfwUCh18X9nKl" alt=""><figcaption></figcaption></figure>

Then do the same in the app on Source store to remove the connection completely.

After the connection is removed, it may take time to process. Please wait for a while to let the app finish it then you can create a new connection.

***

**🙋 Still need support?**

If you still need help, please feel free to contact us at <hi@tipo.io>. We’ll be happy to assist you further.


# Map locations for inventory sync

This guide shows you how to map Shopify locations between your Source and Destination stores so inventory sync works correctly.

To make sure your inventory quantities are always accurate, online orders and in-person sales are assigned to [locations](https://help.shopify.com/en/manual/locations).

### ✅ Why location mapping is required

Shopify tracks inventory by **location** (warehouse, retail store, fulfillment center).\
To sync inventory accurately, Tipo Sync needs to know:

Which **Source location** should sync to which **Destination location**.

Without mapping:

* inventory may not sync
* inventory may sync to the wrong location
* stock can look incorrect in the Destination store

### 🛠️ **Step 1: Decide locations to sync for Source store**&#x20;

1\. Open the app in **Source** store > click **Settings**

2\. Scroll down to **Locations** part, and select one of the 2 options below:

* **All locations**: products available in all locations of your store will be synced with the Destination store
* **Specific locations**: only the products in the selected location(s) is updated when there are changes in the Destination store

3\. Click **Save**

<figure><img src="/files/Zaqs29WS6az2cZsXnnKN" alt=""><figcaption></figcaption></figure>

***

### 🛠️ Step 2: Map locations when connecting 2 stores

1\. Open the app in Source store > click **Stores** > click **Get connect code** button  > copy the connect code on the popup

<figure><img src="/files/4nz6tkHQlmvwcyftl5uV" alt=""><figcaption></figcaption></figure>

2\. Go to the **Destination** store open the Tipo Multi-store app > click **Stores** >  click **Connect** **Store** button

3\. Enter the connect key (get the key from app Dashboard in Source store)

<figure><img src="/files/raQf7Wz1rqkD3lffGpdi" alt=""><figcaption></figcaption></figure>

4. Select the products you want to sync and complete the setting in the connection detail
5. Scroll down to Mapping **locations** section and select locations to map between stores

On the mapping screen, you’ll see:

* Source store locations (left)
* Destination store locations (right)

<figure><img src="/files/pb2QpafDov7vDCaQbXW7" alt=""><figcaption></figcaption></figure>

<figure><img src="/files/71zIOuqSxwl6NQNf5nZ0" alt=""><figcaption></figcaption></figure>

**Note**: Currently our app only syncs 1 location from to Source store to 1 location from Destination store.  It is not possible to map one location from Source store to 2 locations in Destination store

5. &#x20;Click **Save**&#x20;

The sync will be run immediately. It may take for while to complete.

***

### ✅ What happens after mapping

Once mapping is saved, the app will

* Update inventory only at the locations you mapped in the connection
* Ignore locations that are not mapped

<figure><img src="/files/2e3jkHf1C5rs9uHZLEe5" alt=""><figcaption></figcaption></figure>

> **Important: One-to-One Mapping**
>
> Each location can only be mapped to one corresponding location.

✅ Supported:

| Source store | Destination store |
| ------------ | ----------------- |
| Warehouse A  | Warehouse A       |

❌ Not supported:

| Source store | Destination store |
| ------------ | ----------------- |
| Warehouse A  | Warehouse A       |
| Warehouse A  | Warehouse B       |

A single source location cannot sync inventory to multiple destination locations.

### **🧪** Example

Suppose both stores have the following locations:

| Source Store       | Destination Store  |
| ------------------ | ------------------ |
| My Custom Location | My Custom Location |
| Shop location      | Shop location      |

And the mapping is configured as:

| Destination Store  | Source Store       |
| ------------------ | ------------------ |
| My Custom Location | My Custom Location |
| Shop location      | Shop location      |

<figure><img src="/files/4H5odTEuiUEh92JxAqcU" alt=""><figcaption></figcaption></figure>

#### Example 1: One-Way Inventory Sync

Sync direction: Source Store → Destination Store

Before sync

**Source Store**

| Location           | Available |
| ------------------ | --------- |
| My Custom Location | 10,000    |
| Shop location      | 0         |

**Destination Store**

| Location           | Available |
| ------------------ | --------- |
| My Custom Location | 5         |
| Shop location      | 100       |

After sync

**Destination Store**

| Location           | Available |
| ------------------ | --------- |
| My Custom Location | 10,000    |
| Shop location      | 0         |

Because inventory is synced from the Source Store to the Destination Store, the destination inventory is updated to match the mapped source locations.

***

#### Example 2: Two-Way Inventory Sync

Sync direction: Source Store ↔ Destination Store

Assume the locations are mapped as:

| Destination Store  | Source Store       |
| ------------------ | ------------------ |
| My Custom Location | My Custom Location |
| Shop location      | Shop location      |

**Scenario A: Sale in Source Store**

Before sale:

| Location           | Source Store | Destination Store |
| ------------------ | ------------ | ----------------- |
| My Custom Location | 10,000       | 10,000            |

A customer purchases 1 item in the Source Store.

After Shopify updates inventory:

| Location           | Source Store |
| ------------------ | ------------ |
| My Custom Location | 9,999        |

Tipo Sync then updates the mapped location in the Destination Store:

| Location           | Destination Store |
| ------------------ | ----------------- |
| My Custom Location | 9,999             |

Result: Both stores remain synchronized.

***

**Scenario B: Sale in Destination Store**

Before sale:

| Location           | Source Store | Destination Store |
| ------------------ | ------------ | ----------------- |
| My Custom Location | 10,000       | 10,000            |

A customer purchases 1 item in the Destination Store.

After Shopify updates inventory:

| Location           | Destination Store |
| ------------------ | ----------------- |
| My Custom Location | 9,999             |

Tipo Sync then updates the mapped location in the Source Store:

| Location           | Source Store |
| ------------------ | ------------ |
| My Custom Location | 9,999        |

Result: Both stores remain synchronized.

***

#### Example 3: Unmapped Locations Are Ignored

Suppose only **My Custom Location** is mapped.

| Destination Store  | Source Store       |
| ------------------ | ------------------ |
| My Custom Location | My Custom Location |

**Shop location** is not mapped.

#### Source Store

| Location           | Available |
| ------------------ | --------- |
| My Custom Location | 10,000    |
| Shop location      | 500       |

#### Destination Store

| Location           | Available |
| ------------------ | --------- |
| My Custom Location | 10,000    |
| Shop location      | 100       |

After inventory sync:

| Location           | Result     |
| ------------------ | ---------- |
| My Custom Location | Synced     |
| Shop location      | Not synced |

The inventory at **Shop location** remains unchanged because it is not included in the location mapping.

***

### ▶️ A Tutorial video <a href="#a-tutorial-video" id="a-tutorial-video"></a>

{% embed url="<https://youtu.be/VH43AzCzmJ8>" %}

***

**🙋 Still need support?**

If you still need help, please feel free to contact us at <hi@tipo.io>. We’ll be happy to assist you further.


# Unsync products

This guide explains how to **unsync** products between your **Source store** and **Destination store**. Unsyncing removes the link (mapping) so the product will no longer receive updates from the Source store.

### ❓ What happens when you unsync?

When you unsync a product:

* The mapping between Source and Destination is removed
* Future updates from Source will no longer apply to that product in Destination
* The product may remain in the Destination store

***

### 🛠️ **Steps to unsync specific product**&#x20;

1\. Go to the **Destinations** store, open the app Dashboard > click **Stores** > click **Products** to see the synced product list of the connection

<figure><img src="/files/MWBCDRb2n5FXJ2ytfeUI" alt=""><figcaption></figcaption></figure>

2\. Click this icon to  stop sync for each product

<figure><img src="/files/c4SnxxR3lccsZOSiXWhb" alt=""><figcaption></figcaption></figure>

3\. For bulk action: select the products you want to sync. Select **Select all 25+ products** if you want to select all products in the list > click **Unsync** button on the right side

<figure><img src="/files/zjCpnPrnMXgDLX3vBu5t" alt=""><figcaption></figcaption></figure>

After unsyncing, these products will be marked as **Manually Excluded**, indicating they are no longer synchronized with the Source Store.​

<figure><img src="/files/UtewojW6Z2lcnLsxGuix" alt=""><figcaption></figcaption></figure>

<figure><img src="https://tipo.io/wp-content/uploads/2024/11/2025-04-11_16-22-46-1024x674.png" alt=""><figcaption></figcaption></figure>

If you want to continue the sync again,  select the products again and click **Sync** button instead of **Unsync** button.

**📝 Note**

> **Unsyncing does not delete the product.**\
> It only stops future updates from the **Source store** from syncing to the **Destination store**. The product will still remain in your Destination store unless you manually delete it.

***

#### 🙋 Still need support?

If you still need help, please feel free to contact us at **\[your support email or link]**. We’ll be happy to assist you further.


# Select which product information to sync

Tipo app allows you to choose which product information should be synchronized from the Source store to the Destination store.

This gives you full control over what data is updated across stores.

* **Product Fields** – Title, Description, Status, SEO fields, Images, Tags, Vendor, Category, and more.
* **Variant Fields** – Variant title, Barcode, Weight, Tax settings, Inventory tracking, and more.
* **Price Fields** – Price, Unit price, Cost per item.

***

### 🛠️ **How to set**

1\. Open the app in **Destination** store > click **Settings > Product Fields to Synchronize**

3\. Select one option for each product field. There are 3 options for you:

* **Sync** – Create and update
* **Create only** – Only set the value when creating a new product
* **Ignore** – Never sync this field

<figure><img src="/files/08b3YJIWD0XTLwMqDNmW" alt=""><figcaption></figcaption></figure>

<figure><img src="/files/0MK0z5eGK4TODiVCdO0u" alt=""><figcaption></figcaption></figure>

4\. Click **Save** to finish

For example:

* If you want to sync product title from Source store to Destination store, select **Sync** option
* If you do not want to sync product price from Source store to Destination store, select **Ignore** option

> Note: **Product Title** and **Variant Title** are required fields when you sync a new product from source store. The **Ignore** option is not available for them.

***

### Example

#### 🔄 Sync

| Stage              | Source Store               | Destination Store          |
| ------------------ | -------------------------- | -------------------------- |
| Initial sync       | Summer Linen Shirt         | Summer Linen Shirt         |
| After title change | Premium Summer Linen Shirt | Premium Summer Linen Shirt |

**Result:** The field stays synchronized. Changes made in the Source Store are automatically updated in the Destination Store.

#### 📝 Create only

| Stage              | Source Store               | Destination Store  |
| ------------------ | -------------------------- | ------------------ |
| Initial sync       | Summer Linen Shirt         | Summer Linen Shirt |
| After title change | Premium Summer Linen Shirt | Summer Linen Shirt |

**Result:** The field is copied when the product is created, but future changes are not synchronized.

#### 🚫 Ignore

| Stage              | Source Store               | Destination Store  |
| ------------------ | -------------------------- | ------------------ |
| Initial sync       | Summer Linen Shirt         | Custom Store Title |
| After title change | Premium Summer Linen Shirt | Custom Store Title |

**Result:** The field is never synchronized. Changes in the Source Store do not affect the Destination Store.

***

### 🔗 How Product Matching Works

Before syncing a product, Tipo Sync checks whether the product already exists in the Destination store.

<figure><img src="/files/90yNRC2221UxGywuCa9B" alt=""><figcaption></figcaption></figure>

The app compares products using the selected Matching Identifier:

* Handle (Recommended)
* SKU
* Barcode

After checking for a match, Tipo Sync follows the selected sync mode.

***

### 📊 Quick Comparison

<figure><img src="/files/byYAcUaQvybUKw5WTHAT" alt=""><figcaption></figcaption></figure>

| Sync Mode          | Matching Product Found | No Matching Product Found |
| ------------------ | ---------------------- | ------------------------- |
| 🔄 Create & Update | Update Product         | Create Product            |
| 🔁 Update Only     | Update Product         | Ignore Product            |
| ➕ Create Only      | Ignore Product         | Create Product            |

This table explains the core difference between all three modes.

***

#### 🙋 Still need support?

If you still need help, please feel free to contact us at **\[your support email or link]**. We’ll be happy to assist you further.


# View detail of map products

This guide explains how to view **mapped products** in Tipo app, so you can confirm which Source product is linked to which Destination product, and quickly troubleshoot sync issues (wrong match, duplicates, missing updates).

### 📍 Where to find “Mapped products”

Go to the **Destinations** store, open the app > click **Stores** > click **Products** to see the synced product list of the connection

Click the eye icon to view the sync detail of the product

<figure><img src="/files/MWBCDRb2n5FXJ2ytfeUI" alt=""><figcaption></figcaption></figure>

<figure><img src="/files/7yAINdSsZ1pnSINt1g4U" alt=""><figcaption></figcaption></figure>

<figure><img src="/files/SIIMvcaji0Atfpit0sCo" alt=""><figcaption></figcaption></figure>

<figure><img src="https://tipo.io/wp-content/uploads/2022/12/2025-04-16_17-05-25-1024x708.png" alt=""><figcaption></figcaption></figure>

In the mapped products list, you can verify:

* Which Source product is linked to which Destination product
* &#x20;Mapping status (mapped / not mapped / error)
* 🔎 Search specific products to confirm they are linked correctly

***

**🙋 Still need support?**

If you still need help, please feel free to contact us at <hi@tipo.io>. We’ll be happy to assist you further.


# Email notifications for Destination store

This guide explains how to enable email notifications for your Destination store, so you can stay informed about important sync events (connections, sync results, and issues).

**Steps to manage**

1\. Open the app in Destination store > click **Settings** > scroll down to **Email Notifications**

2\. Tick on the checkbox of the email template you want to use

* **Store Connected:** Receive an email when a store connects to your store.
* **Store Disconnected:** Receive an email when a store disconnects to your store.

3\. Click **Save**

<figure><img src="/files/9ZnhzxxM6nfnSZMGzTRt" alt=""><figcaption></figcaption></figure>

***

**🙋 Still need support?**

If you still need help, please feel free to contact us at <hi@tipo.io>. We’ll be happy to assist you further.


# Email notification (Source store)

This guide explains how to set up email notifications for the Source store, so you (or your team) can receive alerts about sync activity and important events.

**Steps to manage**

1\. Open the app in Source store > click **Settings**

2\. Scroll down to **Email Notifications** > tick checkbox to set up email notification

* **Store Connected:**  Receive an email notification when a new store connects to your store
* **Store Disconnected:** Receive an email notification when a connected store disconnects from your store
* **Order Notification:** Receive an email notification when a destination store creates an order containing synchronized products

3\. Click **Save**

<figure><img src="/files/WrlasiA5ZgJnnIzge8eL" alt=""><figcaption></figcaption></figure>

Below is an example of a email sent from  the app.&#x20;

<figure><img src="/files/mXyDYrj9ADYpZ4nD2bWF" alt=""><figcaption></figcaption></figure>

***

**🙋 Still need support?**

If you still need help, please feel free to contact us at <hi@tipo.io>. We’ll be happy to assist you further.


# Email notifications for Destination store

This guide explains how to enable email notifications for your Destination store, so you can stay informed about important sync events (connections, sync results, and issues).

**Steps to manage**

1\. Open the app in Destination store > click **Settings** > scroll down to **Email Notifications**

2\. Tick on the checkbox of the email template you want to use

* **Store Connected:** Receive an email when a store connects to your store.
* **Store Disconnected:** Receive an email when a store disconnects to your store.

3\. Click **Save**

<figure><img src="/files/9ZnhzxxM6nfnSZMGzTRt" alt=""><figcaption></figcaption></figure>

***

**🙋 Still need support?**

If you still need help, please feel free to contact us at <hi@tipo.io>. We’ll be happy to assist you further.


# Import with CSV Files

Use CSV Import to quickly create or update products (and inventory) in your Shopify store using a spreadsheet file.

## ✅ Before you start (requirements)

#### 📌 Prepare your CSV file

Make sure your CSV has:

* **Column headers** in the first row (ex: `Handle`, `Title`, `Vendor`)
* A **unique key** you can use to match records (recommended: **Handle**)
* Correct format (CSV file)

#### 🔑 Recommended primary key

* **Product Handle** (best for most imports)
* You may also see other keys depending on your data (ex: Product ID, Variant SKU)

***

## 🛠️ Steps to upload file&#x20;

### Open CSV Uploads in Tipo app

<figure><img src="/files/5U9M2qGvlcm5qhfj92rK" alt=""><figcaption></figcaption></figure>

1. In Shopify Admin, open **Apps → Tipo Sync**
2. Click **CSV uploads**
3. Click **Add csv file**

You’ll be taken to the import wizard (**1/3 progress**).

***

### 📤 Step 1/3 — Upload CSV&#x20;

<figure><img src="/files/AWY02Vr9vWCqdWVcrEqt" alt=""><figcaption></figcaption></figure>

#### **Choose your upload source**

You can upload CSV from:

* **CSV Import** (upload file from your computer)
* Import from Web Link (URL)
* FTP Server Upload
* SFTP Server Upload

#### **Choose CSV options**

**Separator**

* Comma (most common)
* Semicolon
* Other

**CSV Data**

* **Product** (for product fields like title, description, vendor…)
* **Inventory** (for inventory quantities)

Then click **Next Step**.

<figure><img src="https://tipo.io/wp-content/uploads/2024/11/2024-11-04_16-26-46-1024x674.png" alt=""><figcaption></figcaption></figure>

***

### 🧩 Step 2/3 — Map Fields&#x20;

<figure><img src="/files/rfZhQFtswMPvs3sv8EsU" alt=""><figcaption></figcaption></figure>

**A) Primary Key mapping**

This tells the app how to match rows in your CSV to products in Shopify.

* **Primary Key**: choose what your Shopify store will match by\
  Example: **Product Handle**
* **Column heading**: choose the column in your CSV\
  Example: **Handle**

> If your Primary Key doesn’t match, the app may create duplicates or fail to update the correct product.

**B) Map your CSV columns to Shopify fields**

You’ll see tabs like:

* **Product**
* **Variant**
* **Image**
* **Metafield**
* **Inventory**

For each row:

* **Import to Shopify** = Shopify field (ex: Title)
* **Column heading** = CSV column (ex: Title)

You can click **➕ Add mapping** to import more fields.

Then click **Next Step**.

***

### ⚙️ Step 3/3 — Import Settings&#x20;

<figure><img src="/files/VQGY4i7dPVLLA0qjU59M" alt=""><figcaption></figcaption></figure>

#### **Step 3.1. Matching & Imports (how to update Shopify)**

Choose one:

✅ **Create new items**

* Only creates new products (no updating existing ones)

✅ **Only update current items that have the same primary key**

* Updates existing products only
* Does NOT create new ones

✅ **Create new items if not exist and update current items that have the same primary key** *(common choice)*

* Creates missing products
* Updates existing products that match (by Handle/SKU/etc.)

***

#### **Step 3.2. Upload specification (how much to import)**

* **Import All**: import everything in the file
* **Specify import**: import only a selected range of rows (useful for testing)

***

#### **Step 3.3. Filter data (optional)**

* **Only import data containing …** (include rule)
* **Exclude data containing …** (exclude rule)

Use this if you want to import only certain rows (ex: only rows that include `SYNC`).

***

#### **Step 3.4. Image data (if your CSV includes images)**

Choose one:

* **Add new images** (adds images without removing old ones)
* **Upon creation product only** (only add images for new products)
* **Overwrite current images** (replaces existing images)

***

#### **Step 3.5. Email notifications (optional)**

Choose when you want emails:

* On upload start
* On upload completion
* On upload error

***

#### **Step 3.6. Schedule upload**&#x20;

* **Run now** (import immediately)\
  (Other schedule options may appear depending on your plan/settings.)

Finally click **Save** (top-right).

***

## 🧪 Example: Update existing products + create new ones

**CSV sample**

| Handle              | Title               | Vendor     |
| ------------------- | ------------------- | ---------- |
| ceramic-table-lamp  | Ceramic Table Lamp  | ModernHome |
| wooden-floor-mirror | Wooden Floor Mirror | ModernHome |

**Settings to choose**

* **Primary Key**: Product Handle
* **Column heading**: Handle
* **Matching & Imports**: Create new items if not exist and update current items that have the same primary key

**Result**

* If `ceramic-table-lamp` already exists → it will be updated
* If `wooden-floor-mirror` does not exist → it will be created

***

**🙋 Still need support?**

If you still need help, please feel free to contact us at <hi@tipo.io>. We’ll be happy to assist you further.


# Why isn’t my sync running?

If the sync isn’t working as expected, here are some common reasons and how to fix them:

### ⏱️ 1. Check the Sync Time

After the Source and Destination stores are connected, the app starts the initial sync automatically.

The sync time may take a few minutes depending on:

* The amount of data
* Number of products/variants
* Shopify processing time

#### How product sync works

After the initial connection:

* Product create/update events are grouped and synced every **30 minutes**
* All products updated during that period will sync together

> Please wait about 30 minutes after making changes in the Source store before checking the Destination store.

#### Inventory sync

Inventory is synced in real time.

You do not need to wait for the 30-minute sync cycle to update inventory quantities.

***

### 💳 2. You Reached Your Plan’s Variant Limit

Syncing will stop when the Destination store reaches the allowed variant limit for the current plan.

Example

* Current plan allows: 500 variants
* Store currently has: 5100 variants
* Result → New products cannot sync

Know more about the Pricing plan of the app [here](https://docs.tipo.io/faqs/why-isnt-my-sync-running).

<figure><img src="/files/s8KHIQno2ZYUOcKwndn7" alt=""><figcaption></figcaption></figure>

How to solve:

* Either upgrade your plan to support more variants, or
* Remove unnecessary products from the Destination store.

***

### 🏷️ 3. The Product Does Not Match Sync Conditions

When setting up sync rules, you may have chosen to sync only products with a specific tag. If a product **doesn’t have that tag**, it won’t be synced.

<figure><img src="/files/bp1ZqP0SyYt3y298KO9x" alt=""><figcaption></figcaption></figure>

How to check:

* In Source store, please go to the app settings > **Share products** > see the option you select.

<figure><img src="/files/MsGGXL24OgqESK8wkK9N" alt=""><figcaption></figcaption></figure>

* In destination store:

  Go to the **Destinations** store, open the app **Dashboard** > click on the store URL of the source store to open the connection detail

  <figure><img src="/files/wVXOCQxebmGQY6mZYwSv" alt=""><figcaption></figcaption></figure>

* For **Products sync** part, check the selected option:

<figure><img src="/files/THLUypchIKZb5yYl4Zhh" alt=""><figcaption></figcaption></figure>

### ⚙️ 4. Sync Mode Configuration Prevents Syncing

The selected sync mode controls how items are created or updated.

In Destination store,  go to the app > click on connection ID > **Matching & Imports** setting

<figure><img src="/files/5UljpV6dwNxcqgOPTQhD" alt=""><figcaption></figcaption></figure>

#### Update Only

When **Update Only** is enabled:

* The app only updates products that already exist in both stores
* New products will NOT be created automatically

#### Example

* Product exists in Source store
* Product does NOT exist in Destination store
* Result → Product will not sync

In this case, you need to manually add the product to the Destination store first.

<figure><img src="/files/gaolxO8F3itUg6KVx9Tr" alt=""><figcaption></figcaption></figure>

If you want the app to automatically create missing products, switch to option "**Create and Update**"

***

### 🔑 5. Missing Product Identifier

The app uses identifiers to match products between stores.

Common identifiers:

* SKU
* Barcode
* Handle

If the identifier is empty or invalid, the product cannot sync correctly.

Example

* Sync identifier = SKU
* Product SKU is empty
* Result → Product will not sync

<figure><img src="/files/1qnXIG7s4PF9lD6HORyZ" alt=""><figcaption></figcaption></figure>

<figure><img src="/files/aa3OzrnojkpdCuan9u1G" alt=""><figcaption></figcaption></figure>

<figure><img src="/files/hjzXnbaVkcshIEjlvT8m" alt=""><figcaption></figcaption></figure>

> Important: All synced products should contain valid identifiers.

***

### 📦 6. Product Status Is Not Included

Your sync settings may only allow specific product statuses.

### Example

Sync settings:

* Only sync **Active** products

Product status:

* Draft

Result:

* Product will not sync

<figure><img src="/files/nxmjM3t7VzdXZT63UYE9" alt=""><figcaption></figcaption></figure>

<figure><img src="/files/CAsY4GfckuSNYyYf5CSA" alt=""><figcaption></figcaption></figure>

***

If the sync still doesn’t work for you, please contact us at [hi@tipo.io](https://tipo.io/index.php/kb/why-the-sync-doesnt-run/hi@tipo.io) and let us know the information below:

* Store URLs
* Collaborator code of each store
* The products that are not synced

**🙋 Still need support?**

If you still need help, please feel free to contact us at <hi@tipo.io>. We’ll be happy to assist you further.

<br>


# What syncs (and what doesn’t)?

Tipo app helps you keep data consistent between your connected stores. Depending on your settings, the app can sync products, inventory, and orders.

### What the app can sync

✅ **Products** (title, description, images, price, etc. based on your product sync settings)\
✅ **Inventory** (one-way or two-way, with mapped locations)\
✅ **Orders / Draft Orders** (import orders from Destination → Source, depending on your mode)\
✅ **Metafields** (if enabled + configured)\
✅ **Collections / Pages / Blogs** (if enabled)

### What the app does NOT sync (common expectations)

❌ **Payments** (charges stay in the Destination store)\
❌ **Order status updates after the first import** (fulfillment changes, cancellation updates, etc.)\
❌ **Discounts** (if your current setup doesn’t support it)

#### Notes

* Exact behavior depends on which mode you select in **Settings → Sync Inventory and Orders.**
* Always check your matching identifier (Handle / SKU / Barcode) to avoid mismatches.

***

**🙋 Still need support?**

If you still need help, please feel free to contact us at <hi@tipo.io>. We’ll be happy to assist you further.


# How does the app match products?

(Handle vs SKU vs Barcode)

To sync correctly, Tipo app needs a way to identify the “same product” across stores. This is called the **matching identifier**.

### ✅ Supported matching identifiers

You can match products using:

* **Handle** (most common)
* **SKU**
* **Barcode**

### ✅ How matching works

When sync runs:

1. The app looks at the identifier you selected (example: **Handle**)
2. It finds the same identifier in the Destination store
3. If it finds a match → update existing product
4. If no match → (depending on your setting) create a new product or skip

***

**🙋 Still need support?**

If you still need help, please feel free to contact us at <hi@tipo.io>. We’ll be happy to assist you further.


# If I delete a product in Source, what happens in Destination?

This depends on the setting you configure in the connection detail.

Check the setting in the **Destination** store > open the connection detail here

<figure><img src="/files/JNLFFHjnv08mZjwaAyIO" alt=""><figcaption></figcaption></figure>

The app lets you select one of the actions

* **Unpublish Recommended**\
  Unpublish the product on the Destination store when it’s deleted from the Source store.
* **Unpublish or Delete**\
  If sold before, Unpublish. If never sold, delete it from the Destination store.
* **Delete**\
  Remove the product completely from the Destination store.
* **No action**\
  Leave the product unchanged on the destination store

<figure><img src="/files/I8FSC5XHdmGmGK73V5Ki" alt=""><figcaption></figcaption></figure>

> **Delete option** is selected

If you delete the product from Source store, the products (with the same handle) will deleted from the Destination store automatically.

***

**🙋 Still need support?**

If you still need help, please feel free to contact us at <hi@tipo.io>. We’ll be happy to assist you further.


# What is a product handle?

### What Is Product Handle in Shopify?

A product handle in Shopify is a unique text identifier used in your store’s URLs.\
It's automatically generated from the product title when you create a product.

* It helps Shopify identify and link to the product page.
* It's used in the product URL (e.g., `yourstore.com/products/handle`).
* In sync apps like Tipo, handles are used to match products between Source and Destination stores.

#### Example

If your product is called:\
**"Blue Cotton T-Shirt"**

Then Shopify will generate a handle like:\
`blue-cotton-t-shirt`

Your product URL will be:\
`https://yourstore.com/products/blue-cotton-t-shirt`

> If this handle is the same in both Source and Destination stores, Tipo can match and sync the product correctly.

### **Where can we find and edit product handle in Shopify?**

**Edit Products Handles In Shopify Admin**

1\. From your store backend, go to **Products** > open the product you want to edit

2\. Edit product title

3\. Scroll down to S**earch engine listing**, click edit icon and change the name here

<figure><img src="/files/jIkaDjsAET13lCiF5O6f" alt=""><figcaption></figcaption></figure>

<figure><img src="/files/sJC9vB8enHyRcx3Iz9IA" alt=""><figcaption></figcaption></figure>

4\. Save the product

To confirm the update, click the “View” button and look for the product URL in your web browser’s address bar. The handle should now appear in the URL.

**Note:**&#x20;

Be careful when changing handles — if the product is already published, changing the handle will change the product's URL and may affect SEO or existing links.

***

**🙋 Still need support?**

If you still need help, please feel free to contact us at <hi@tipo.io>. We’ll be happy to assist you further.


# Can I sync orders only (no inventory)?

Orders are synced from Destination store to Source store.

If you enable “**Sync Orders**”, the inventory will still be updated automatically. This is because when a customer places an order on a destination store, the app reduces the stock quantity on the source store to keep inventory accurate across stores.

<figure><img src="/files/ahaTyQRUEEwTmrkiVov9" alt=""><figcaption></figcaption></figure>

If you still don’t want to sync inventory but orders, I suggest you try the  **Draft order sync** option. If there is an order created in Destination store, the new draft order is created in Source store.

<figure><img src="/files/NUgv2YVjamEjR6e5qAoR" alt=""><figcaption></figcaption></figure>

**🙋 Still need support?**

If you still need help, please feel free to contact us at <hi@tipo.io>. We’ll be happy to assist you further.


# How long does sync take?

Tipo app doesn’t sync instantly. It runs on a schedule:

* The app syncs in **30-minute blocks**
* Any products created or updated during that time will be included in the next sync run

**Example**

If you update a product title in the **Source store**:

1. Save the change in Shopify
2. Wait up to **30 minutes**
3. Check the same product in the **Destination store** to see the updated title

✅ Tip: If you need changes to appear sooner, use [**Manual push sync**](https://docs.tipo.io/product-syncs/manually-push-sync) to run sync immediately.

⚠️ **Note**: all the syncs can not be reverted.

**🙋 Still need support?**

If you still need help, please feel free to contact us at <hi@tipo.io>. We’ll be happy to assist you further.


# Can I sync draft or archived products?

Yes, the app fully supports syncing draft and archived products across connected Shopify stores.

To enable this feature, simply go to the **Destination Store** within the app and configure the product status filters. You can choose to sync:

* Active products
* Draft products
* Unlisted products
* Archived products

<figure><img src="/files/JNLFFHjnv08mZjwaAyIO" alt=""><figcaption></figcaption></figure>

<figure><img src="/files/g625YW3ZdzgKzlbSaClI" alt=""><figcaption></figcaption></figure>

**🙋 Still need support?**

If you still need help, please feel free to contact us at <hi@tipo.io>. We’ll be happy to assist you further.


# Getting Started with Single-store Sync

Single-store sync helps you keep inventory accurate **inside one Shopify store** by linking related products together (for example: **bundle ↔ components**, duplicate listings, or product sets).&#x20;

When stock changes for one item, Tipo can update the others automatically so you don’t need manual edits.

***

### ✅ Before you start

Make sure you have:

* Tipo app installed on your Shopify store
* Products already created in your store (the items you want to link together)
* A clear idea of your use case:
  * Bundle product and component products
  * Multiple listings that share the same stock
  * Variants or separate products that should stay in sync

> 💡 Tip: Single-store sync does **not** connect two Shopify stores. Everything happens within the same store.

***

### 🧭 Key Concepts&#x20;

Single-store sync typically works through **Groups** + **Rules**.

* **Group**: A set of related products/variants that should follow the same inventory logic.
* **Master product** (or main item): The product that drives inventory.
* **Component products**: Items that get updated when the master changes.

***

### 🔑 Key Features <a href="#key-features" id="key-features"></a>

* **Sync inventory between related products**

  Keep stock aligned for products that should move together (for example, bundle items and their component items).
* **Automate inventory updates with Sync Groups**

  Put products/variants into a group so the app updates inventory automatically when sales/restocks happen.
* **Bundle inventory automation (Master ↔ Component)**
  * When a bundle sells, the app can reduce inventory for the component items.
  * When you restock components, the available bundle quantity can update accordingly.
* **Real-time inventory consistency**

  When inventory changes (sale, refund/cancel, manual adjustment), the app updates the connected items to keep your store consistent.
* **Smart scan**:  automatically detects and groups products that share matching **SKUs**.

***

### 🛠️ Quick steps with Single store sync

#### 1) Install the app and select  **Single-store mode**

Install [here](https://apps.shopify.com/multi-store-sync-tipo)

Select one of store mode you need:

* **Single Store**: A single store setup designed to keep products synchronized within the same store. Learn more
* **Multi Store**: A multi store that manages multiple stores.

<figure><img src="https://docs.tipo.io/~gitbook/image?url=https%3A%2F%2F2618001169-files.gitbook.io%2F%7E%2Ffiles%2Fv0%2Fb%2Fgitbook-x-prod.appspot.com%2Fo%2Fspaces%252FQFJLe0hkcyiradJOCgpx%252Fuploads%252Flgn2iyWDGcYjZN5g70eG%252F2025-10-23_13-48-05.png%3Falt%3Dmedia%26token%3D7543041f-da7d-4c07-9b69-520225618bb5&#x26;width=768&#x26;dpr=4&#x26;quality=100&#x26;sign=4933032f&#x26;sv=2" alt=""><figcaption></figcaption></figure>

#### 2) Choose how you want inventory to behave

Common single-store scenarios:

#### Scenario A: Bundle stock depends on components

Example: “Gift Set” uses 1 mug + 1 box\
→ Bundle stock should be the minimum available among components.

#### Scenario B: Multiple listings share the same stock

Example: same product listed in different collections/pages\
→ All listings should always show the same inventory.

#### Scenario C: Rule-based syncing

Example: product A should always match product B, or apply a multiplier rule.

> You’ll use the group setup to apply the right logic.

#### 3) Create your first Sync Group

* You can manually group products to share inventory.
* If your inventory Sync groups include products with the same SKUs, you should run a smart scan to automatically detect and group products.

#### 4) Test sync (Recommended)

Do a quick test before using it for your whole catalog:

1. Choose one product in the group and adjust inventory in Shopify
2. Wait for Tipo to process the inventory change

***

#### 📚 Additional Resources <a href="#additional-resources" id="additional-resources"></a>

* [Create inventory group with smart scan](https://docs.tipo.io/inventory-sync-groups/create-inventory-sync-groups-automatically-with-smart-scan)
* [Create inventory group with manually](https://docs.tipo.io/inventory-sync-groups/create-a-inventory-sync-group-manually)
* [Create a new bundle group](https://docs.tipo.io/bundle-groups/create-a-new-bundle-group)
* Contact support team via email <hi@tipo.io>


# Feature Comparison

* Use **Inventory Group Syncing** if you want manual control over shared stock
* Use **Smart Scan** if you want automatic grouping using SKUs
* Use **Bundle Group Syncing** if one product depends on other products

<table><thead><tr><th width="141.39996337890625">Feature</th><th>What it does</th><th width="190.60009765625">Best for</th><th>Example</th></tr></thead><tbody><tr><td><strong>Inventory Group Syncing</strong></td><td>Multiple products share <strong>one total inventory</strong></td><td>Same item sold as separate products or variants</td><td>Inventory = 10 → 4 sold → <strong>6 left</strong> for all linked products</td></tr><tr><td><strong>Smart Scan (Auto-group by SKU)</strong></td><td>Automatically groups products that have the <strong>same SKU</strong></td><td>Stores that already use SKUs and want fast setup</td><td>Products with SKU <code>TSHIRT-M</code> are auto-grouped</td></tr><tr><td><strong>Bundle Group Syncing</strong></td><td>Syncs inventory between a <strong>bundle</strong> and its <strong>individual items</strong></td><td>Kits, sets, or bundle products</td><td>Buy 1 candle → Gift box stock decreases</td></tr></tbody></table>

**🙋 Still need support?**

***

If you still need help, please feel free to contact us at <hi@tipo.io>. We’ll be happy to assist you further.


# Switch Sync Mode

Tipo Sync offers **two sync modes**. Choosing the right one depends on whether you manage **one Shopify store** or **multiple stores**.

### ℹ️ Quick definition <a href="#quick-definition" id="quick-definition"></a>

**🏪 Single store sync**

Sync happens inside one Shopify store to automate how products/inventory are managed within that store.

Typical features in this mode include:

* Inventory Sync Groups
* Bundle Groups
* Reports / analytics for syncing activity

Use it when you have only one store and want to keep inventory or bundles organized automatically.

***

**🔁 Between stores sync (Multi-store sync)**

Sync happens between two or more Shopify stores.

In this mode you will usually have:

* **Source store** = the main store where you manage products
* **Destination store(s)** = stores that receive synced products/inventory.

Typical features in this mode include:

* Connect stores (Source ↔ Destination)
* Product sync (import new products, sync existing ones, mapping)
* Inventory sync between stores (one-way or two-way)
* Order sync (depending on your setup)
* Email notifications

Use it when you have **multiple Shopify stores** and need to copy/update data across them.

***

### 🕹️ When should I use each mode? <a href="#when-should-i-use-each-mode" id="when-should-i-use-each-mode"></a>

**Choose Single store sync if you:**

* have one Shopify store
* want to automate inventory updates and bundle behaviors inside the same store
* don’t need to connect to another store

**Choose Between stores sync if you:**

* run multiple Shopify stores (regional stores, wholesale + retail, multiple brands)
* want to push products from one store to another
* want inventory or orders to stay aligned across stores

***

### 🔀 Key differences <a href="#key-differences" id="key-differences"></a>

TopicSingle store syncBetween stores sync

Number of stores

1 store

2+ stores

Setup

No store connection needed

Must connect Source + Destination

Main goal

Automate inventory/bundles within one store

Keep products/inventory/orders synced across stores

Product creation

Not focused on cross-store import

Can import/sync products between stores

Inventory

Groups & automation in the same store

Location mapping + one-way/two-way sync

Best for

One-store merchants

Multi-store merchants, wholesalers

***

### 🔄 Switch from Single-store to Multi-store Mode

Use this mode if you want to **sync data across multiple stores**.

1. Go to **Settings** in your app sidebar **>** **General** >  turn on **Switch to Multi-store Mode**\
   → You’ll see a confirmation popup.
2. Review the warning message carefully:
   * All current settings will be reset to default
   * Any ongoing sync tasks will stop
   * This action cannot be undone
3. Click **Confirm** to complete the change.

<figure><img src="/files/yAnr7W2KMSxYEnNB0EFO" alt=""><figcaption></figcaption></figure>

<figure><img src="/files/DgIe3sn9v5yiueAFHBm8" alt=""><figcaption></figcaption></figure>

### 🔄 Switch from Multi-store to Single-store Mode

Use this mode if you only want to **sync one store** (no connections to others).

1. Go to **Settings** in your app sidebar > Under **General**, enable **Switch to Single-store Mode**\
   → You’ll see a confirmation popup.
2. Review the message:
   * All connections will be disconnected
   * All settings reset to default
   * This action cannot be undone
3. Click **Confirm** to finalize the change.

<figure><img src="/files/93So6NdBiNB8fzArr9Tx" alt=""><figcaption></figcaption></figure>

<figure><img src="/files/jNAW3hHmlEVviXQCJPX0" alt=""><figcaption></figcaption></figure>

**🙋 Still need support?**

If you still need help, please feel free to contact us at <hi@tipo.io>. We’ll be happy to assist you further.


# Inventory Sync Groups

Inventory Sync Groups help you keep stock consistent across related products in a single Shopify store. Instead of updating inventory in multiple places, you group items together and the app keeps their quantities aligned automatically.

### ℹ️ What is an Inventory Sync Group?

An **Inventory Sync Group** is a set of products/variants that should share the same inventory.

When inventory changes for one item in the group (sale, restock, manual adjustment), the app updates the other items in that group so everything stays accurate.

**Common use cases**

* Same product listed multiple times (different titles, colors, collections)
* Duplicate listings for different channels or campaigns
* “Same stock, different product pages” setups

***

### 🧪 Quick example (easy)

You have 3 listings that all use the same physical stock:

* “Classic Hoodie - Blue”
* “Classic Hoodie - Promo Listing”
* “Classic Hoodie - Bundle Page”

If they are in the same Inventory Sync Group:

* Sell 1 hoodie → inventory updates across all 3 listings automatically.

***

### 🛠️ 2 ways to create Inventory Sync Groups

#### 1) Smart Scan (Auto-group by SKU)

Smart Scan automatically finds products/variants that match by **SKU** and groups them for you.

<figure><img src="/files/fDIGKY48HFN85fXcjw5h" alt=""><figcaption></figcaption></figure>

**Best when**

* Your store already has clean, consistent SKUs
* You have many products and want fast setup
* Variants that should share inventory use the same SKU pattern

**How it works**

* The app scans your catalog
* It detects variants with matching SKUs (based on the rules you choose)
* It creates Inventory Sync Groups automatically

Learn more [here](https://docs.tipo.io/inventory-sync-groups/inventory-sync-groups/smart-scan)

***

#### 2) Manual Group Creation

Manual creation lets you choose exactly which products/variants go into a group.

<figure><img src="/files/ejaZruyIJvRpJEsBX9el" alt=""><figcaption></figcaption></figure>

**Best when**

* Your SKUs are missing or inconsistent
* Only specific items should be grouped
* You want full control over group logic

**How it works**&#x20;

* You create a new Inventory Sync Group
* Select the products/variants you want inside the group
* Save → the app keeps inventory aligned for that group

Learn more [here](https://docs.tipo.io/inventory-sync-groups/inventory-sync-groups/create-a-inventory-sync-group-manuall)&#x20;

#### Compare table:

<table><thead><tr><th width="175.5333251953125">Feature</th><th> Smart Scan (Auto-group by SKU)</th><th>Manual Group Creation</th></tr></thead><tbody><tr><td>Best for</td><td>Fast setup for many products</td><td>Full control for specific products</td></tr><tr><td>How it groups</td><td>Automatically groups by SKU rules</td><td>You pick products/variants yourself</td></tr><tr><td>Setup time</td><td>Very fast</td><td>Slower (depends on how many items)</td></tr><tr><td>Needs SKUs?</td><td>✅ Yes (SKUs should be consistent)</td><td>❌ Not required</td></tr><tr><td>Control level</td><td>Medium</td><td>High</td></tr><tr><td>Good for beginners</td><td>Yes (if SKUs are clean)</td><td>Yes (easy but manual)</td></tr><tr><td>Common risk</td><td>Wrong groups if SKUs are messy</td><td>Missing items if you forget to add them</td></tr></tbody></table>

***

**🙋 Still need support?**

If you still need help, please feel free to contact us at <hi@tipo.io>. We’ll be happy to assist you further.


# Smart Scan

The **Smart Scan** feature in Tipo app automatically detects and groups products that share matching **SKUs**. This helps you save time and reduce manual setup errors when managing large inventories.

### ℹ️ What Smart Scan does

When Smart Scan runs, it will:

* Scan your catalog for SKUs
* Group items with matching SKUs into Inventory Sync Groups
* Keep inventory consistent inside each group (so related items share the same available quantity)
* Save setup time compared to creating groups manually

> 💡 Best for stores with consistent SKU naming (for example: `TSHIRT-RED-M`, `TSHIRT-RED-L`).

### ℹ️  When should you use Smart Scan?

✅  Use Smart Scan if:

* Your products already have SKUs
* &#x20;SKUs are **consistent** across variants/products that should share inventory
* You want to create many groups quickly
* You’re setting up Single-store mode for the first time

⚠️  **Avoid Smart Scan if:**

* Many products have **missing SKUs**
* SKUs are reused incorrectly (different products sharing the same SKU by mistake)
* You need a custom group that doesn’t match SKU structure\
  → In these cases, use **Manual Group Creation** instead.

***

### 🛠️ How to use&#x20;

1. Open the sync app > click on  **Inventory Groups** section on the left menu >  click **Smart Scan** button

<figure><img src="/files/I0D7TEe59amFkITK4Fzg" alt=""><figcaption></figcaption></figure>

2. In the **Smart Scan Inventory Groups** page, configure the following options:

<figure><img src="/files/V4ce36vHkZLXYcMDi7Z4" alt=""><figcaption></figcaption></figure>

#### **Choose How to Handle Groups**

* **Create new groups:** Create fresh groups for products that match your scan criteria.
* **Overwrite existing groups:** Replace your current Product Groups with new ones found during the scan.
* **Create new groups if not exist and overwrite existing groups:** Create new groups for unmatched products and update any existing ones.

#### **Select Which Products to Scan**

* **All products:** Scan every product in your store.
* **Products that match the tags below:** Only scan products that contain the tags you specify.
* **Products except those that match the tags below:** Exclude products that have the specified tags (recommended if you only want to skip certain products).

💡 Example: Products that match the tags `Women`\
If you add the tag `women`, all products with this tag will be grouped during the scan.

#### Auto activate locations (Optional)

Enable **Auto activate locations** if you want the app to automatically activate the relevant locations when running Smart Scan.

3. Once all options are set, click **Scan Now** to begin grouping products automatically.
4. Optionally, click **Export CSV** to download your current product list before scanning.

***

### After the Scan

Smart Scan uses SKU as the “label” to decide what belongs together.

* If multiple items share the same SKU (or match the scan rules), they get placed in one Inventory Sync Group
* After that, the app treats that group as “linked inventory”
* When inventory changes for one item, the group stays in sync (depending on your group rules/settings)

&#x20;**Example**

You sell the same item in multiple listings:

* Product A (variant) SKU: `TSHIRT-RED-M`
* Product B (variant) SKU: `TSHIRT-RED-M`

✅ Smart Scan will group these together → they share the same inventory.

**Result:**\
If `TSHIRT-RED-M` quantity becomes **12**, both listings reflect **12** (so you don’t oversell).

### 🧩 Related guides

[Sell Coffee Mug - (Inventory Sync Group for same SKU)](https://docs.tipo.io/sample-cases/sell-coffee-mug-inventory-sync-group-for-same-sku)

[Create a group manually ](https://docs.tipo.io/inventory-sync-groups/inventory-sync-groups/create-a-inventory-sync-group-manually)

***

**🙋 Still need support?**

If you still need help, please feel free to contact us at <hi@tipo.io>. We’ll be happy to assist you further.


# Create a Inventory Sync Group manually

Manual group creation lets you choose exactly which products/variants should share inventory. This is the best option when your SKUs are missing/inconsistent, or when you want full control over the group members.

### ℹ️ What manual Inventory Sync Groups do

When you create a group manually, Tipo will:

* Link selected products/variants into one **Inventory Sync Group**
* Keep inventory consistent across items in that group (based on your group rules)
* Reduce overselling by preventing “out-of-sync” stock across related listings
* Let you control exactly what is included (no auto-detection)

***

### ℹ️ When should you use manual creation?

Use manual creation if:

* &#x20;You want to sync only a few specific items
* Your SKUs are missing, inconsistent, or not suitable for Smart Scan
* You want to prevent accidental grouping
* You have special inventory logic that needs careful selection

Smart Scan is faster, but manual is more accurate when you need full control.

***

### 🛠️ Step to create group

1. Open the sync app > click on  **Inventory Sync Groups** section on the left menu >  click **New** **Inventory Sync Groups** button
2. Fill in the group details:&#x20;

<figure><img src="/files/uLWNcfBLnVHzGlCWhcvM" alt=""><figcaption></figcaption></figure>

* **Title / Name:** A meaningful name (e.g. “Black Tee Variants”)
* **Status / Active:** Enable the group

3. Set Locations and Stock

In the **Locations** section:

* Enable one or more locations where these products are available.
* Enter the **Stock** quantity for each selected location.

Note: This becomes the shared inventory across all products in this group.

4. Add Products to the Group

You can add products in two ways:

**Option 1: Manual select**

Choose this if you only have a few products.

* Click **Manual select**, search, and add product **variants**.
* Example: To sync “Unisex Tee – M”, add both *Men’s Tee – M* and *Women’s Tee – M* variants.

<figure><img src="/files/Rn75sapmcQkCJjX7Zw6H" alt=""><figcaption></figcaption></figure>

**Option 2: Use Condition**

Use this to quickly find products by condition.

* Click **Use Condition** and set conditions for **Title**, **SKU**, **Price**, **Vendor**, **Type**, **Tag**, or **Collection**.
* Click **Generate matching products** to preview, then **Select** to add them.

<figure><img src="/files/QXxmlenhgPuV1XVxjQLu" alt=""><figcaption></figcaption></figure>

5. **Save** the Inventory Sync Group.

Once saved, all included products will share the same inventory: when one sells, others update automatically.

<figure><img src="/files/Eml3pqS7EXj4m205XYeE" alt=""><figcaption></figcaption></figure>

### 🧪 Example

Let’s say you sell:

* **Men’s Tee – M**
* **Women’s Tee – M**

To sync their inventory:

1. Create a group named **Unisex Tee – M**
2. Add both variants using **Manual select**
3. Enable **Shop location** and set stock to **100**
4. Set status to **Active**, then click **Save**

→ Now, when one variant sells, the other’s inventory automatically updates.

### ❓ Troubleshooting (quick)

#### Inventory didn’t update

Check:

* the group is saved and active
* inventory tracking is enabled in Shopify for those variants
* you selected the correct variants (not just the product)

#### ❓ Wrong items are syncing

* remove the incorrect item from the group
* save again and re-test

***

### 🔗 Related guides

* [ Smart Scan (Auto-group by SKU)](https://docs.tipo.io/inventory-sync-groups/inventory-sync-groups/smart-scan)
* [Sync events in Inventory Sync Groups (what triggers updates)](https://docs.tipo.io/inventory-sync-groups/sync-events-in-inventory-sync-groups)
* [Sell Shirt Red and Blue (Inventory Sync Group for different SKUs)](https://docs.tipo.io/sample-cases/sell-shirt-red-and-blue-inventory-sync-group-for-different-skus)

***

**🙋 Still need support?**

If you still need help, please feel free to contact us at <hi@tipo.io>. We’ll be happy to assist you further.


# Sync events in Inventory Sync Groups

This guide explains what **Sync Events** are and how they keep your **Inventory Sync Groups** updated automatically.

## ℹ️  What are Sync Events?

A **Sync Event** is an action that changes inventory in Shopify—and triggers Tipo to update other products in the same Inventory Sync Group.

In simple terms:

> **Something changes stock → Tipo detects it → Tipo syncs the group.**

***

## 🔄 How sync happens (Sync events)

Each time one of the events below occurs, Tipo creates a **Sync Event** and updates inventory for products inside the related **Inventory Sync Group**.\
Here are the main events that can trigger synchronization:

### 🧩 1) Group created or updated

Whenever a group is created or updated, the app automatically syncs inventory according to the configuration in that group.&#x20;

**When it triggers**

**a) Group created/edited:** You create a new group or update group settings/variants

**b) Bulk update:** You update multiple groups using the bulk editor

**c) Import:** You import groups via CSV

**What happens**

Tipo recalculates the group inventory based on the new settings, then updates all linked items.

**Example:**\
You create a group that links T-shirt Red and T-shirt Blue because they share the same stock.\
After you click **Save**, Tipo Sync triggers a Group created/updated sync event and recalculates the group inventory.\
For example, if the inventory is 100 units, Tipo Sync sets:

* T-shirt Red = 100
* T-shirt Blue = 100

***

### 🛒 2) Order created

**When it triggers**

This event happens when a customer places an order for a product in a sync group.

**What happens**

Shopify reduces inventory → Tipo updates the rest of the group to keep inventory consistent.

**Example:**

Your group links T-shirt Red and T-shirt Blue, and both show 100 units.\
A customer buys 3 of T-shirt Blue.\
Tipo Sync detects the inventory change and updates the group:

* T-shirt Blue = 97
* T-shirt Red = 97

### &#x20;↩️ 3) Order refunded or canceled

**When it triggers**

This event happens when an order is refunded/canceled and inventory is returned to stock (based on Shopify settings).

**What happens**

Inventory increases in Shopify → Tipo syncs the new quantity to other items in the group.

**Note**: Only items with “Restock” checked in Shopify will be synced back to available inventory.

<figure><img src="/files/IoeLMITo30Fym7ogFLGo" alt=""><figcaption></figcaption></figure>

**Example:**<br>

After the sale, both shirts show **97 units**.\
You refund **2** items and return inventory to stock.\
Tipo Sync syncs the group:

* T-shirt Red = 99
* T-shirt Blue = 99

***

### 📍4)  Order location changed

**When it triggers**

This event happens when the fulfillment/inventory location for an order item changes (for stores using multiple locations).

**What happens**

Tipo recalculates inventory based on the updated location and updates group items accordingly.

<figure><img src="/files/MJHlxwkXomBH5NLePVIx" alt=""><figcaption></figcaption></figure>

**Example:**\
A sale was originally deducted from **Warehouse A**, then the order location is changed to **Warehouse B**.\
Tipo app recalculates inventory based on the new location and updates group items using that location’s available stock.

***

### ✏️ 5) Order edited

**When it triggers**

This event happens when order line items are changed after the order is created.&#x20;

Includes:

**a. Add New Product:** The newly added product is synced and its stock reduced.

**b. Update Quantity:** The app adjusts inventory to reflect the updated product quantity in the order.

**What happens**

Shopify adjusts inventory again → Tipo applies the updated inventory across the group.

**Example:**\
A customer originally ordered **1** unit, then you edit the order to **3** units.\
Shopify adjusts inventory again, and Tipo Sync updates the group so all linked items match the new inventory level.

***

### Summary

| Event Type                    | Trigger                                             | Action Taken                                                        | Example                                                    |
| ----------------------------- | --------------------------------------------------- | ------------------------------------------------------------------- | ---------------------------------------------------------- |
| **Group Created / Updated**   | Group created, edited, bulk updated, or imported    | Recalculates and syncs inventory for all variants in the group      | You link T-shirt Red and Blue → both updated to same stock |
| **Order Created**             | New order placed                                    | Deducts ordered quantity across all linked variants                 | 1 Red sold → 1 Blue also deducted                          |
| **Order Refunded / Canceled** | Refund or cancellation with “Restock items” checked | Restocks product quantity in the group                              | 1 Red refunded → 1 Blue also restocked                     |
| **Order Location Changed**    | Order moved to another fulfillment location         | Adjusts stock in both old and new locations                         | Move from Warehouse A → B → stock adjusted                 |
| **Order Edited**              | Order modified                                      | Updates inventory when new products are added or quantities changed | Added 1 more Red → 1 Blue also reduced                     |

**🙋 Still need support?**

If you still need help, please feel free to contact us at <hi@tipo.io>. We’ll be happy to assist you further.


# Bulk update Inventory Sync Groups

The **Bulk Update** feature allows you to manage multiple inventory sync groups at once, saving time when updating statuses, quantities, or active locations.

### ✅ What you can do with Bulk Update

With Bulk Update, you can quickly:

* Update group settings for many groups at the same time
* Rename or organize groups faster
* Trigger syncing for many updated groups after saving

> 💡 After a bulk update, Tipo creates a **Sync Event** and recalculates inventory for affected groups

### 🛠️ Steps

1. Open the app > go to **Inventory Sync Groups**&#x20;
2. Select the groups you want to update by ticking on the checkbox
3. Click **Bulk Update** at the top right

<figure><img src="/files/YacPU74DKIpW8CCAQu3h" alt=""><figcaption></figcaption></figure>

4. Edit Group details

In the **Bulk Update Inventory Sync Groups** view, you can:

* Update Status: Choose whether the group is *Active* or *Disabled*.
* Adjust Inventory Quantities: set new quantities for each location.
* Activate or Deactivate Locations: Use the checkbox to select which locations are included in syncing.

<figure><img src="/files/BrrkvPpDQ8rOHqE2WIUd" alt=""><figcaption></figcaption></figure>

5. Once you’ve made all updates, simply click **Save**.

The app will update all selected groups at once.

**🙋 Still need support?**

If you still need help, please feel free to contact us at <hi@tipo.io>. We’ll be happy to assist you further.


# Import and Export Inventory Sync Groups

This guide explains how to **export** your Inventory Sync Groups to a CSV file and **import** them back when you want to set up groups faster, copy settings to another store, or make bulk edits in a spreadsheet.

### ✅ What this feature does

* **Export** your existing Inventory Sync Groups to a CSV file
* Edit groups in bulk using Excel/Google Sheets
* **Import** the CSV to create or update groups in the app
* Set up many groups quickly (instead of creating groups one by one)

***

### 📥 **How to import**

1. Open the app > click **Inventory** **Groups** > click **Import**

<figure><img src="/files/yHVOI3t3eC6M3i2Vlvgr" alt=""><figcaption></figcaption></figure>

2. Download the **sample CSV template** to understand the correct format
3. Click **Add file** and upload your CSV file

<figure><img src="/files/olE6W56fZhUxYNeYjOUf" alt=""><figcaption></figcaption></figure>

4. Choose an **Import Type**:

* **Create new groups:** Add new inventory groups only.
* **Overwrite existing groups**: Replace existing groups with the same name.
* **Create new groups if not exist and overwrite existing groups:** Combine both actions.

5. Click **Import** to finish.

**Example**

If your CSV contains:

| id | title                  | status | location\_id | location\_name      | quantity | variant\_id    | variant\_title                        |
| -- | ---------------------- | ------ | ------------ | ------------------- | -------- | -------------- | ------------------------------------- |
| 1  | Inventory Sync Group 1 | active | 81987633427  | My Custom Location  | 54       | 44866231861523 | The Minimal Snowboard - Default Title |
| 1  |                        |        | 81987600659  | Shop location       | 21       |                |                                       |
| 1  |                        |        | 81987666195  | Snow City Warehouse | 40       |                |                                       |
| 2  | Inventory Sync Group 2 | active | 81987633427  | My Custom Location  | 32       | 44866231894291 | The Hidden Snowboard - Default Title  |
| 2  |                        |        | 81987600659  | Shop location       | 45       |                |                                       |
| 2  |                        |        | 81987666195  | Snow City Warehouse | 43       |                |                                       |

After importing this CSV: The app will create two groups:

* **Inventory Sync Group 1** → includes *The Minimal Snowboard* synced across three locations.
* **Inventory Sync Group 2** → includes *The Hidden Snowboard* synced across three locations.

***

### 📤 Export Inventory Groups

Exporting allows you to download your inventory sync data into a CSV file. It is ideal for backups or editing offline.

1. Open the app > click **Inventory Groups** > click **Export**

<figure><img src="/files/b2GEZ3T0zXPRvGwEzM3E" alt=""><figcaption></figcaption></figure>

2. Choose an option:

* **Current page:** Export only the groups you see on the screen.
* **All pages**: Export all inventory sync groups.

<figure><img src="/files/h3pp2n1cpMkZZhc6ou1l" alt=""><figcaption></figcaption></figure>

3. Click **Export** and the CSV file will download automatically.

***

#### 🛠️ Manage Inventory Groups

After importing, you can manage and review details in each group:

* **Group Name:** Used to identify the sync group.
* **Locations & Initial Inventory**: Set synced stock levels for each location.
* **Add Variants**: Add products manually or by condition (e.g., based on tags or collections).
* **Preview Variants:** See all products included in the group and their current inventory levels.

**Example**

You imported a group named **“T-Shirts”**.\
It syncs stock across 3 locations:

* Main Warehouse (50 units)
* Storefront (20 units)
* Online Warehouse (30 units)

When one sells 2 items, the app automatically updates all locations to keep stock consistent.

***

**Notes:**

* Always download the sample CSV before importing to ensure your file matches the format.
* Use **Export** regularly to back up your sync data.
* If importing large files, make sure your CSV is clean, no empty columns or duplicate headers.

**🙋 Still need support?**

If you still need help, please feel free to contact us at <hi@tipo.io>. We’ll be happy to assist you further.


# Troubleshooting: Inventory Sync Groups

Use this page when your group inventory doesn’t look correct or doesn’t update as expected.

### ✅ Before you start (quick checklist)

* Refresh the page and wait 1–2 minutes (some updates are not instant).
* Confirm the products/variants are in the same Inventory Sync Group.
* If you use **Smart Scan**, confirm the SKU format is correct and consistent.

***

### 1) Inventory is not updating

#### What you see

Inventory changes in Shopify, but the other grouped products don’t update.

#### Most common causes

* Inventory tracking is OFF for one or more variants.
* Inventory was updated in a location not used (or not the intended location).
* The products are not actually grouped (wrong variants selected).
* The change hasn’t been processed yet.

#### How to solve

1. Open Shopify **Products** > open the product > check **Inventory** section
2. Make sure **Track quantity** is enabled for the variants in the group
3. Confirm you updated inventory in the correct location
4. Go to **Tipo app > Inventory Sync Groups** and confirm the variants are included
5. Make a small test change (e.g., adjust by +1) and check again

***

### 2) Wrong quantities after grouping

#### What you see

After creating a group, inventory numbers look unexpectedly high/low.

#### Why it happens

* When a group is created, the app needs a **single “shared quantity”** for the group.
* If variants had different inventory before grouping, the result may look “wrong” depending on how your store was set up.

#### How to solve

1. Decide what the correct shared inventory should be (example: “We have 100 total”)
2. Update the inventory for **one** variant to the correct value
3. Let the group sync apply the same number to the other variants
4. Re-check that all variants show the same inventory

***

### 3) Products not detected by Smart Scan (Auto-group by SKU)

#### What you see

Smart Scan doesn’t create groups or misses products you expected.

#### Most common causes

* SKUs are empty for some variants
* SKUs don’t match exactly (spaces, lowercase/uppercase, extra characters)
* SKUs are unique (no duplicates = nothing to group)
* Only some variants share the SKU

#### How to solve

1. Export your product CSV (or open products) and check SKU values
2. Make SKU formatting consistent (example: `TSHIRT-RED-M`)
3. Re-run **Smart Scan**
4. If your SKUs are not designed to match, use [**Manual group creation**](https://docs.tipo.io/inventory-sync-groups/inventory-sync-groups/create-a-inventory-sync-group-manually) instead&#x20;

***

### 4) Group conflicts (a product/variant appears in multiple groups)

#### What you see

A variant is already grouped and you can’t add it again (or syncing behaves inconsistently).

#### Why it happens

A single variant should belong to **only one** Inventory Sync Group to avoid conflicting inventory updates.

#### How to solve

1. Find the product/variant inside **Inventory Sync Groups**
2. Identify which groups currently contain it
3. Remove it from the old group (or delete the old group)
4. Add it to the correct group
5. Save and re-check inventory

***

**🙋 Still need support?**

If you still need help, please feel free to contact us at <hi@tipo.io>. We’ll be happy to assist you further.


# Bundle Groups Overview

### ℹ️ What is a Bundle Group?

A **Bundle Group** links a **Master product (bundle)** with one or more **Component products**.\
When inventory changes (for example, a bundle is sold or components are restocked), Tipo app updates inventory based on your bundle rules.

***

### ℹ️ When should I use Bundle Groups?

Use Bundle Groups if you sell:

* **Kits / bundles** (e.g., “Gift Set” contains 1 candle + 1 box)
* **Packs** (e.g., “3-Pack Socks” consumes 3 units of the same SKU)
* **Build-your-own sets** where the master item depends on components

***

### 🔑 Key terms

* &#x20;**Master product**: the bundle listing customers buy (e.g., “Gift Box Set”)
* **Component products**: the items inside the bundle (e.g., “Candle”, “Box”)
* **Quantity rule**: how many units of each component are required for 1 bundle

***

### ✅ How Bundle inventory works

Tipo keeps inventory accurate by:

* Reducing component inventory when the **Master** sells
* Updating Master availability based on **component stock**
* Preventing overselling when a component is out of stock (depending on your rule setup)

***

### 🧪 Example

Let’s say you sell a bundle:

**Master (Bundle):** Gift Box Set\
**Components:**

* Candle (needs **1**)
* Gift Box (needs **1**)

**Inventory before sale**

* Candle: 20
* Gift Box: 12\
  ✅ Bundle can be sold **12** times (limited by the lowest component)

**After 2 bundle sales**

* Candle becomes 18
* Gift Box becomes 10\
  ✅ Bundle availability becomes **10**

***

### ℹ️ What affects syncing?

Bundle updates can happen when:

* &#x20;An order is created (bundle sold)
* An order is refunded/cancelled (inventory returned)
* You edit the Bundle Group settings/rules

**🙋 Still need support?**

If you still need help, please feel free to contact us at <hi@tipo.io>. We’ll be happy to assist you further.


# Create a new Bundle Group

You can create bundle groups to link multiple product variants and manage their inventory together.

Bundle Groups help you keep bundle inventory accurate by linking a **Bundle product (Master)** with the items inside it (**Components**). When the bundle sells, Tipo updates the component inventory automatically.

### ✅ Before you start

Make sure:

* Your **Bundle (Master)** product already exists in Shopify
* Your **Component** products exist and have **Track quantity** enabled
* You know how many units of each component are required for 1 bundle

***

### 🛠️ Steps to manage&#x20;

1. Open the app > click **Bundle Groups** >  click **New** **Bundle Group** button
2. Enter a **Title** and select **Status** as **Active**

<figure><img src="/files/gLYILaiCpvivlw1f9ggC" alt=""><figcaption></figcaption></figure>

3. Add Variants to the Group. There are 2 ways to add variants:

You can add variants using two methods:

* **Manual select:** Choose specific product variants from your catalog.

<figure><img src="/files/ArVDcwrZOFHQqNyThRlu" alt=""><figcaption></figcaption></figure>

* **Smart select:** Use filters (e.g., Title, Price, Vendor, Tag, Product Type, or Collection) to find and select multiple variants at once.\
  Example: Filter by *Tag contains “g90”* to quickly select all related variants.

<figure><img src="/files/qIX0hjE6hbF25UsQA2xN" alt=""><figcaption></figcaption></figure>

4. Set Bundle quantities: assign a **Master Variant** (main item controlling inventory sync) and set the **Bundle Quantity** for each.\
   This determines how many units of each variant are linked in the bundle.

<figure><img src="/files/bu15ONHGsy41WSn96tM3" alt=""><figcaption></figcaption></figure>

5. Save the bundle group.&#x20;

***

### 🔄 How Bundle Groups work

#### How the app calculates bundle availability

A bundle’s available quantity is based on the lowest available component stock, considering the quantity required.

**Formula (simple):**\
Bundle available = min( Component stock ÷ Quantity required )

#### What happens when a bundle is sold?

When an order is created for the Master product:

* Tipo app deducts inventory from each component based on its required quantity
* The bundle availability updates automatically after component stock changes

#### Example

**Bundle setup**

**Master (Bundle):** Gift Box Set\
**Components:**

* Candle × 1
* Gift Box × 1

**Inventory before sale**

* Candle: 20
* Gift Box: 12

✅ Bundle availability = **12** (Gift Box is the lowest)

#### Customer buys 2 bundles

Tipo Sync updates components:

* Candle: 20 → 18
* Gift Box: 12 → 10

✅ Bundle availability becomes **10**

**🙋 Still need support?**

If you still need help, please feel free to contact us at <hi@tipo.io>. We’ll be happy to assist you further.


# Inventory calculation rules for Master Products

This guide explains how to calculates the available inventory for a **Master (bundle) product** based on its **component items**.

<figure><img src="/files/uyloTAiv5rQeefMgzNzw" alt=""><figcaption></figcaption></figure>

### ℹ️ What is “Master product inventory”?

The **Master product** is the bundle item customers purchase.\
Its available quantity is calculated from the inventory of its **components**.

Example:

* Master: **Gift Box Set**
* Components: **Candle ×1**, **Gift Box ×1**

***

### **❓**&#x57;hy “Master product inventory matter?

* **Prevents overselling bundles**\
  If the Master shows “In stock” but a component is out of stock, you can sell bundles you can’t fulfill. Correct Master inventory avoids that.
* **Shows the real bundle availability**\
  The Master’s available quantity should reflect what you can truly build from components (often limited by the lowest component stock).
* **Keeps storefront + fulfillment aligned**\
  Accurate Master inventory means your storefront availability matches your warehouse reality, reducing cancellations and support issues.

***

### 🔢 Default calculation

Calculates bundle availability using this logic:

> **Bundle available = the lowest component availability**, based on required quantity.

#### Formula

For each component:

* **Component availability = (component stock ÷ required quantity)**

Then:

* **Master available = min(all component availabilities)**

***

### 🧪 Example&#x20;

Bundle setup:

* Candle × 1
* Gift Box × 1

Inventory:

* Candle stock = 20
* Gift Box stock = 12

Component availability:

* Candle: 20 ÷ 1 = 20
* Gift Box: 12 ÷ 1 = 12

✅ Master (bundle) available = **12**

**🙋 Still need support?**

If you still need help, please feel free to contact us at <hi@tipo.io>. We’ll be happy to assist you further.


# Sync triggers between Master and Component Products

This guide explains what actions trigger syncing in Bundle Groups, and what Tipo app updates between the Master (bundle) product and its Component products.

## ✅ What are “sync triggers”?

A **sync trigger** is an event that changes inventory in Shopify and causes Tipo Sync to recalculate the bundle.

In simple terms:

> **Something changes stock → Tipo detects it → updates Master and/or Components**

***

## 🧩 How syncing works&#x20;

### 1.Sync from Master → Component Products

When a change happens to the **Master** product, the system will update the **Component** products accordingly.

This ensures that when a **Master** is sold, its **Components** are also deducted.

#### 1.1. Order Created

When an order includes a Master product, the corresponding quantity of each Component product is subtracted.

**Example:**\
If a Master bundle “Gift Box” includes:

* 1 Candle
* 1 Soap

When a customer orders **2 Gift Boxes**, the system will automatically deduct **2 Candles** and **2 Soaps** from inventory.

#### **1.2. Order Refund / Order Cancel**

If an order containing a Master product is refunded or canceled, and the **Restock** option is enabled, the quantities of the Components are restored accordingly.

**Example:**\
If 1 “Gift Box” was refunded with restock enabled, both the Candle and Soap quantities increase by 1.

#### **1.3. Order change Location**

If the location of an order is changed, the system updates inventory at both the old and new locations to ensure consistency.

**Example:**\
If an order moves from Warehouse A to Warehouse B, the Component inventory in Warehouse A is increased, and the inventory in Warehouse B is decreased.

#### **1.4. Order Edit**

If the order containing Master products is edited:

* **Add new products:** Component quantities are adjusted accordingly.
* **Update product quantities:** The Component quantities are recalculated based on the new order quantity.

**Example:**\
If the order originally had 1 Gift Box and is updated to 2, the Components’ inventory will be reduced by 1 more each.

***

### **2. Sync from Component → Master Products**

This direction applies when you enable the **“Sync Component to Master”** setting.\
It ensures that when Component quantities change, the related Master’s quantity is automatically updated.

#### **2.1. When Creating or Updating a Bundle**

When you create or edit a Bundle Group, the Master’s inventory is recalculated based on the available stock of all Components.

**Example:**\
If “Gift Box” = 1 Candle + 1 Soap

* Candle = 10 units
* Soap = 20 units\
  → Master “Gift Box” inventory = 10 (based on the lowest Component quantity).

#### **2.2. When clicking “Update Master Inventory”**

You can manually refresh the Master’s inventory at any time by clicking this button in the app.\
This recalculates the Master’s available quantity from the current Component quantities.

<figure><img src="/files/JBavB5rsaKw6UupoBfOW" alt=""><figcaption></figcaption></figure>

#### **2.3. Order created**

If an order includes Component products (instead of the Master), the system recalculates the Master’s available quantity.

**Example:**\
If a customer buys 1 Candle (a Component of “Gift Box”), the available “Gift Box” quantity will also decrease since one of its Components is now lower.

#### **2.4. Order refund / Order cancel**

When an order containing Components is refunded or canceled with restock enabled, the Master quantity increases accordingly.

#### **2.5. Order change Location**

When the order location of Component products is changed, the system adjusts the Master’s inventory to reflect changes in the new and old locations.

#### **2.6. Order edit**

If the order is edited (e.g., changing quantity or adding/removing a Component), the Master’s inventory is recalculated accordingly.

***

### Unsynced Events

#### 1.Manual Inventory Edits

If you manually change the inventory of a product directly in your Shopify admin, the app will not automatically sync this change to other related products.\
**Reason:**&#x20;

* Manual edits made outside the app (e.g., adjusting stock in Shopify → **Products** → Edit inventory) are not recorded as sync events.
* The app only tracks changes made through orders, refunds, or app actions.

**Example:**\
You manually increase the inventory of “Candle” (a Component of “Gift Box”) from 10 → 20 in Shopify.\
→ The app will not automatically update the “Gift Box” quantity.\
To refresh the Master inventory after manual edits, go to the app and click **“Update Master Inventory”**.

#### 2.Updates from third apps

If another app (such as a fulfillment, warehouse, or inventory management app) changes the product quantity, this will not trigger sync in the Tipo app.

**Reason**:&#x20;

* The Tipo app only syncs inventory when it detects specific Shopify events (like order creation, refund, or edit).\
  \- 3rd-party apps may update inventory via API or custom scripts that Shopify does not classify as standard inventory events.

**Example:**\
You’re using a warehouse management app that automatically decreases the stock of “Soap” when it’s packed for shipment.\
→ Tipo Sync will not detect this change and won’t adjust the Master “Gift Box” inventory.\
In this case, you can manually refresh the sync by clicking **“Update Master Inventory”** or re-saving the bundle group.

#### 3.Draft Orders

When you create draft orders in Shopify, inventory is not reduced until the order is actually completed or paid.\
Therefore, the app does not trigger inventory sync for draft orders.

**Reason:**

* Shopify treats draft orders as “not finalized,” meaning the inventory remains unchanged.
* Syncing at this stage could cause inaccurate stock levels.

**Example:**\
You create a draft order for 2 Gift Boxes but haven’t marked it as paid yet.\
→ Tipo does not update inventory for the Components (“Candle” and “Soap”) until the draft order becomes a confirmed order.\
Once the draft order is paid or converted, the sync will run normally.

**🙋 Still need support?**

If you still need help, please feel free to contact us at <hi@tipo.io>. We’ll be happy to assist you further.


# Import and Export Bundle Groups

Import & Export helps you create or update many Bundle Groups quickly using a CSV files, no need to set up bundles one by one.

### ✅ What this feature can do

With Import & Export, you can:

* **Export** your current Bundle Groups to a CSV file
* Edit bundle setups in bulk (Master, components, quantities)
* **Import** the CSV to create or update Bundle Groups
* Set up dozens/hundreds of bundles faster
* Keep a backup of your bundle configuration

***

### 📥 Importing Bundle Groups

You can import bundle groups using a CSV file. This is perfect for bulk creation or updates.

**Steps:**

1. Go to the app > click **Bundle Groups**  > click **Import**

<figure><img src="/files/ifHlSngMMjp28ygsDg08" alt=""><figcaption></figcaption></figure>

2. In the modal:

* Use the link to **download a sample CSV template**   (optional)
* Click **Add file** to upload your CSV

<figure><img src="/files/c2kdMxN6SW4aY7xuhsS2" alt=""><figcaption></figcaption></figure>

3. Choose your import type:

* **Create new groups** – Adds only new bundle groups.
* **Overwrite existing groups** – Updates existing groups based on the CSV.
* **Create new groups if not exist and overwrite existing groups** – Combines both actions.

4. Click **Import** to start the process.

**Note**: Make sure your CSV matches the template format to avoid errors.

***

### 📤 Exporting Bundle Groups

Exporting lets you back up your data or prepare it for analysis or migration.

**✅ Before importing**

To prevent import errors:

* Use the same column format as the exported file
* Ensure all **Masters** and **Components** exist in Shopify
* Confirm identifiers (SKU/handle/variant info) match exactly (no extra spaces)

> 💡 Best practice: **Export → Edit → Import** (don’t build the file from scratch).

**Steps:**

1. Open the app > click **Bundle Groups** > click **Export**&#x20;

<figure><img src="/files/6ZX2J75c0URz9TJOZR4r" alt=""><figcaption></figcaption></figure>

2. In the modal:

* Choose **Current page** to export only what's visible.
* Choose **All pages** to export all bundle groups.

3. Click **Export** to download the CSV file.

**🙋 Still need support?**

If you still need help, please feel free to contact us at <hi@tipo.io>. We’ll be happy to assist you further.


# Update Master Inventory

This guide explains how Update Master Inventory works in Bundle Groups, when to use it, and what happens after you run it.

### ✅ What is “Master inventory”?

The **Master product** is the bundle product your customers buy (example: **Gift Box Set**).

The **Master inventory** represents how many bundles are available to sell, based on the inventory of the **component products**.

***

### 🎯 Why you might need to “Update Master Inventory”

Normally, Tipo app updates bundle availability automatically when components change.\
But sometimes you may want to force a recalculation, for example:

* You just created or edited a Bundle Group
* You imported bundle groups via CSV
* Component inventory was updated in bulk (import/another app)
* Master availability looks out of date and you want to refresh it

***

### 🔄 What happens when you update Master inventory?

When you run **Update Master Inventory**, Tipo app will:

1. Read the latest inventory of all **components**
2. Recalculate how many bundles can be created (based on quantity rules)
3. Update the **Master product inventory** to match the calculated result

✅ This helps keep your bundle availability accurate.

***

### 🛠️ Steps

1. Open the app > go to **Bundle Groups**  > select the bundle groups you want to update by checking the boxes beside their names.
2. Click **Update Master Inventory** button

<figure><img src="/files/k9GkeboAMImGKbWZqyAt" alt=""><figcaption></figcaption></figure>

The system will automatically:

* Recalculate the **Master Product** quantities based on the current inventory levels of their **Component Products**.
* Update the **Master** **Product** stock across all linked bundles.

&#x20;**Example:**\
Suppose your Master variant (a gift set) includes:

* 2 × Product A
* 1 × Product B

If Product A now has 6 units in stock and Product B has 5, then the Master variant will be recalculated as **min(6 ÷ 2, 5 ÷ 1) = 3 units available**.

This action recalculates the master variant’s inventory based on the component inventory, following the setting **“Sync Master with Component inventory”** in the app’s settings.

<figure><img src="/files/wzb3lMGpErgNeiFdczCM" alt=""><figcaption></figcaption></figure>

***

**🙋 Still need support?**

If you still need help, please feel free to contact us at <hi@tipo.io>. We’ll be happy to assist you further.


# Troubleshooting: Bundle Groups

### ✅ Before you start (quick checklist)

Check these first

* The bundle is set up as a **Bundle Group** (Master + Components saved)
* You selected the correct variants (not only product titles)
* **Track quantity** is enabled for all component variants in Shopify
* Component quantities are correct (×1, ×2, ×3…)
* You’re checking the correct Shopify location (if you use multiple locations)

***

### 🛠 Case 1: Cannot create Bundle Groups

If you cannot create a Bundle or Inventory Sync Group, make sure all required information is properly set up.

**Checklists:**

* The group must include at least 2 variants.

**Example**:&#x20;

A bundle with only one product variant (e.g., just “T-shirt Blue – Small”) cannot be created. You need at least two (e.g., “T-shirt Blue – Small” and “T-shirt Blue – Large”).

The group must have at least one active location, and that location’s inventory must not be blank.

**Example***:*&#x20;

If your “Main Warehouse” location has no inventory number entered, the system cannot calculate the initial stock for the group.

Each variant can belong to only one group.

***

### 🛠  **Case 2: Scan, Import, Export, or Report not working**

If your scan, import, export, or report function doesn’t start or seems stuck:

| Only one task can run at a time.     | Wait until the current background process is finished before starting a new one.                                                                                                                                                        | If you’re already importing a large CSV file, running a “Scan” at the same time will fail until the import is complete. |
| ------------------------------------ | --------------------------------------------------------------------------------------------------------------------------------------------------------------------------------------------------------------------------------------- | ----------------------------------------------------------------------------------------------------------------------- |
| These actions run in the background. | You’ll receive an email notification once the task is complete.                                                                                                                                                                         | After running “Export Inventory Groups,” check your email inbox, the system will send a download link once it’s ready.  |
| Didn’t receive the email?            | <p>1. Check your email address in the app’s <strong>Settings</strong> tab to make sure it’s correct.<br> 2. Check your <strong>spam</strong> or <strong>promotions</strong> folder, some email providers filter task notifications.</p> | If you don’t see the export report email, look in the Spam folder or verify the address in Settings.                    |

***

### 🛠 Case 3: Unexpected Inventory Changes

If inventory numbers change unexpectedly between Master and Component products, it’s usually due to a triggered sync event.

We suggest you open the **History** tab in the app to review which event caused the change.\
**Example***:* You may see that inventory for “Bundle A” decreased because an order containing “Master Product A” was created.

**Note:**\
History records are automatically deleted after **2 months**, so older changes will no longer appear.

If you suspect a sync loop or unexpected adjustment, try reviewing recent orders or edits made through third-party apps that might have modified stock quantities.

***

### 🛠  Case 4: Bundle (Master) inventory is 0 but components have stock

#### Why it happens

**Why it happens (Most often)**

* A component is out of stock at the tracked location
* Component quantity is set incorrectly (e.g., should be ×2)
* Inventory tracking is disabled for a component variant

**How to solve**

1. Open the Bundle Group and confirm each **component variant**
2. Check component inventory in Shopify and ensure **Track quantity** is enabled
3. Confirm quantities required per bundle are correct
4. Run **Update Master Inventory** to recalculate

✅ Example: If a bundle needs **2× Product A**, then Product A stock limits the bundle.

**🙋 Still need support?**

If you still need help, please feel free to contact us at <hi@tipo.io>. We’ll be happy to assist you further.


# Reports

### ✅ What Reports does

Reports help you export store data and spot inventory issues fast without manually checking products one by one.

In **Tipo app** > click **Reports**, you can:

* Export data (for CSV import or analysis)
* Identify products that need attention (out of stock, dead stock, no recent updates, etc.)

***

### 📊 How to generate a report

1. In Shopify Admin, open **Apps** > open I**nventory Sync, Multi store TP** app&#x20;
2. Click **Reports** in the left menu

<figure><img src="/files/5Tkldix3Si77iuTlLy6X" alt=""><figcaption></figcaption></figure>

3. Select one of the report types:&#x20;

* **Product**: exports product + variant information (useful for CSV imports)
* **Location**: exports your Shopify locations (useful for inventory mapping/import)
* **Threshold**: exports products that are below a defined stock threshold
* **Out of Stock**: exports products with 0 inventory
* **No Recent Inventory Updates**: finds products that haven’t had inventory updates recently
* **Dead Stock**:  identifies products that are not selling during a selected period

4. Select the data you want to export&#x20;

<figure><img src="/files/4f4CKvSbNFrGS3OKDjPb" alt=""><figcaption></figcaption></figure>

5. Click **Generate report**

***

#### ✅ **After export** <a href="#after-export" id="after-export"></a>

<figure><img src="https://docs.tipo.io/~gitbook/image?url=https%3A%2F%2F2618001169-files.gitbook.io%2F%7E%2Ffiles%2Fv0%2Fb%2Fgitbook-x-prod.appspot.com%2Fo%2Fspaces%252FQFJLe0hkcyiradJOCgpx%252Fuploads%252FjuZ347toIa5guYOLhxWj%252F2025-10-14_17-24-25.png%3Falt%3Dmedia%26token%3D0b680725-6c05-45bc-a837-7e6fe2fc4be5&#x26;width=768&#x26;dpr=4&#x26;quality=100&#x26;sign=5d04fe8c&#x26;sv=2" alt=""><figcaption></figcaption></figure>

All reports are exported in **CSV format**, which can be opened in Excel or Google Sheets.

When you export data from Tipo Sync, the system will automatically send an email to your Shopify account once the export process is complete.

The email will include a download link for the exported CSV file.

Example email:

<figure><img src="https://docs.tipo.io/~gitbook/image?url=https%3A%2F%2F2618001169-files.gitbook.io%2F%7E%2Ffiles%2Fv0%2Fb%2Fgitbook-x-prod.appspot.com%2Fo%2Fspaces%252FQFJLe0hkcyiradJOCgpx%252Fuploads%252FXh3W6u6DoA5m7XGzewzU%252F2025-10-14_17-21-41.png%3Falt%3Dmedia%26token%3D87af0622-4a9a-41ef-9414-927752757a4b&#x26;width=768&#x26;dpr=4&#x26;quality=100&#x26;sign=bc8808e7&#x26;sv=2" alt=""><figcaption></figcaption></figure>

***

### 🧾 Example: Product report

Steps

1. In **Reports**, click **Product**
2. Choose what to include:

* **All products** (fastest option)
* **Specific products** (use this if you only want a few items)

3. Click **Generate report**

You’ll see a message like **“Task created successfully”.**&#x20;

The **Product** report exports a spreadsheet-style table like this:

Common columns you’ll see:

* **handle** — the product handle (used to match/update products in Shopify)
* **title** — product title
* **vendor** — brand/vendor name
* **product\_type** — product category/type
* **tags** — tags assigned to the product

<figure><img src="/files/sarp8g19KVpSJxm1LVKY" alt=""><figcaption></figcaption></figure>

**🙋 Still need support?**

If you still need help, please feel free to contact us at <hi@tipo.io>. We’ll be happy to assist you further.


# 🕘 History (Sync Activity Log)

The **Report** feature in Tipo Sync helps you analyze and export inventory data, so you can make better stock management decisions. You can export reports as CSV files and use them for tracking, planning, or updating your inventory.

Open the app > click **Report** > You’ll see a list of available report types.

<figure><img src="/files/edYgzZGoYFY0RcR9ru87" alt=""><figcaption></figcaption></figure>

### Report Types

#### **1. Product Report**

Export product variant data used for import or analysis.

**How to use:**

* Choose whether to include **All products** or **Specific products**.
* If specific, set filter conditions (e.g., Title, Vendor, Tag, Product Type, or Collection).
* Click **Generate report** to export a CSV file.

**Example:**\
Export all products tagged with “Summer Collection” to update prices in bulk.

#### &#x20;2. Location Report

Export location data to create CSV import templates for location-based sync setup.

**Use case:**\
Useful when setting up new sync locations or verifying stock distribution across multiple warehouses.

#### **3. Threshold Report**

Export products that have reached your defined threshold levels.

**How to use:**

* Choose **All products** or **Specific products**.
* Select one of the following:
  * **Using Threshold Groups configuration** – export based on your predefined threshold group settings.
  * **Single Level** – set one threshold value.
  * **Multiple Level** – set multiple alert levels.

**Example:**\
Generate a report of products with stock below 10 units to plan restocking.

<figure><img src="/files/LF3zNz3tz8IVdcH8Ukfm" alt=""><figcaption></figcaption></figure>

#### **4. Out of Stock Report**

Export a CSV file of products that are currently out of stock.

**Use case:**\
Identify which products to restock immediately to avoid lost sales.

#### **5. No Recent Inventory Updates**

Export products that haven’t had inventory changes within a certain period.

**Use case:**\
Detect slow-moving products and consider promotions or delisting them.

#### **6. Dead Stock Report**

Identify products that haven’t sold within a selected period.

**How to use:**

* Choose **All products** or **Specific products**.
* Select a time range: 7, 14, 30, or 60 days.
* Choose to group results by **Product** or **Variant**.
* Click **Generate report** to export.

**Example:**\
Find products that haven’t sold in 30 days to decide whether to discount or discontinue them.

### **After export**

<figure><img src="/files/NduHSU7KBE6y6Ks2IpMi" alt=""><figcaption></figcaption></figure>

All reports are exported in **CSV format**, which can be opened in Excel or Google Sheets.

When you export data from Tipo Sync, the system will automatically send an email to your Shopify account once the export process is complete.

The email will include a download link for the exported CSV file.

Example email:

<figure><img src="/files/rPYbvzFFF5e8PTiloDQp" alt=""><figcaption></figcaption></figure>


# History (Sync Activity Log)

The History page helps you track what Tipo app has done in your store so you can quickly confirm a sync ran, see the result, and debug issues if something looks off.

### ✅ What you can see in History

<figure><img src="/files/uWn8lgAZdZA33LANhoWG" alt=""><figcaption></figcaption></figure>

### ✅ What you can see in History

On the History table, each row shows one sync action (a “job”), including:

* **Type**: Inventory Sync Group or Bundle Group
* **Group ID**: The group that triggered the update
* **Title**: Group name
* **Order / Action**: What the system did (example: *Update master inventory*, *Update product group*)
* **Status**: Completed / Unchanged / (other statuses if shown)
* **Created At**: When the action happened
* **View**: Open details for that job&#x20;

***

### 📍 Where to find History

1. Open **Shopify Admin** > open the app
2. Click **History** in the left menu
3. Find the row you want to check > click the 👁️ eye icon > a History Detail popup opens, showing:

* Group name + action type
* Status (example: Completed)
* Inventory results table (what changed)

**🙋 Still need support?**

If you still need help, please feel free to contact us at <hi@tipo.io>. We’ll be happy to assist you further.


# Out-of-stock Handling - Inventory Groups

Out-of-stock handling controls what Tipo app should do when one item in an Inventory Sync Group becomes out of stock.

### ✅ When to use this setting

Use out-of-stock handling if your group contains products that represent the same stock (examples):

* same product listed multiple times (different titles, languages, marketplaces)
* duplicate listings that must always have the same available quantity

If your grouped products should not go out of stock together, keep this setting off.

***

### ⚙️ Where to configure it

1. Open the app > click **Settings**&#x20;
2. Find **Inventory Groups > When products in the group are out of stock** > choose your preferred behavior

* **Option 1: Continue syncing:**\
  The app will keep syncing inventory data even if a product in the group is out of stock.\
  (Recommended if you want inventory levels to stay consistent across stores or variants.)
* **Option 2: Pause sync & notify by email:**\
  Syncing will pause automatically when a product in the group runs out of stock.\
  You’ll receive an email notification so you can restock or take action before resuming syncing.

<figure><img src="/files/Da0AZA8lCfvWUhY1iWBY" alt=""><figcaption></figcaption></figure>

3. Click **Save**.

***

.

***

### 🧪 Example

You group **T-shirt Red** and **T-shirt Blue** (shared stock).

* If **Continue syncing** is selected: when you restock, both products will update again automatically.
* If **Pause sync & notify by email** is selected: syncing stops at 0, and you’ll get an email so you can fix stock before it syncs further.

**🙋 Still need support?**

If you still need help, please feel free to contact us at <hi@tipo.io>. We’ll be happy to assist you further.


# Sync Master with Component inventory - Bundle Groups

When you sell **bundle products**, the “Master” product (the bundle listing) should only be available if the **component items** are in stock.\
This setting helps you keep the bundle inventory accurate automatically.

### ✅ What this setting does

When **Sync Master with Component inventory** is enabled:

* The **Master** variant inventory is calculated from **component** inventory
* When component stock changes (sale, restock, manual adjustment), the **Master** updates automatically
* &#x20;Helps prevent overselling bundles that can’t be fulfilled

***

### 🔑 Key terms

* **Master product / Master variant**: the bundle listing customers buy (e.g., “Gift Set”)
* **Component products**: items inside the bundle (e.g., Candle + Soap)
* **Required quantity**: how many units of each component the bundle needs

### ⚙️ Where to turn it on

1. Open the app > click **Settings**&#x20;
2. In **Bundle groups**, enable **Sync Master with Component inventory**
3. Click **Save**

<figure><img src="/files/TRnvyOQbUjlcpC9u85Q8" alt=""><figcaption></figcaption></figure>

***

### ✅ How the inventory is calculated

The app checks each component’s available stock and calculates how many full bundles you can make.

**Example**

Your Master variant **“Gift Set”** includes:

* **2 × Product A**
* **1 × Product B**

Current stock:

* Product A = **6**
* Product B = **5**

Calculation:

* Product A allows: **6 ÷ 2 = 3 bundles**
* Product B allows: **5 ÷ 1 = 5 bundles**

⇒  Master inventory becomes: **min(3, 5) = 3 bundles available**

So the bundle will show **3** in stock.

**🙋 Still need support?**

If you still need help, please feel free to contact us at <hi@tipo.io>. We’ll be happy to assist you further.


# Email Notifications


# Set up email notification

### ✅ What you’ll get notified about

When notifications are enabled, Tipo Sync can email you when:

* &#x20;**Inventory Sync Group sync fails**
* ⚠️ **Bundle Group sync fails**
* (Optional) **Sync is paused because a product is out of stock** (if you choose “Pause sync & notify by email” in settings)

***

### 🛠️ How to set your notification email

1. Open the app > go to the app **Settings**&#x20;
2. In **Notifications** parts > **Send emails to** > enter the email address you want to use&#x20;
3. Tick on the checkbox of the email template you want to use

**🔔 Email alert at sync product group failed**

Receive an email if syncing between inventory groups fails.\
Useful for monitoring and fixing issues quickly.

**🔔 Email alert at sync bundle group failed**

Receive an email if syncing between bundle groups fails.\
Helps you stay aware of syncing errors and ensure product accuracy.

4. Save the app Settings.&#x20;

<figure><img src="/files/Scjf8OyMD7AhT465chrO" alt=""><figcaption></figcaption></figure>

***

### 🧩 Example

You set **Send emails to = <hi@tipo.io>** and enable **Bundle Group failed** alerts.\
If a bundle sync fails (for example, a component product is missing inventory tracking), Tipo Sync will email **<hi@tipo.io>** so you can review and fix it.

***

**🙋 Still need support?**

If you still need help, please feel free to contact us at <hi@tipo.io>. We’ll be happy to assist you further.


# Sell Shirt Red and Blue  (Inventory Sync Group for different SKUs)

### Case

I have two products in my store:

| Product Name | SKU        | Inventory Quantity | Track Quantity Enabled |
| ------------ | ---------- | ------------------ | ---------------------- |
| Blue Shirt   | BLUE-SHIRT | 30                 | Yes                    |
| Red Shirt    | RED-SHIRT  | 20                 | Yes                    |

I want these two products to **share the same inventory pool** so when one sells, the stock reduces for both. This helps me avoid overselling and manage stock centrally.

<figure><img src="/files/ZjzeDgC1etJMhfnuLThv" alt=""><figcaption></figcaption></figure>

### Solution: Create an Inventory Sync Group

Steps:&#x20;

1. Open the sync app > click on **Inventory Sync Groups** section on the left menu > click **New** **Inventory Sync Groups** button
2. Enter a name for the group, e.g., **Inventory Sync Group -T-shirt** and Set the group status to **Active**.
3. Set **Initial Synced Stock**  to **50** (which is the sum of 30 + 20)
4. Add the two products: **Blue Shirt** and **Red Shirt.** I filter them by tag. Click Preview variants button to see that products will be added to the group
5. **Save** the Inventory Sync Group.

   Once saved, all included products will share the same inventory: when one sells, others update automatically.

<figure><img src="/files/X5fQT8KYZAjehw5P3t4C" alt=""><figcaption></figcaption></figure>

<figure><img src="/files/1O4dx1zXIEe4GSTpY9aF" alt=""><figcaption></figcaption></figure>

### Result&#x20;

The **Blue Shirt** and **Red Shirt** now share a combined stock of **50 units**.

<figure><img src="/files/crdyrWBC66FsBirkSf03" alt=""><figcaption></figcaption></figure>

* When a customer buys **1 Blue Shirt**, the shared stock reduces from 50 to **49**.
* This updated stock is reflected for both products, so the inventory shown for Blue Shirt and Red Shirt becomes **49**.
* If a customer buys **2 Red Shirts**, the stock reduces from 49 to **47**, and this update is visible for both products.

Summarizing the inventory changes after purchases:

| Action           | Shared Stock | Blue Shirt Stock | Red Shirt Stock |
| ---------------- | ------------ | ---------------- | --------------- |
| Initial stock    | 50           | 50               | 50              |
| Buy 1 Blue Shirt | 49           | 49               | 49              |
| Buy 2 Red Shirts | 47           | 47               | 47              |

**🙋 Still need support?**

If you still need help, please feel free to contact us at <hi@tipo.io>. We’ll be happy to assist you further.


# Sell Coffee Mug - (Inventory Sync Group for same SKU)

### Case

This scenario addresses products where multiple listings are created for different designs, but they all draw inventory from the exact same physical stock. This is common when products are created with different colors, themes, or slightly different images but share one inventory management identifier (SKU).

* **The Problem:** Your current e-commerce platform shows 50 units for each mug listing, leading to a potential total oversell of 150 units when only 50 are actually available in the warehouse.

| Mug (Holiday Design)  | `MUG-GIFTSET` | 50 | Yes |
| --------------------- | ------------- | -- | --- |
| Mug (Birthday Design) | `MUG-GIFTSET` | 50 | Yes |
| Mug (Generic Design)  | `MUG-GIFTSET` | 50 | Yes |

<figure><img src="/files/MmrmEzi4mA6xq84tAgL5" alt=""><figcaption></figcaption></figure>

**The Goal:** You need to link all three product listings into a single **Inventory Sync Group** based on the shared **`MUG-GIFTSET`** SKU. This ensures that a sale from *any* listing immediately updates the stock level across *all* listings in real-time.

### Solution: Use Smart Scan to create Inventory Sync Group

**Steps**

1. Open the sync app > click on **Inventory Groups** section on the left menu > Click **Smart Scan** button

<figure><img src="https://docs.tipo.io/~gitbook/image?url=https%3A%2F%2F2618001169-files.gitbook.io%2F%7E%2Ffiles%2Fv0%2Fb%2Fgitbook-x-prod.appspot.com%2Fo%2Fspaces%252FQFJLe0hkcyiradJOCgpx%252Fuploads%252FQcfcVb2A0mu8VuDT0YK0%252F2025-10-21_15-52-27.png%3Falt%3Dmedia%26token%3D8ac1a828-b879-495c-b1c7-348973ab681a&#x26;width=768&#x26;dpr=4&#x26;quality=100&#x26;sign=3c6fe966&#x26;sv=2" alt=""><figcaption></figcaption></figure>

2. In the **Smart Scan Inventory Groups** page, configure the following options:

* Choose how to handle Groups: **Create new groups**
* Select which products to scan:  select products with tag  **MUG-GIFTSET**

<figure><img src="/files/ZUicr81u8UygD0Q8Eviw" alt=""><figcaption></figcaption></figure>

* enable the option **Auto activate locations** > select the location you want to adjust&#x20;

<figure><img src="/files/1ZBMJBOZZRniV2T9YkgV" alt=""><figcaption></figcaption></figure>

3. Click **Export CSV** button to see what products will be edited - it helps you check before scanning

<figure><img src="/files/CSUCRUBJMPuQHFxi7m1Z" alt=""><figcaption></figcaption></figure>

4. Once all options are set, click **Scan Now** to begin grouping products automatically

When Smart Scan finishes:

* You’ll see new Product Groups created in your **Product Groups** list.
* You can set the stock for all products&#x20;

<figure><img src="/files/Y5ci8UHFq9NyUBnZeKlS" alt=""><figcaption></figcaption></figure>

<figure><img src="/files/Gde9N0DbELTyFOJLCV8N" alt=""><figcaption></figcaption></figure>

### Result

* Initial State: All three product listings show the full available inventory of 50.
* The Event: A customer buys one Mug (Holiday Design).
* The Sync: The Inventory Sync Group instantly recognizes the shared SKU pool has decreased to 49. Tipo Sync then pushes this new 49 stock level to the listings for the Birthday and Generic Mugs, ensuring you never oversell.

<table data-header-hidden><thead><tr><th>Product Name</th><th width="123.08935546875">SKU</th><th width="130.8011474609375">Initial Stock</th><th>Event</th><th>Final Stock (After Sync)</th></tr></thead><tbody><tr><td>Mug (Holiday Design)</td><td><code>MUG-GIFTSET</code></td><td>50</td><td>1 Unit is Purchased</td><td>49</td></tr><tr><td>Mug (Birthday Design)</td><td><code>MUG-GIFTSET</code></td><td>50</td><td>Sync Group Updates</td><td>49</td></tr><tr><td>Mug (Generic Design)</td><td><code>MUG-GIFTSET</code></td><td>50</td><td>Sync Group Updates</td><td>49</td></tr></tbody></table>

**🙋 Still need support?**

If you still need help, please feel free to contact us at <hi@tipo.io>. We’ll be happy to assist you further.


# Small Planter Kit - Bundle Group

This guide provides a detailed example of how to use a Bundle Group to calculate the inventory of a bundled product based on the stock of its individual components.

### Case

This scenario involves a main bundled product ("Small Planter Kit") whose inventory must be calculated based on the available stock of two component products ("Wooden Panel" and "Bag of Soil").

<figure><img src="/files/oG2PmnvHwktXJbVuubUh" alt=""><figcaption></figcaption></figure>

| Type          | Product Name          | SKU         | Current Stock  | Role in Bundle                                    |
| ------------- | --------------------- | ----------- | -------------- | ------------------------------------------------- |
| **Bundle**    | **Small Planter Kit** | `KIT-PLN01` | 0 (Calculated) | *Main Product (Inventory needs to be determined)* |
| **Component** | Wooden Panel          | `PNL-WOOD`  | 80             | *Required: 4 Panels per Kit*                      |
| **Component** | Bag of Soil           | `BAG-SOIL`  | 45             | *Required: 1 Bag per Kit*                         |

* **The Problem:** The **Small Planter Kit** is listed on your storefront, but you cannot manually track its inventory without constantly checking the stock of the individual Panel and Soil Bag components.
* **The Goal:** Create a **Bundle Group** that uses the stock of `PNL-WOOD` and `BAG-SOIL` to accurately calculate the maximum available inventory for the `KIT-PLN01` bundle.

### Solution: Create a Bundle Group

We will create a new Bundle Group in Tipo Sync to define the recipe for the `KIT-PLN01` product.

**Steps**

1. Open the app > click Bundle Groups > click **New** **Bundle Group** button
2. Enter a **Title** and select **Status** as **Active**
3. In **Master Variant** field, search and select the main product: **Small Planter Kit** (`KIT-PLN01`)

<figure><img src="/files/hUNBonJcBeFpkOfCscLg" alt=""><figcaption></figcaption></figure>

4. In Add Component Variants section, add **Component** products (The Recipe)

* **Component 1 (Wooden Panel):**
  * Search for and select: **Wooden Panel** (`PNL-WOOD`).
  * Set **Quantity Required:** Enter `4` (since the kit requires four panels).
* **Component 2 (Bag of Soil):**
  * Click **Add New Component** again.
  * Search for and select: **Bag of Soil** (`BAG-SOIL`).
  * Set **Quantity Required:** Enter `1` (since the kit requires one bag of soil).

<figure><img src="/files/UGMfVie3E4e4t19vnhkR" alt=""><figcaption></figcaption></figure>

5. Save the bundle group.

Tipo Sync will now calculate the available inventory for `KIT-PLN01` and push that number to your storefront.

### Result: Inventory Calculation and Real-Time Update

Tipo Sync uses a limiting factor calculation: it checks how many complete sets can be built from the available components.

**1 - The Initial Calculation**

| Component                 | Current Stock | Quantity Required per Set | Available Sets (Stock / Required Qty) | Limiting Factor |
| ------------------------- | ------------- | ------------------------- | ------------------------------------- | --------------- |
| Wooden Panel (`PNL-WOOD`) | **80**        | 4                         | 80 / 4 = **20**                       | **Limit**       |
| Bag of Soil (`BAG-SOIL`)  | **45**        | 1                         | 45 / 1 = **45**                       |                 |
| **BUNDLE RESULT**         |               |                           | **Calculated Available Sets**         | **20**          |

**2- Real-Time Stock Update Example**

If a customer buys **5** Small Planter Kits:

<table data-header-hidden><thead><tr><th></th><th width="110.0242919921875"></th><th width="141.3134765625"></th><th></th><th></th></tr></thead><tbody><tr><td>Product</td><td>Before Sale</td><td>Sale Quantity</td><td>Stock Deduction</td><td>After Sync</td></tr><tr><td><strong>Small Planter Kit</strong> (<code>KIT-PLN01</code>)</td><td>20</td><td>5 Kits Sold</td><td>N/A (Calculated)</td><td><strong>15</strong> (New Calculated Inventory)</td></tr><tr><td>Wooden Panel (<code>PNL-WOOD</code>)</td><td>80</td><td>N/A</td><td>5 kits * 4 Panels = <strong>20</strong></td><td><strong>60</strong></td></tr><tr><td>Bag of Soil (<code>BAG-SOIL</code>)</td><td>45</td><td>N/A</td><td>5 kits * 1 Bag = <strong>5</strong></td><td><strong>40</strong></td></tr></tbody></table>

Tipo Sync instantly reduces the component inventory (Panels by 20, Soil Bags by 5) and then recalculates the new kit inventory (15) and pushes it to the storefront, ensuring your stock levels are always accurate.

**🙋 Still need support?**

If you still need help, please feel free to contact us at <hi@tipo.io>. We’ll be happy to assist you further.


# Getting Started

### ⚡ Getting Started with Tipo Appointment Booking

Welcome to **Tipo Appointment Booking**, your all-in-one solution for managing appointments, services, and customer bookings on Shopify. Whether you're running a salon, clinic, or consulting business, Tipo helps you streamline scheduling and deliver a seamless booking experience.

***

### 📌 Key Features

* **Multiple Appointment Types:** Offer flexible booking options for retail assistance, spa treatments, salon services, tutoring, consultations, and more.
* **Customizable Booking Form:** Tailor the booking experience with editable fields like location, date/time, font, colors, and background.
* **Capacity Control**: Limit how many people can book a particular time slot.
* **Advanced Booking Management:** View and manage appointments with detailed customer info, service details, and status tracking.
* **Google Calendar Sync:** Seamlessly sync appointments with your Google Calendar to stay organized across platforms.
* **Custom Fields for Customer Info and Add-on options:** ask fields to collect  information and let customers choose optional extras that add to the total price
* **Automated Notifications:** Send confirmation, reminder, reschedule, and cancellation alerts via email
* **Team Member and Set Availability:** Assign services to staff members and manage their availability with ease.

***

### 💡Quick start guide

Here’s how to set up Tipo Appointment Booking in a few clear steps:

#### &#x20;**1. Install the App**&#x20;

Go to the Shopify App Store, find **Tipo Appointment Booking**, and install it [here](https://apps.shopify.com/tipo-appointment-booking)

#### &#x20;**2. Create Your First Service**&#x20;

Go to the app dashboard → **Services** → **Add Service**. Choose between free, paid, full-day, or multi-day formats.

Configure Booking Options:

* Choose whether this service is free, paid, full-day, or multi-day
* Configure essential details: name, description, capacity, duration, price, and location
* Assign staff (employees) to the service and set their availability

#### &#x20;**3. Customize the Booking Widget**&#x20;

Adjust the look and feel of the booking form to match your store’s branding.

#### 4. Configure General Settings

Go to **Settings → General** in the app

* Set the time step, default appointment status, and whether overlapping bookings are allowed
* Block dates (holidays, maintenance) when booking should be disabled

#### &#x20;**5. Test the Booking Flow**&#x20;

Preview your storefront and make a test booking to ensure everything works smoothly.

#### &#x20;**5. Manage Appointments**&#x20;

Use the calendar view to reschedule, cancel, or manually add bookings.

#### 6. Reference

* [Create a new service](https://docs.tipo.io/tipo-appointment-booking/services-and-appointments/create-a-service)
* [Set Availability for Services](https://docs.tipo.io/tipo-appointment-booking/availability-team-members/set-availability-for-services)
* [Manage appointments](https://docs.tipo.io/tipo-appointment-booking/appointment-management/manage-appointments)

***

**🙋 Still need support?**

If you still need help, please feel free to contact us at <hi@tipo.io>. We’ll be happy to assist you further.


# Service types

The service types are based on payment options and service duration.

When you create a new service, you can now define how your customers book and pay through our redesigned interface. This guide covers the two main configuration paths.

1-Service Types Based on Time

2-Service Types Based on Payment

### 🕒 1. Service Types Based on Time

The Booking Logic determines how your calendar is presented to customers. Choose the layout that matches your business workflow.

<figure><img src="/files/5qEP0n7ZhV5KsZd3tIlF" alt=""><figcaption></figcaption></figure>

#### A. Book by Time Slot

Best for services that happen within a day and have a set duration.

* Examples: \* Barber Shop: 30-minute haircut slots.
  * Medical Clinic: 15-minute check-up appointments.
  * Yoga Studio: 1-hour group classes.
* Customer View: A list of specific times (e.g., 10:00 AM, 10:30 AM) showing available slots.

<figure><img src="/files/FSaL40ddy6NCGadWqag5" alt=""><figcaption></figcaption></figure>

#### B. Book for a Full Day

Used for services where the customer occupies the entire date from start to finish.

* Examples: \* Photography Studio: Renting the space for a full day shoot.
  * Car Rental: Hiring a vehicle for a 24-hour period.
  * Wedding Venue: Booking the hall for a single event date.
* Customer View: A calendar where they select one specific day.

<figure><img src="/files/GElU4oeEG4cNuYH86gzi" alt=""><figcaption></figcaption></figure>

#### C. Book Across Multiple Days

Best for services that span several consecutive days.

* Examples: \* Summer Camp: A 5-day youth program.
  * Pet Boarding: Booking a kennel for a Friday–Monday stay.
  * Retreat: A 3-day wellness workshop.
* Customer View: A date-range picker where they select a Start Date and End Date.

<figure><img src="/files/jK8O12rEGgsx8HQpVSuB" alt=""><figcaption></figcaption></figure>

#### Compare service types

<table data-header-hidden><thead><tr><th width="194.54998779296875"></th><th width="216.85009765625"></th><th></th></tr></thead><tbody><tr><td><strong>Service Type</strong></td><td><strong>Best For</strong></td><td><strong>Detailed Business Examples</strong></td></tr><tr><td>Book by Time Slot</td><td>Hourly or short-duration appointments.</td><td><p>• Barber Shop: A 30-min "Classic Haircut."</p><p></p><p>• Dental Clinic: A 45-min "Routine Checkup."</p><p></p></td></tr><tr><td>Book for a Full Day</td><td>One-day rentals or events that occupy the whole day.</td><td><p>• Photography Studio: Daily rental of "Studio A."<br></p><p>• Car Rental: Hiring a "Delivery Van" for 24 hours.</p></td></tr><tr><td>Across Multiple Days</td><td>Long-term stays or multi-session workshops.</td><td><p>• Pet Boarding: A "4-Day Kennel Stay."<br></p><p>• Education: A "3-Day Marketing Boot Camp."<br></p></td></tr></tbody></table>

***

### 💳 2. Service Types Based on Payment

You can now control exactly how and when you collect money for your bookings in the **How customers pay section.**

<figure><img src="/files/TLg3WICrWO74bzcud70V" alt=""><figcaption></figcaption></figure>

* **Pay** **Now**&#x20;
  * Example: A High-End Spa that requires a $50 deposit to prevent "no-shows."
  * Workflow: Data is saved only after a successful Shopify checkout. A Shopify order is created.&#x20;
* **Pay Later**
  * Example: A Home Cleaning Service where the customer pays cash or via card reader after the job is done.
  * Workflow: The booking is confirmed immediately, draft order is created in Shopify and an invoice is created in Shopify for later payment.
* **No Payment Required**
  * Example: A Free Discovery Call for a consultant or a Product Demo.
  * Workflow: The customer simply enters their details and receives a confirmation without seeing a checkout page.

#### Compare table

<table data-header-hidden><thead><tr><th width="125.25006103515625"></th><th width="342.89990234375"></th><th></th></tr></thead><tbody><tr><td><strong>Payment Method</strong></td><td><strong>Customer Experience</strong></td><td><strong>Detailed Business Examples</strong></td></tr><tr><td>Pay Now</td><td>Customer select datetime > book > Must complete Shopify checkout to confirm > a new order is created in Shopify Orders.</td><td>Workshop: Requires full $200 ticket payment upfront to join.</td></tr><tr><td>Pay Later</td><td>Confirm slot instantly; pay at a later time. A draft order is created in store. </td><td>Home Cleaning: Customer pays via cash or card after the job is finished.</td></tr><tr><td>No Payment</td><td>Fast booking; checkout is skipped entirely.</td><td><p>Software Demo: A "Free 30-minute Product Tour" for new users.</p><p></p></td></tr></tbody></table>


# Create a service

Create a service in Tipo Appointment Booking so customers can book time slots (or full-day / multi-day services) and you can manage availability, payments, and booking rules.

The Tipo Booking app creates service based on Shopify products. After creating a service in the app, the booking form will show up on the product page on the online store.

### ✅ Before you start

* You’ve installed **Tipo Appointment Booking app**
* You know what type of booking you want (time slots, full day, multi-day

***

### 🛠️ Step 1: Open Services

* Open the app > click **Services**&#x20;
* Click **New service** button

<figure><img src="/files/oeZxT34prPJBQHtBCgCc" alt=""><figcaption></figcaption></figure>

***

### 🛠️ Steps 2: Choose a service type

On **Choose service type**, select one of these:

<figure><img src="/files/5qEP0n7ZhV5KsZd3tIlF" alt=""><figcaption></figcaption></figure>

**A. Book by Time Slot**

Best for services that happen within a day and have a set duration.

* Examples: \* Barber Shop: 30-minute haircut slots.
* Customer View: A list of specific times (e.g., 10:00 AM, 10:30 AM) showing available slots.

**B. Book for a Full Day**

Used for services where the customer occupies the entire date from start to finish.

* Examples: \* Photography Studio: Renting the space for a full day shoot.
  * Car Rental: Hiring a vehicle for a 24-hour period.
* Customer View: A calendar where they select one specific day.

**C. Book Across Multiple Days**

Best for services that span several consecutive days.

* Examples: \* Summer Camp: A 5-day youth program.
* Customer View: A date-range picker where they select a Start Date and End Date.

***

### 🛠️ Step 3: Create the service product in Shopify

The app creates/uses a Shopify Product for your service. In the **Add product** screen:

* **Title**: e.g., Yoga class
* **Status**: Active
* **Category**: choose the closest match (optional)
* **Price**: set your service price (for checkout services)

Click **Save**.

<figure><img src="/files/clOut9s1IqX4v3WKjqor" alt=""><figcaption></figcaption></figure>

### 🛠️ Step 4: Configure service settings&#x20;

#### 👥 Capacity

Set how many people can book the same time slot.

* Example: `1` for 1-on-1 appointments
* Example: `5` for group sessions

#### ⏱️ Duration

Choose how long each booking takes:

* Quick buttons (30, 60, 90, 120 min…)
* Or **Custom**
* If your service supports it, you can choose:
  * **Less than a day**
  * **Multiple days**

**Example**: Haircut = `60 min`&#x20;

<figure><img src="/files/ijFXMxpIOM7TcI053Z0E" alt=""><figcaption></figcaption></figure>

***

### 🛠️ Step 5: Choose payment type

Under **Choose payment type**, pick one:

| Option                                    | What it means                                               | Best for                                     | Example                          |
| ----------------------------------------- | ----------------------------------------------------------- | -------------------------------------------- | -------------------------------- |
| ✅ No payment required                     | Customers can confirm the booking **without paying online** | Free bookings, pay in person, pay by invoice | Consultation (free booking)      |
| 💰 Pay to book → **Pay now**              | Customers must **pay immediately** to confirm the booking   | High-demand slots, deposits, paid services   | Salon appointment (Pay now)      |
| 💰 Pay to book → **Pay later**            | Customers confirm now, and **pay later** (offline/manual)   | Pay at store, bank transfer, manual payment  | Repair service (Pay later)       |
| 💰 Pay to book → **Let customers choose** | Customers choose **Pay now or Pay later** at booking time   | Mixed payment preferences                    | Class booking (customer chooses) |

### 🛠️ Step 6: Set Availability&#x20;

In the **Availability** section, click **Manage**

* Assign team members to this service (required). If you have not had a team member, create a new one.&#x20;
* Their schedules determine what time slots are available

[Learn more](https://docs.tipo.io/tipo-appointment-booking/availability-team-members/set-availability-for-services#how-to-set-availability)

<figure><img src="/files/QzDHtcWHxbRBRS3dnqtg" alt=""><figcaption></figcaption></figure>

***

### 🛠️Step 7: Customize more settings (Optional)

* In **Location** field, enter the location of the service
* **Color**: helps identify bookings in the calendar
* **Questions & Add-ons**: collect info (name, preferences) or sell add-ons
* **Advanced settings**: booking rules, lead time, buffer time, etc. (if available)

<figure><img src="/files/2a8bCDm2aCSMf1GGfFMZ" alt=""><figcaption></figcaption></figure>

***

### 🛠️ Step 8: Save your changes

Click **Save** button. &#x20;

***

### 🌐 How the service works on your storefront <a href="#how-it-works-on-your-storefront" id="how-it-works-on-your-storefront"></a>

After you create and save a service in **Tipo Appointment Booking**, the app automatically turns it into a bookable product on your Shopify storefront.

What customers will see

**1) A “Book” button appears on the product page**\
Once the service is published, customers will see a booking button (for example: **Book now**) on the service product page.

<figure><img src="/files/AfotkqEcIlQXdOP9DaUs" alt=""><figcaption></figcaption></figure>

**2) Customer clicks the button → booking popup opens**\
A popup will appear where customers can:

* Pick a **date**
* Choose an **available time slot**
* Select the correct **variant** (if your service has variants)

<figure><img src="/files/DZPYHeJ110FGwrorKxD8" alt=""><figcaption></figcaption></figure>

**3) Customer confirms the booking**\
What happens next depends on your payment type:

* If it’s a Paid service (Pay to book): When the customer clicks Continue, Shopify checkout is required.
* If it’s a Free service (Book without payment): Customers can confirm the booking without checkout.

<figure><img src="/files/8TkKGrqDwP5LkANkG32J" alt=""><figcaption></figcaption></figure>

**Note**:&#x20;

To make sure the booking form works on the site, please activate the app on the theme [here](https://tipo.io/index.php/kb/integrate-uninstall-the-app-to-a-theme/)&#x20;

Also, the book button of the app works based on buy button on the theme. Please check and make sure the buy button (add to cart button) is enabled in the current theme.

***

### ▶️ Tutorial video&#x20;

{% embed url="<https://youtu.be/tEh5Rox-bqM>" %}

***

**🙋 Still need support?**

If you still need help, please feel free to contact us at <hi@tipo.io>. We’ll be happy to assist you further.


# Regular Booking Service (Book by time slot)

Regular Booking is the best option for services that happen in fixed time slots (minutes or hours), like haircuts, consultations, tutoring, or classes.

### ✅ What this service type does

With **Regular Booking**, customers can:

* Pick a date
* Choose an **available time slot** (example: 09:00–09:30)
* Book and (optionally) pay, depending on your payment settings

You can control:

* **Service duration** (30 min, 60 min, custom…)
* **Capacity** (how many people per slot)
* **Payment type** (free booking or pay-to-book)
* **Availability** (team members / schedules, if your app supports it)

<figure><img src="/files/FSaL40ddy6NCGadWqag5" alt=""><figcaption></figcaption></figure>

***

### 🎯 When should I use Regular Booking?

Use this when your service:

* Takes less than a day
* Has clear start/end times
* Needs a time-slot schedule

**Examples**

* Haircut (30–60 min)
* 1:1 consultation (60 min)
* Language lesson (45 min)
* Massage (90 min)

***

### 🧩 Before you start (recommended)

Make sure you know:

* Your service **duration** (ex: 30 min)
* Your service **capacity** (ex: 1 customer per slot)
* Whether customers must **pay to book** (Pay now / Pay later / customer chooses)

***

### 🛠️ Step-by-step: Create a Regular Booking service

#### 1) Open services

* Open the app > click **Services**
* Click **New service** button

#### 2) Choose service type

Select **Book by time slot** (time-slot service).

<figure><img src="/files/RKxlgLYl4VCqHugACb1c" alt=""><figcaption></figcaption></figure>

#### 3) Create product&#x20;

* **Title** (example: *Haircut for men*)
* **Description** (optional, but helpful for customers)
* **Status**: Active (or **Draft** while testing)
* Optional: **Media**, **Vendor**, **Tags**, etc. (Shopify product fields)

<figure><img src="/files/4lJLmuJpqz8ACq2RZ9WE" alt=""><figcaption></figcaption></figure>

#### 4) Configure service settings

* Set **Capacity:** choose how many customers can book each time slot.

**Examples**

1 = one customer per slot (most common)

5 = group class with 5 seats per slot

* Set **duration** (minutes/hours): Under **Duration**, choose a preset or **Custom**.

**Examples**

Haircut: 40 **min**

<figure><img src="/files/itrERkfBNztJeti2Z2SZ" alt=""><figcaption></figcaption></figure>

#### 5) Choose payment type

Pick one option under **Choose payment type**:

| Option                             | What it means                                        | Best for                                   |
| ---------------------------------- | ---------------------------------------------------- | ------------------------------------------ |
| **No payment required**            | Customers book without paying online                 | Free consultations, pay-in-person services |
| **Pay to book**                    | Customers must pay (or commit to payment) to confirm | Deposits, paid appointments                |
| **Pay now** (inside Pay to book)   | Charge immediately                                   | High-demand services                       |
| **Pay later** (inside Pay to book) | Book first, pay later                                | Invoices, manual payment                   |
| **Customer chooses**               | Customer selects Pay now or Pay later                | Flexible businesses                        |

**Example**

* Salon appointment → **Pay to book → Pay now**
* Free consultation → **Book without payment**

#### 6) Configure availability

* Assign **team members**
* Set **available days of the team member**

[Learn more](https://docs.tipo.io/tipo-appointment-booking/availability-team-members/set-availability-for-services#how-to-set-availability)

Set these to match when you can actually accept bookings.

#### 7) Customize more settings (Optional)

* In **Location** field, enter the location of the service
* **Color**: helps identify bookings in the calendar
* **Questions & Add-ons**: collect info (name, preferences) or sell add-ons
* **Advanced settings**: booking rules, lead time, buffer time, etc. (if available)

#### 8) Save

Click **Save** to finish creating the service.

***

### 🧪 Example setup (simple)

**Service:** Haircut

* Duration: **0 min**
* Capacity: **1**
* Payment: **Pay to book → Pay now**\
  Result: Customers will see 30-minute slots and must pay to confirm.

***

### 🌐 How it works on your storefront

After you create the service:

1. The app adds a **Book** button on the product/service page
2. Customer clicks **Book**
3. A booking popup opens where they select:
   * date
   * time slot
   * (and location/team member if applicable)

<figure><img src="/files/Y0NUoaGRM3oIOXE4gF8E" alt=""><figcaption></figcaption></figure>

4. If it’s a paid service, the customer continues to checkout to complete payment

***

**🙋 Still need support?**

If you still need help, please feel free to contact us at <hi@tipo.io>. We’ll be happy to assist you further.


# Full-day service

A Full-day Service lets customers book an entire day instead of a time slot. This is ideal for rentals, day-long sessions, or appointments that take the whole day.

### ✅ What this service type does

With Full-day booking, customers:

* choose a **date**
* book the **full day** (no time slot)
* (optional) pay online, depending on your payment settings

You can control:

* capacity (how many bookings per day)
* paid vs free booking
* availability (team members / schedule, if applicable)
* location (optional)

<figure><img src="/files/GElU4oeEG4cNuYH86gzi" alt=""><figcaption></figcaption></figure>

***

### 🎯 When should I use Full-day Service?

Use Full-day booking when:

* your service is not time-slot based
* customers should reserve the full day
* you don’t want overlaps within the day

**Examples**

* Photographer “Day session”
* Meeting room rental (1 day)
* Equipment rental (1 day)
* Event booth booking (1 day)

***

### 🛠️ Step-by-step: Create a Full-day Service

#### 1) Open Services <a href="#step-1-open-services" id="step-1-open-services"></a>

* Open the app > click **Services**
* Click **New service** button

#### 2) Choose a service type <a href="#steps-2-choose-a-service-type" id="steps-2-choose-a-service-type"></a>

Select **Full-day booking**

<figure><img src="/files/bTl5pqrTwgKRTo3QBSNm" alt=""><figcaption></figcaption></figure>

#### 3) Create product&#x20;

* **Title** (example: *Haircut*)
* **Description** (optional, but helpful for customers)
* **Status**: Active (or **Draft** while testing)
* Optional: **Media**, **Vendor**, **Tags**, etc. (Shopify product fields)

<figure><img src="/files/0mIDOeleEhVJqMqao2Qp" alt=""><figcaption></figcaption></figure>

#### 4) Configure service settings

<figure><img src="/files/f4rNzDdoowAWet1jnVMO" alt=""><figcaption></figcaption></figure>

* **Duration** = 1 day
* Set **Capacity:** Choose how many customers can book the same day

**Examples**

**Capacity =1 ⇒** only one booking per day (most common)

**Capacity = 2+ ⇒** allow multiple bookings per day (for rentals with multiple units)

**5) Choose payment type**

| Option                    | What it means                         | Best for                       |
| ------------------------- | ------------------------------------- | ------------------------------ |
| ✅ **No payment required** | Confirm booking without paying online | Free booking, pay in person    |
| 💰 Pay to book            | Require payment behavior              | Paid services                  |
| Pay now                   | Charge immediately                    | Deposits / guaranteed bookings |
| Pay later                 | Confirm now, pay later                | Invoice / in-store payment     |
| Customer chooses          | Customer selects Pay now or later     | Flexible checkout              |

**6) Configure availability (important)**

Set when the service is available:

* working days (Mon–Sun)
* blackout dates (if any)
* As it is the full day service, the employee must be available from **00:00-24:00.**&#x20;

[Learn more](https://docs.tipo.io/tipo-appointment-booking/availability-team-members/set-availability-for-services#how-to-set-availability)

<figure><img src="/files/Z9qNHYZrAO3ggGqA0BiK" alt=""><figcaption></figcaption></figure>

#### 7) Customize more settings (Optional) <a href="#step-7-customize-more-settings-optional" id="step-7-customize-more-settings-optional"></a>

* In **Location** field, enter the location of the service
* **Color**: helps identify bookings in the calendar
* **Questions & Add-ons**: collect info (name, preferences) or sell add-ons
* **Advanced settings**: booking rules, lead time, buffer time, etc. (if available)

#### 8) Save

Click **Save** to finish creating the service.

***

#### 🧪 Example (easy)

**Service:** Studio rental (Full day)

* Type: Full-day booking
* Capacity: 1 booking/day
* Payment: Pay to book → Pay now\
  Customer books **Dec 10** → pays → the entire day is reserved.

### 🌐 **How it works on the site**

For services configured as **Full Day,** the booking process is simplified for customers:

* The customer clicks the “Book Now” button on your store > A booking popup appears.
* The customer sees a calendar of available dates (since full-day bookings don’t require time selection).

<figure><img src="/files/sFYF0sL1pfhcbShQoto8" alt=""><figcaption></figcaption></figure>

* The customer selects their preferred date > They proceed to confirm the booking.

No time slots are shown or required.&#x20;

***

**🙋 Still need support?**

If you still need help, please feel free to contact us at <hi@tipo.io>. We’ll be happy to assist you further.


# Multi-day service

A Multi-day Service lets customers book a date range (start date → end date). This is perfect for rentals or events that last multiple days.

***

### ✅ What this service type does

With **Multi-day booking**, customers:

* choose a **start date**
* choose an **end date**
* book the whole date range
* (optional) pay online depending on payment settings

You control:

* booking rules (min/max days, if available)
* capacity (how many bookings can happen at the same time)
* paid vs free booking
* availability and location

<figure><img src="/files/jK8O12rEGgsx8HQpVSuB" alt=""><figcaption></figcaption></figure>

***

### 🎯 When should I use Multi-day Service?

Use **Multi-day booking** when:

* customers need to reserve multiple consecutive days
* it’s not tied to specific time slots

**Examples**

* Equipment rental (3 days)
* Workshop ticket (2 days)
* Hotel-like rental for a product/service
* Multi-day event passes

***

### 🛠️ Step-by-step: Create a Multi-day Service

#### 1) Open Services <a href="#step-1-open-services" id="step-1-open-services"></a>

* Open the app > click **Services**
* Click **New service** button

#### 2) Choose a service type <a href="#steps-2-choose-a-service-type" id="steps-2-choose-a-service-type"></a>

Select **Book across multiple days**

<figure><img src="/files/3PHlhCyH4cVoRcpZYY05" alt=""><figcaption></figcaption></figure>

**3) Create product (for service)**

Fill in:

* **Title** (example: *Camera rental – Multi-day*)
* **Status**: Active (or Draft)
* Price (if paid)

Click **Save**

<figure><img src="/files/saewmzSejWd6qMPnf3qb" alt=""><figcaption></figcaption></figure>

#### **4) C**onfigure service settings

* Set duration: Depending on your app settings, you may be able to set:

**Minimum days** (example: 1 day minimum)

**Maximum days** (example: up to 10 days)

Set **Check in time** and **Check out time**

<figure><img src="/files/zevEYerCpO7ne8PzddQV" alt=""><figcaption></figcaption></figure>

* **Set capacity:**

**Capacity = 1 ⇒** only one booking for a date range at a time (common for rentals)

**Capacity** = **2+** ⇒  allow multiple simultaneous bookings (if you have multiple units)

**5) Choose payment type**

| Option                    | What it means               | Best for               |
| ------------------------- | --------------------------- | ---------------------- |
| ✅ **No payment required** | Book without online payment | Pay later/offline      |
| 💰 Pay to book            | Paid booking flow           | Rentals/events         |
| Pay now                   | Charge immediately          | Deposits/confirmations |
| Pay later                 | Confirm now, pay later      | Invoices               |
| Customer chooses          | Customer selects            | Flexible               |

**6) Configure availability**

Set:

* available date range  for employee
* As it is the full day service, the employee must be available from **00:00-24:00.**&#x20;

[Learn more](https://docs.tipo.io/tipo-appointment-booking/availability-team-members/set-availability-for-services#how-to-set-availability)

#### 7) Customize more settings (Optional) <a href="#step-7-customize-more-settings-optional" id="step-7-customize-more-settings-optional"></a>

* In **Location** field, enter the location of the service
* **Color**: helps identify bookings in the calendar
* **Questions & Add-ons**: collect info (name, preferences) or sell add-ons
* **Advanced settings**: booking rules, lead time, buffer time, etc. (if available)

#### 8) Save

Click **Save** to finish creating the service.

***

### 🌐 How it works on your storefront

After publishing:

1. A **Book** button appears on the service product page
2. Customer selects **start date + end date**
3. If paid → customer goes to **checkout**
4. Booking appears in **Appointments**

<figure><img src="/files/IaFwE15pyATpv4uJZsA2" alt=""><figcaption></figcaption></figure>

5. The app automatically calculates the total booking price based on:

* **Service price** (price per day)
* Number of booked days
* Number of customers in an appointment

**Formula**

> **Final price = Service price × Number of booked days × Number of customers**

***

#### 🧪 Example&#x20;

**Service:** Camera rental (Multi-day)

* Customer selects: Dec 16- Dec18
* That reserves 3 days
* Capacity: 1 (so no overlapping rental ranges)
* Service price: $100/day ⇒ the total price = $300

***

### ⚙️ Set the charge rule

For multi-day services, you can choose how customers are charged based on the length of their booking.

Under **How customers will be charged**, select the pricing rule that best fits your service.

<figure><img src="/files/2Fp3lVINdrVM4KG78AVX" alt=""><figcaption></figcaption></figure>

You can choose from:

#### Per participant, per day

Each participant is charged for every day of the booking.

**Example**

Service price: **$100**

Booking: **Dec 16 – Dec 18**\
Participants: **1**

The booking covers 3 days:

`$100 × 3 days = $300`

This option works well for services such as:

* Equipment rental
* Daily workspace rental
* Multi-day activities

***

#### Per participant, per night

Each participant is charged for every night between check-in and check-out.

**Example**

Service price: **$100**

Check-in: **Dec 16**\
Check-out: **Dec 18**\
Participants: **1**

The booking includes 2 nights:

`$100 × 2 nights = $200`

This option is useful for services such as:

* Accommodation
* Overnight rentals
* Retreats
* Camping or lodging services

***

#### Per participant

Each participant is charged only once, regardless of how many days the booking lasts.

**Example**

Service price: **$100**

Booking: **Dec 16 – Dec 18**\
Participants: **1**

Total:

`$100 × 1 participant = $100`

The booking duration does not increase the service price.

This option works well for:

* Multi-day event passes
* Retreat registration fees
* Courses with one fixed price

***

### ▶️  Tutorial video

{% embed url="<https://youtu.be/M2_Dh0pSXcI>" %}

***

**🙋 Still need support?**

If you still need help, please feel free to contact us at <hi@tipo.io>. We’ll be happy to assist you further.


# Payment Options Overview

Customers can book your services **with or without payment**, depending on how you configure the service. This guide explains the difference and helps you choose the right option for your business.

<figure><img src="/files/zYQ340kV7Ojr3UW2HhoP" alt=""><figcaption></figcaption></figure>

### ℹ️ **Overview**

Tipo supports two types of services:

| **Feature**                      | **Paid Service**                                                           | **Free Service**                                                                      |
| -------------------------------- | -------------------------------------------------------------------------- | ------------------------------------------------------------------------------------- |
| Requires Customer Payment?       | ✔️ Yes (Customer must pay online)                                          | ❌ No (Booking is free)                                                                |
| Customer Redirected to Checkout? | ✔️ Yes (Directed to cart or checkout page)                                 | ❌ No (Bypasses the checkout process)                                                  |
| Shopify Order Created?           | ✔️ Yes (A standard order is created upon purchase)                         | ✔️ Yes (An order is created for tracking, usually a "Pay later" or "Test-mode" order) |
| Customer Flow                    | Must complete the standard Shopify purchase flow                           | Completes instantly after filling out a simple free form                              |
| Useful For                       | Classes, charged services, rentals, and services requiring payment upfront | Free trials, consultations, shop visits, and informational appointments               |

***

### **💡 Two Main Payment Modes**

#### **1️⃣ Free Booking (No Payment Required)**

Customers confirm the appointment **without paying online**.

<figure><img src="/files/eDUpqDKTtxUpqyImJI5S" alt=""><figcaption></figcaption></figure>

**Best for:**

* Consultations
* Try-before-you-buy services
* Businesses collecting payment in person
* Free community classes

**Customer experience:**

| **Step**      | **Action**                                                                       | **Outcome**                                                               |
| ------------- | -------------------------------------------------------------------------------- | ------------------------------------------------------------------------- |
| Click Book    | Customer selects a time slot and clicks the book button.                         |                                                                           |
| Fill Form     | The customer is presented with the Free Service form (e.g., Name, Email, Phone). | No payment details are required.                                          |
| Confirm       | The customer clicks Confirm button.                                              | The booking completes instantly, directing them to a confirmation screen. |
| Order Created | no order                                                                         | no order                                                                  |

**Video**

{% embed url="<https://youtu.be/Rx7F0f3ubXw?si=PhYcg0-FlWh8iXS6>" %}

***

#### **2️⃣ Paid Booking (Pay to book)**

Customers must **complete checkout** to secure their appointment.

<figure><img src="/files/HTAtg9u22scRhosA5Z9Q" alt=""><figcaption></figcaption></figure>

**Best for:**

* Appointments with limited capacity
* Classes or workshops
* Services requiring deposits
* Prepaid sessions

**Customer experience:**

| **Step**             | **Action**                                                    | **Outcome**                                        |
| -------------------- | ------------------------------------------------------------- | -------------------------------------------------- |
| Click Book           | Customer selects a time slot and clicks the book button.      |                                                    |
| Redirect to Checkout | The customer is redirected to the cart page or checkout page. | The service product is added to their cart.        |
| Purchase             | The customer completes the payment and checkout process.      | The customer is charged for the service.           |
| Order Created        | The purchase is finalized.                                    | A standard Shopify order is created in your store. |

**Video**

{% embed url="<https://youtu.be/PHdH6gW25fc>" %}

***

**🙋 Still need support?**

If you still need help, please feel free to contact us at <hi@tipo.io>. We’ll be happy to assist you further.


# Free Booking (Book without Payment)

Use Free booking when you want customers to book a time slot without paying online. The app will still create appointments and keep your calendar organized, no checkout step.

### 💡 When to use Free booking

Free booking works well for:

* &#x20;**Consultations / trials** – first visit is free, you charge later if needed
* **In-person services paid on site** – pay in cash or card at your location
* **School visits / tours / demo sessions** – booking only, no fee
* **Services handled by invoice** – you bill customers manually afterwards

If you need customers to pay online, use **Paid services (Pay to book)** instead.

Demo: <https://demo-app-v2-tipo-appointment-booking.myshopify.com/products/couples-spa-package>   (password: 1234)

***

### ⚙️ How to set up a Free service

#### Step 1: Open Services <a href="#step-1-open-services" id="step-1-open-services"></a>

* Open the app > click **Services**
* Click **New service** button

<figure><img src="https://docs.tipo.io/~gitbook/image?url=https%3A%2F%2F2420234940-files.gitbook.io%2F%7E%2Ffiles%2Fv0%2Fb%2Fgitbook-x-prod.appspot.com%2Fo%2Fspaces%252F1ux6d1pfkKFKCAAHuj8H%252Fuploads%252FlASe8qs1MDHUBriOdBjs%252F2025-12-10_16-25-41.png%3Falt%3Dmedia%26token%3D944cc7aa-8a6c-4071-94ff-828b2a07a354&#x26;width=768&#x26;dpr=4&#x26;quality=100&#x26;sign=7ad3ccae&#x26;sv=2" alt=""><figcaption></figcaption></figure>

#### Steps 2: Choose a service type <a href="#steps-2-choose-a-service-type" id="steps-2-choose-a-service-type"></a>

**Full-day booking**

Best for services that take a whole day (event rental, photoshoot day).

* Customers book an entire day
* Paid via Shopify checkout

**Regular booking**

Best if you collect payment offline.

* Customers book a time slot
* No Shopify checkout required

**Multi-day booking (without checkout)**

* Customers book multiple days
* No checkout

#### Step 3: Create the service product in Shopify <a href="#step-3-create-the-service-product-in-shopify" id="step-3-create-the-service-product-in-shopify"></a>

The app creates/uses a Shopify Product for your service. In the **Add product** screen:

* **Title**: e.g., Yoga class
* **Status**: Active
* **Price**:&#x20;
  * Set the price to **$0**, or
  * Keep a regular price (if you still want to show a value), *the app will ignore it for checkout when using free booking*.

Click **Save**.

<figure><img src="/files/To0d6Ix8dJ02gtX9EN9O" alt=""><figcaption></figcaption></figure>

#### Step 4: Configure service settings <a href="#step-4-configure-service-settings" id="step-4-configure-service-settings"></a>

**👥 Capacity**

Set how many people can book the same time slot.

* Example: `1` for 1-on-1 appointments
* Example: `5` for group sessions

**⏱️ Duration**

Choose how long each booking takes:

* Quick buttons (30, 60, 90, 120 min…)
* Or **Custom**
* If your service supports it, you can choose:
  * **Less than a day**
  * **Multiple days**

**Example**: Haircut = `60 min`

#### Step 5: Choose payment type <a href="#step-5-choose-payment-type" id="step-5-choose-payment-type"></a>

Choose **No payment required**

<figure><img src="/files/DlVYWug7UFcIriSQ6rhz" alt=""><figcaption></figcaption></figure>

#### Step 6: Set Availability <a href="#step-6-set-availability" id="step-6-set-availability"></a>

In the **Availability** section, click **Manage**

* Assign team members to this service (required). If you have not had a team member, create a new one.
* Their schedules determine what time slots are available

[Learn more ](https://docs.tipo.io/tipo-appointment-booking/availability-team-members/set-availability-for-services#how-to-set-availability)

#### Step 7: Customize more settings (Optional) <a href="#step-7-customize-more-settings-optional" id="step-7-customize-more-settings-optional"></a>

* In **Location** field, enter the location of the service
* **Color**: helps identify bookings in the calendar
* **Questions & Add-ons**: collect info (name, preferences) or sell add-ons
* **Advanced settings**: booking rules, lead time, buffer time, etc. (if available)

<figure><img src="https://docs.tipo.io/~gitbook/image?url=https%3A%2F%2F2420234940-files.gitbook.io%2F%7E%2Ffiles%2Fv0%2Fb%2Fgitbook-x-prod.appspot.com%2Fo%2Fspaces%252F1ux6d1pfkKFKCAAHuj8H%252Fuploads%252Fb5hhCSDyiPCv9ETBeuWh%252F2025-12-10_16-33-21.png%3Falt%3Dmedia%26token%3D935e8f6a-e347-4668-87e1-4a18493e5980&#x26;width=768&#x26;dpr=4&#x26;quality=100&#x26;sign=bdf1f9ef&#x26;sv=2" alt=""><figcaption></figcaption></figure>

#### Step 8: Save your changes

***

### 🛠️ Set up free form

Next, set up custom fields to collect customer data for the free appointment:

1. Open the app > click **Settings** > scroll down to **Customer account**
2. Enable the field(s) you want to show
3. Set up field label and set as required if needed
4. Click **Save**

<figure><img src="/files/iRZcXlAdg7XHU6jIiPUT" alt=""><figcaption></figcaption></figure>

<figure><img src="/files/cJOYgZwQ7KoaAR4Lgl2s" alt=""><figcaption></figcaption></figure>

***

### 🌐 How it works on your storefront <a href="#how-it-works-on-your-storefront" id="how-it-works-on-your-storefront"></a>

1. Customer opens the service product page.
2. Clicks the **Book now** / **Schedule** button.
3. Chooses date, time, and fills in their details.
4. Clicks **Confirm booking**.

&#x20;Because the service is **“No payment required”**:

* There is no payment method step.
* Shopify checkout is skipped.
* The appointment is created immediately and appears in your app & calendar.

<figure><img src="/files/AgerPmibmASlvZb8ePhp" alt=""><figcaption></figcaption></figure>

<figure><img src="/files/ecaJfDFk9DsouNaNxgKB" alt=""><figcaption></figcaption></figure>

***

### 📋 How it looks in admin

After a customer books:

* You’ll see the appointment under **Appointments** in Tipo.
* The order/payment section in Shopify is not created for this booking (unless you manually create one).
* You can still:
  * Reschedule
  * Cancel
  * Add notes

***

### ▶️ A Tutorial video <a href="#a-tutorial-video" id="a-tutorial-video"></a>

{% embed url="<https://youtu.be/mkhQlaZItKA>" %}

***

### ✅ Quick comparison: Free vs Paid services

<table><thead><tr><th width="230.63330078125">Type</th><th>Booking flow</th><th>Best for</th></tr></thead><tbody><tr><td><strong>Book without payment</strong></td><td>Customer books → appointment created → <strong>no checkout</strong></td><td>Free </td></tr><tr><td> <strong>Pay to book – Pay now</strong></td><td>Customer books → goes to checkout → <strong>pays immediately</strong></td><td>Paid appointments</td></tr><tr><td><strong>Pay to book – Pay later</strong></td><td>Customer books → appointment created → <strong>invoice sent</strong></td><td>Invoice / offline payment workflows</td></tr></tbody></table>

***

### **❓**&#x46;AQ

#### **Q: Can I change a free service to paid later?**

Yes. Just edit the service, change Choose payment type to **Pay to book**, and save

#### **Q: Will customers still get confirmation emails?**

Yes. Confirmation and reminder emails (if enabled) work the same for free and paid bookings.

#### **Q: Do I need a price set in Shopify for free bookings?**

Not required. You can set the price to $0 or leave your normal price, the important part is the “Book without payment” option inside Tipo.

***

**🙋 Still need support?**

If you still need help, please feel free to contact us at <hi@tipo.io>. We’ll be happy to assist you further.


# Paid Service (Pay to book)

Use **Pay to book** when you want customers to confirm their appointment only after they pay.\
The app connects your booking flow with Shopify checkout so you get confirmed, paid bookings.

### 💡 When to use “Pay to book”

Perfect for services where payment is required or recommended:

* **Salon & spa appointments**
* **Classes & workshops** (yoga, dance, courses)
* **Consultations & sessions** (therapy, coaching, beauty)
* **Events with limited seats** where no-shows are costly
* **Tours, rentals, or experiences** requiring upfront payment or deposit

If you don’t want to charge online, use **Free booking (no payment)** instead.

***

### ⚙️ How to set up a Paid service (Pay to book)

#### Step 1: Open Services <a href="#step-1-open-services" id="step-1-open-services"></a>

* Open the app > click **Services**
* Click **New service** button

<figure><img src="https://docs.tipo.io/~gitbook/image?url=https%3A%2F%2F2420234940-files.gitbook.io%2F%7E%2Ffiles%2Fv0%2Fb%2Fgitbook-x-prod.appspot.com%2Fo%2Fspaces%252F1ux6d1pfkKFKCAAHuj8H%252Fuploads%252FlASe8qs1MDHUBriOdBjs%252F2025-12-10_16-25-41.png%3Falt%3Dmedia%26token%3D944cc7aa-8a6c-4071-94ff-828b2a07a354&#x26;width=768&#x26;dpr=4&#x26;quality=100&#x26;sign=7ad3ccae&#x26;sv=2" alt=""><figcaption></figcaption></figure>

***

#### Steps 2: Choose a service type <a href="#steps-2-choose-a-service-type" id="steps-2-choose-a-service-type"></a>

<figure><img src="/files/5qEP0n7ZhV5KsZd3tIlF" alt=""><figcaption></figcaption></figure>

**A. Book by Time Slot**

Best for services that happen within a day and have a set duration.

* Examples: \* Barber Shop: 30-minute haircut slots.
* Customer View: A list of specific times (e.g., 10:00 AM, 10:30 AM) showing available slots.

**B. Book for a Full Day**

Used for services where the customer occupies the entire date from start to finish.

* Examples: \* Photography Studio: Renting the space for a full day shoot.
  * Car Rental: Hiring a vehicle for a 24-hour period.
* Customer View: A calendar where they select one specific day.

**C. Book Across Multiple Days**

Best for services that span several consecutive days.

* Examples: \* Summer Camp: A 5-day youth program.
* Customer View: A date-range picker where they select a Start Date and End Date.

***

#### Step 3: Create the service product in Shopify <a href="#step-3-create-the-service-product-in-shopify" id="step-3-create-the-service-product-in-shopify"></a>

The app creates/uses a Shopify Product for your service. In the **Add product** screen:

* **Title**: e.g., Cycling
* **Status**: Active
* **Category**: choose the closest match (optional)
* **Price**: set your service price (for checkout services)

Click **Save**.

<figure><img src="/files/jkdcCCohd2xvaa10bb2q" alt=""><figcaption></figcaption></figure>

#### Step 4: Configure service settings <a href="#step-4-configure-service-settings" id="step-4-configure-service-settings"></a>

**👥 Capacity**

Set how many people can book the same time slot.

* Example: `1` for 1-on-1 appointments
* Example: `5` for group sessions

**⏱️ Duration**

Choose how long each booking takes:

* Quick buttons (30, 60, 90, 120 min…)
* Or **Custom**
* If your service supports it, you can choose:
  * **Less than a day**
  * **Multiple days**

**Example**: Haircut = `60 min`

***

#### Step 5: Choose payment type <a href="#step-5-choose-payment-type" id="step-5-choose-payment-type"></a>

Select one of the option below: &#x20;

You’ll see these options under it:

* **Pay now** – customer must pay immediately at checkout
* **Pay later** – a draft order & invoice are created; customer pays later
* **Allow customer to choose pay now or pay later** – customer picks at booking time

<figure><img src="/files/HTAtg9u22scRhosA5Z9Q" alt=""><figcaption></figcaption></figure>

***

#### Step 6: Set Availability <a href="#step-6-set-availability" id="step-6-set-availability"></a>

In the **Availability** section, click **Manage**

* Assign team members to this service (required). If you have not had a team member, create a new one.
* Their schedules determine what time slots are available

[Learn more](https://docs.tipo.io/tipo-appointment-booking/availability-team-members/set-availability-for-services#how-to-set-availability)

<figure><img src="/files/wInQ4rFO9Q23Xttmp6e4" alt=""><figcaption></figcaption></figure>

***

#### Step 7: Customize more settings (Optional) <a href="#step-7-customize-more-settings-optional" id="step-7-customize-more-settings-optional"></a>

* In **Location** field, enter the location of the service
* **Color**: helps identify bookings in the calendar
* **Questions & Add-ons**: collect info (name, preferences) or sell add-ons
* **Advanced settings**: booking rules, lead time, buffer time, etc. (if available)

<figure><img src="https://docs.tipo.io/~gitbook/image?url=https%3A%2F%2F2420234940-files.gitbook.io%2F%7E%2Ffiles%2Fv0%2Fb%2Fgitbook-x-prod.appspot.com%2Fo%2Fspaces%252F1ux6d1pfkKFKCAAHuj8H%252Fuploads%252Fb5hhCSDyiPCv9ETBeuWh%252F2025-12-10_16-33-21.png%3Falt%3Dmedia%26token%3D935e8f6a-e347-4668-87e1-4a18493e5980&#x26;width=768&#x26;dpr=4&#x26;quality=100&#x26;sign=bdf1f9ef&#x26;sv=2" alt=""><figcaption></figcaption></figure>

#### Step 8: Save the service.&#x20;

Click **Save** at the top right of the service page.\
Your service is now a paid service (Pay to book).

***

#### ✅ How your service works on your online store <a href="#how-your-service-works-on-your-online-store" id="how-your-service-works-on-your-online-store"></a>

* Customer opens the service product page.
* Clicks the **Book now / Schedule** button.
* Selects a date, time, and fills in required details.
* Payment step:
  * If **Pay now:** they are redirected to **Shopify checkout** to pay
  * If **Pay later:** booking is confirmed, and they receive an invoice
  * If **Customer chooses: t**hey pick **Pay now** or **Pay later** in the booking popup

<figure><img src="/files/exl19a1ObFXZJjzlGdqe" alt=""><figcaption></figcaption></figure>

Once complete:

* The appointment appears in the **Appointments** list in the Tipo app.
* A corresponding **order or draft order** appears in Shopify (depending on the payment option).

Video

{% embed url="<https://www.youtube.com/watch?v=PHdH6gW25fc>" %}

***

### 📋 How it looks in admin

After a customer books a paid service:

* In **Tipo app > Appointments**, you’ll see the booking with its status and payment note.
* In **Shopify Orders**
  * **Pay now** → a regular **paid order** is created.
  * **Pay later** → a **draft order / invoice** is created, awaiting payment.

You can still:

* Reschedule or cancel appointments
* Manually mark payments as received (for Pay later)
* Communicate with the customer as usual

***

### ✅ Quick comparison: Free service vs Paid service

| Type                        | Payment step                                  | Booking status                     | Best for                                        |
| --------------------------- | --------------------------------------------- | ---------------------------------- | ----------------------------------------------- |
| **No payment required**     | No payment – booking only                     | Appointment created, no order      | Free                                            |
| **Pay to book – Pay now**   | Checkout immediately after booking            | Appointment + **paid** order       | Online paid services, deposits, no-show control |
| **Pay to book – Pay later** | Invoice / draft order sent after booking      | Appointment + draft order (unpaid) | Invoice workflows, offline payments             |
| **Customer chooses**        | Customer selects **Pay now** or **Pay later** | Depends on selected option         | Flexible or mixed payment models                |

***

### ❓ FAQ

#### **Q: Can I switch a service from free to paid later?**

Yes. Edit the service, change Choose payment type from Book without payment to Pay to book, set a price, and save.

#### **Q: What happens if a customer abandons checkout (Pay now)?**

The appointment is not confirmed until payment succeeds. You’ll see the status/order in Shopify if they complete payment.

***

**🙋 Still need support?**

If you still need help, please feel free to contact us at <hi@tipo.io>. We’ll be happy to assist you further.


# Allow customers to choose a payment method

When you set up a **paid service**, you can let customers decide **how** they want to pay:

* **Pay now** – pay immediately at checkout
* **Pay later** – confirm the booking first, pay from an invoice later

This is useful if you want to give customers flexibility (for example: “Pay now to secure your spot or pay later by invoice”).

***

### 🛠️ Turn on “Customer chooses payment method”

1. In the app > click Services > open a service you want to edit
2. In the **Choose payment type** section:
   * Select **Pay to book**
   * Under that, choose **Allow customer to choose pay now or pay later**
3. Click **Save**

<figure><img src="/files/5o57x18BCdbfaRTUmS7O" alt=""><figcaption></figcaption></figure>

***

### ✅ What customers see on the booking widget

On your storefront, when a customer books this service:

1. They pick a date and time.
2. On the **Confirm your sessions** step, they’ll see a **Payment method** section with:
   * **Pay now**
   * **Pay later**

They must choose one before clicking **Book Now**.

<figure><img src="/files/ZuM2VkmS5Dw5VXVf5hqN" alt=""><figcaption></figcaption></figure>

***

### ✅ What happens with each option

<table><thead><tr><th width="112.8333740234375">Option</th><th>What happens after customer confirms</th><th>How payment is handled</th></tr></thead><tbody><tr><td><strong>Pay now</strong></td><td>The app sends the customer straight to Shopify checkout.</td><td>Customer pays immediately. The booking is created only after successful payment. Shopify <strong>order</strong> is created in store backend.</td></tr><tr><td><strong>Pay later</strong></td><td>The app collects the customer info and creates the booking right away.</td><td>Tipo creates a <strong>draft order</strong> and sends an <strong>invoice email</strong> so the customer can pay later.</td></tr></tbody></table>

> 💡 Tip: Use **Pay later** for services where you need to confirm details manually or accept offline payments (bank transfer, cash, etc.).

***

### **📌** When to use this option

**Good use cases:**

* Classes or workshops where some customers pay upfront and others pay by invoice
* Clinics or salons that allow existing clients to pay at the venue
* B2B/wholesale bookings where payment is often processed later

***

**🙋 Still need support?**

If you still need help, please feel free to contact us at <hi@tipo.io>. We’ll be happy to assist you further.


# Assign Locations

Use locations to tell customers where the appointment happens: in-store, online, at a studio, etc. A clear location helps avoid confusion and makes your calendar easier to manage.

### 💡 What locations are used for

* Show customers where their booking will take place
* Allow you to run multiple branches or rooms (Salon A, Salon B, Studio 1…)
* Help staff know where they need to be
* Keep your calendar clear when you have online + in-person services

***

### 📍 Assign a location to a service

If your service takes places at one location, you can add the location directly to the service.

#### How to set

1. Go to app > go to **Services** tab of the  app > open the service you want
2. Find Location section on the right > click **pencil** icon to edit
3. Add location detail to the **Location** field. For example: *1111 Red street*
4. Save the service

If you add location to employee detail, the employee’s location will be prioritized if available.

<figure><img src="/files/fWhOJm79EnoiCMaOj1bn" alt=""><figcaption></figcaption></figure>

#### **How it looks**

The location field will shows up on the booking form after you select employee.

<figure><img src="/files/OptyT82ZzAD5yuzhrkO4" alt=""><figcaption></figcaption></figure>

***

### 📍 Using multiple locations

**Note** : The location depends on the assigned team member. One team member is only available at one location. So if you want to assign 3 locations to service for example, you need to assign the 3 team members to service.

#### **How to set**

1. Open the app > click Team members > open the team member you want to edit&#x20;
2. Click more actions icon on the right of the team member email address > click **Manage location**
3. In **Location** field, enter the location where the team member works. For example: *Uptown, ABC street*
4. Click **Save**

<figure><img src="/files/17CQZXI5gYrDv61J4ejv" alt=""><figcaption></figcaption></figure>

5. Open another team member of the service and add the location

<figure><img src="/files/TD9e8gT7bADqotTfg6cI" alt=""><figcaption></figcaption></figure>

6. Go to the service detail, make sure the 2 team members are assigned to the service

<figure><img src="/files/0n5WvejOYnwhFrwNbM0d" alt=""><figcaption></figcaption></figure>

#### **How it works**

On the booking form, customers choose employee and then the corresponding location appear.

<figure><img src="/files/NOBrLiYmHjJTjkmv0Tii" alt=""><figcaption></figcaption></figure>

<figure><img src="https://tipo.io/wp-content/uploads/2023/12/2024-12-26_10-46-53-1024x622.png" alt=""><figcaption></figcaption></figure>

***

**🙋 Still need support?**

If you still need help, please feel free to contact us at <hi@tipo.io>. We’ll be happy to assist you further.


# Set up Participant Types

Participant Types let you offer different booking options for different types of participants, such as **Adults**, **Children**, **Students**, or **Seniors**, with a different price for each type.

This is useful for classes, tours, events, group activities, and other services where the price depends on who is attending.

### ✅ What Participant Types does

When P**articipant Types** is enabled, customers can choose how many participants of each type they want to include in their booking.

For each participant type, you can set:

* A participant name, such as **Adult** or **Child**
* A price for that participant type
* A default participant type

You can also add multiple participant types and arrange them in the order you want.

For example:

* Adult: **$100**
* Child: **$10**

The customer can then select the appropriate number of adults and children when making a booking.

***

### 🎯 When should I use Participant Types?

Participant Types is useful when the same service has different prices depending on the type of customer.

Examples:

* **Yoga class** — Adult / Child
* **Museum ticket** — Adult / Child / Senior
* **Tour** — Adult / Child
* **Workshop** — Regular / Student
* **Event** — Adult / Teen / Child
* **Family activity** — Adult / Child

If everyone should pay the same price, you usually do not need to enable Participant Types.

***

### 🛠️ How to set up Participant Types

1. Open the app >  goto **Services**
2. Select the service you want to edit.  For example, open your **Yoga** service
3. Scroll down to the **Participant types** section > click **Add participant** button

<figure><img src="/files/P2vKI8jVzVwhrzhbsRAY" alt=""><figcaption></figcaption></figure>

4. Enter the information for the participant type, such as:

* Participant name
* Price

For example:

**Adult**

* Price: `$100`

Save the participant.

<figure><img src="/files/NvgGITAd8VTujyKJH5Li" alt=""><figcaption></figcaption></figure>

5. Click **+ Add participant** again to create additional types.

For example:

**Child**

* Price: `$10`

You can add multiple participant types depending on your service.

<figure><img src="/files/iTHA6L5gGFT6Xu4FVKuE" alt=""><figcaption></figcaption></figure>

6. Manage your participant types

After adding your participant types, they will appear in the Participant Types list.

From here, you can:

* Drag and drop to change their display order
* Edit a participant type
* Delete a participant type
* See which participant type is marked as **Default**

In this example:

| Participant type | Price |
| ---------------- | ----- |
| Adult            | $100  |
| Child            | $10   |

**Adult** is the default participant type.

<figure><img src="/files/UtvrSky1CxbEg5ZOaeWm" alt=""><figcaption></figcaption></figure>

7. After finishing your setup, click **Save** to apply the changes.

Your Participant Types are now ready to use on the booking form.

***

### 🧪 Example: Yoga class

Suppose you offer a Yoga class with these prices:

* Adult: **$100**
* Child: **$10**

A family wants to book for:

* 2 Adults
* 1 Child

The participant price is calculated from the quantities selected:

`2 × $100 + 1 × $10 = $210`

If you also use discounts, add-ons, or other pricing features, the final booking price may be adjusted accordingly.

***

### 🌐 How it works on your storefront

When a customer opens the booking form for a service with Participant Types enabled, they can choose the number of participants they want to book for each available type.

For example:

* Adult: `2`
* Child: `1`

The booking price is then calculated based on the selected participant types and quantities.

The customer can continue choosing their date and time and complete the booking as usual.

<figure><img src="/files/vSOA6oWhlMZAjekQh2HG" alt=""><figcaption></figcaption></figure>

***

**🙋 Still need support?**

If you still need help, please feel free to contact us at <hi@tipo.io>. We’ll be happy to assist you further.


# Set up Quantity Discounts

Quantity Discounts let you offer a percentage discount when customers book for a larger number of participants.

For example, you can offer 5% off for bookings with 2 or more participants.

***

### ⚙️ Set up Quantity Discounts

1. Open the app > go to **Services** > open the service you want to edit
2. Scroll down to the **Quantity discounts** section > Click **+ Add discount**

<figure><img src="/files/ntbejXZgaoofxXYMz0Et" alt=""><figcaption></figcaption></figure>

3. Enter:

* **From:** the minimum number of participants required to receive the discount.
* **Discount value:** the percentage discount you want to offer.

For example:

* From: 20 participants
* Discount value: 15%

Click **Add** to save the discount.

<figure><img src="/files/HlyDDDeUIb9uXwniYP3s" alt=""><figcaption></figcaption></figure>

***

4\. Add more discount levels

You can create multiple discount rules for different group sizes.

For example:

* From **2 participants** → **5% off**
* From **10 participants** → **10% off**
* From **20 participants** → **15% off**

This allows you to offer better prices as the booking size increases.

You can click the **Delete** icon next to a rule if you no longer want to use it.

<figure><img src="/files/L1vyAYpo2QqitG2pS8p2" alt=""><figcaption></figcaption></figure>

5. Click **Save**

***

### 🌐 How it appears on your storefront

When customers select participants on the booking form, Tipo Appointment automatically checks whether their booking qualifies for a Quantity Discount.

Suppose your service has:

* Adult price: **$100**
* Quantity Discount: **5% off from 2 participants**

A customer selects **3 Adults**.

The original participant price is:

`3 × $100 = $300`

Because the booking has 3 participants, it qualifies for the 5% discount:

`$300 × 5% = $15 discount`

The final participant price is:

`$300 - $15 = $285`

The booking form automatically displays the discounted price to the customer.

<figure><img src="/files/K1v1syEtFY5jCRC1B7rt" alt=""><figcaption></figcaption></figure>

***

### 💰 How Quantity Discounts work

Quantity Discounts are based on the total number of participants in the booking.

When the participant quantity meets a configured discount threshold, Tipo Appointment automatically applies the corresponding percentage discount.

Customers do not need to enter a discount code.

The discount is automatically updated when they increase or decrease the number of participants.

If your service uses [**Participant Types**](https://docs.tipo.io/tipo-appointment-booking/settings/set-up-participant-types), all participant types are counted together when determining the booking quantity.

For example:

* 2 Adults
* 1 Child

Total:

`2 + 1 = 3 participants`

If you have a discount starting from 2 participants, this booking qualifies for that discount.

The discount is calculated based on the participant prices, even when different participant types have different prices.

***

### ➕ What about Add-ons?

Quantity Discounts apply to the participant cost only.

Any additional cost from [**Add-ons**](https://docs.tipo.io/tipo-appointment-booking/widget-customization/add-custom-fields-and-add-ons#add-a-paid-add-on-extra-price) **is excluded from the discount**.

For example:

* Participant subtotal: $300
* Quantity Discount: 5%
* Discounted participant price: $285
* Add-on: $30

Final booking total:

`$285 + $30 = $315`

The $30 Add-on is not reduced by the **Quantity Discount**.

***

### 📥 Import and Export discounts

You can also import or export your Quantity Discount settings using the icons next to the **Add discount** button.

<figure><img src="/files/UMWX32aYKKGM0stNKqmr" alt=""><figcaption></figcaption></figure>

#### Export discounts

Click the **Export** icon to export your current Quantity Discount configuration.

This can be useful for keeping a backup or reusing your discount settings.

#### Import discounts

Click the **Import** icon to import Quantity Discount settings.

After importing, review the rules to make sure the participant quantities and discount percentages are correct for your service.

***

**🙋 Still need support?**

If you still need help, please feel free to contact us at <hi@tipo.io>. We’ll be happy to assist you further.


# Set Add-on Charge Rules

For multi-day services, you can choose how an Add-on is charged based on the **booking duration**, **number of participants**, or both.

This gives you more flexibility when offering extras such as equipment rental, meals, additional services, or other optional products.

For example, an equipment rental can be charged **per participant, per day**, while another Add-on can be charged only **once for the entire booking**.

***

### ⚙️ Set up an Add-on charge rule

1. Open the app > go to **Services** > open the multi-day service you want to edit
2. Scroll down to **Questions & Add-ons**
3. Click **Add questions** to create an Add-on field, or edit an existing Add-on

<figure><img src="/files/d7fMcnas8yv4vA2TUyRn" alt=""><figcaption></figcaption></figure>

***

4. In the Add-on settings, find **How customers will be charged?**  > choose the charging rule that best matches how you want to price the Add-on

You can choose from:

* **Per participant, per day**
* **One-time**
* **Per participant**
* **Per day**

<figure><img src="/files/6EOSIaFIS6XFn0CfJntP" alt=""><figcaption></figcaption></figure>

5. Save the service to update the change

***

### 💰 Understand each charge rule

Let's use the same example to see how each option works.

#### Example setup

Service: **Studio rent**

Booking duration: **3 days**

Participants: **2**

Add-on: **Lighting equipment**

Add-on price: **$20**

***

#### Per participant, per day

The Add-on is charged for each participant for each day of the booking.

With our example:

`$20 × 2 participants × 3 days = $120`

The Add-on total is **$120**.

This option is useful when the Add-on cost depends on both the number of people and the booking duration.

<figure><img src="/files/NF6IB5RAn2hgaojRYpK8" alt=""><figcaption></figcaption></figure>

***

#### One-time

The Add-on is charged once for the entire booking, regardless of the booking duration or number of participants.

With our example:

`$20 = $20`

The Add-on total is **$20**.

Even though the booking is for 3 days and 2 participants, the Add-on is only charged once.

<figure><img src="/files/Lh0C0Uw2qXjlyoiNAsXN" alt=""><figcaption></figcaption></figure>

***

#### Per participant

The Add-on is charged once for each participant, regardless of how long the booking lasts.

With our example:

`$20 × 2 participants = $40`

The Add-on total is **$40**.

The 3-day booking duration does not increase the Add-on price.

**Example uses:**

* Registration fee per person
* Equipment assigned to each participant for the whole booking
* Welcome package for each guest

<figure><img src="/files/qbiH0qasRXezjTkBuRMC" alt=""><figcaption></figcaption></figure>

***

#### Per day

The Add-on is charged once for each day of the booking, regardless of the number of participants.

With our example:

`$20 × 3 days = $60`

The Add-on total is **$60**.

The number of participants does not affect the Add-on price.

<figure><img src="/files/FffJc4cmPHtdx9aaaags" alt=""><figcaption></figcaption></figure>

***

| Charge rule              | Calculation | Add-on total |
| ------------------------ | ----------- | ------------ |
| Per participant, per day | $20 × 2 × 3 | **$120**     |
| One-time                 | $20 × 1     | **$20**      |
| Per participant          | $20 × 2     | **$40**      |
| Per day                  | $20 × 3     | **$60**      |


# How Availability Works (Overview)

Learn how staff schedules, service rules, and booking settings work together to control what customers can book.

## ⚙️ How Availability Works in Services

When creating or editing a service, you can choose how availability is calculated.\
Tipo Appointment now provides two options:

* **By team members**
* **By service hours**

You can find this the app > **Services** section > open a service detail.&#x20;

<figure><img src="/files/vqgyJ6bxOS3Jq95jQHph" alt=""><figcaption></figcaption></figure>

***

### 👥 By Team Members

Use this option when your service is provided by specific staff members and their individual schedules determine availability.

Each team member can have their own working hours, and customers will book based on those available time slots.

#### How it works

* Multiple team members can be assigned to one service.
* Each member has their own availability schedule.
* Customers will see time slots based on team member availability.

#### Example

Service: **Yoga Class**

| Team Member | Availability    |
| ----------- | --------------- |
| Teacher A   | Monday only     |
| Teacher B   | Monday – Sunday |

Customers will see more available slots because **Teacher B is available more days**.

#### Important

If Teacher A is booked for Yoga Class 1 at 10:00 AM, they cannot be booked for another service at the same time.

This prevents double booking across services.

#### Best for

* Studios with multiple instructors
* Services that require specific staff
* Businesses managing staff schedules

***

### 🕒 By Service Hours

Use this option when the service does not depend on specific staff members.

Instead, you set availability directly for the service itself.

#### How it works

* No team members are required.
* You set service hours directly in the calendar.
* Customers book based on the service schedule.

#### Example

Service: **Yoga Class**

Service availability:

* Monday – Sunday
* 08:00 – 16:00

Customers can book any time within these hours.

#### Important

Bookings are not linked to team member schedules, so there are no staff conflicts across services.

#### Best for

* Group classes
* Room / facility bookings
* Businesses that do not assign staff per booking

***

### 🔍 Comparison

| Feature                       | By Team Members      | By Service Hours                |
| ----------------------------- | -------------------- | ------------------------------- |
| Uses staff schedules          | ✅ Yes                | ❌ No                            |
| Multiple staff per service    | ✅ Yes                | ❌ No                            |
| Prevents staff double booking | ✅ Yes                | ❌ Not applicable                |
| Service-level schedule        | ❌ No                 | ✅ Yes                           |
| Best for                      | Staff-based services | Resource / class-based services |

***

### 💡 Which Option Should You Choose?

Choose **By Team Members** if:

* You assign bookings to specific staff
* Staff availability affects booking times

Choose **By Service Hours** if:

* You only need service-level scheduling
* Staff assignments are not required

***


# Set Availability for Services

Availability controls **when customers can book** a service. Time slots shown on your storefront come from your **team members’ schedules**.

***

### 💡 When is a service bookable?

A customer can book only when all of these are true:

* A team member is assigned to the service
* That team member has working hours set
* The date/time is not blocked
* The booking date range (if used) allows that date

For example: I have 2 teachers (team member) for service Yoga&#x20;

* Create team member 1 (Teacher 1)  > set available time from Monday to Friday day > assign him to the service&#x20;
* Create team member 2 (Teacher 2)  > set available time on weekend > assign him to the service&#x20;

***

### ✅ Before you start

Make sure you have:

* A service created (with the correct **duration**)
* At least 1 team member added and **assigned to the service**

> Tip: Duration affects the time slots customers see (example: 1-hour duration = 1-hour slots).

***

### 🧭 How to set availability

You can set availability in two ways:

#### Option A: From the service

1. Open the app → **Services**
2. Open the service you want to edit
3. Go to **Availability** and click a team member (or create a new one)&#x20;

<figure><img src="/files/XCAYxFSPTQPriG69lHzh" alt=""><figcaption></figcaption></figure>

#### Option B: From the team member

1. Open the app → **Team members**
2. Open the team member you want to edit

***

### ⏱ Add working hours

1. In the team member’s **Availability** section, click the date/day you want to edit

<figure><img src="/files/b60MDproOHiXdBBrJCH2" alt=""><figcaption></figcaption></figure>

2. Enter **Start time** and **End time** (example: 08:00–18:00)

<figure><img src="/files/Ar3R6xhIpAEKM4TQnNxn" alt=""><figcaption></figcaption></figure>

3. Choose how you want to apply the time:

<table><thead><tr><th width="192.2333984375">Apply to</th><th>Use when</th></tr></thead><tbody><tr><td> <strong>Specific date</strong></td><td>Only one date should be available (e.g., Nov 3 only) </td></tr><tr><td> <strong>All Mondays</strong></td><td>Every Monday should follow this schedule </td></tr><tr><td> <strong>Day/week range</strong></td><td>Apply the same schedule to multiple weekdays or a period of time </td></tr></tbody></table>

4. Click **Save**

***

### ✅ What customers will see (time slots)

Customers will see available slots based on:

* team member working hours
* your service duration

**Example (duration = 1 hour):**\
If availability is **08:00–18:00**, customers will see slots like:\
08:00–09:00, 09:00–10:00, … and the last slot starts at **17:00** and ends at **18:00**.

<figure><img src="/files/ta4XMaR5tafq1X67A7VK" alt=""><figcaption></figcaption></figure>

***

### &#x20;▶️ Tutorial video&#x20;

{% embed url="<https://youtu.be/nZ9YcsdCDNQ>" %}

***

**🙋 Still need support?**

If you still need help, please feel free to contact us at <hi@tipo.io>. We’ll be happy to assist you further.


# Managing Team Members

Add staff, set their schedules, and connect them to services so customers can book the right person at the right time.

### ℹ️ What Team Members are

**Team Members** are the staff who deliver your services. Each member can have:

* Their own **availability schedule**
* Assigned **services**
* Assigned **locations**
* Optional **Team Portal** access to view appointments&#x20;

<figure><img src="/files/3mVwdzlgSJxapJWFVRrl" alt=""><figcaption></figcaption></figure>

***

### ✅ Before you start

Make sure you already have:

* At least **1 service** created (example: “Yoga Class”)
* Your **store locations** set up in Shopify (if you take bookings by location)

***

### 🔎 Open the Team Members page

1. Open the app > go to **Team members**

On the list, you’ll see:

* **Name** (display name customers may see)
* **Status** (Active or Draft)
* **Email** (notifications + login if Team Portal is enabled)
* **Created at** (when the member was added

**Tip:** Use **Draft** while you’re still setting availability/services. Switch to **Active** when ready to accept bookings.

***

### ➕ Add a new team member

1. Open the app > click **Team Members** > Click **Add Team** **member** button

<figure><img src="/files/H6lmdJVeCR4EnwO3Y7dR" alt=""><figcaption></figcaption></figure>

2. Add basic info (name, email, avatar if needed)

<figure><img src="/files/xWSDovIUPpRuEoQ3cfHq" alt=""><figcaption></figcaption></figure>

3. Set up the **Availability** and Day Offs of the team member. [Learn more](https://docs.tipo.io/tipo-appointment-booking/availability-team-members/set-availability-for-services)

<figure><img src="/files/HU3fXYWb1isEzoJTNi77" alt=""><figcaption></figcaption></figure>

4. In **Location** part, enter this employee to locations
5. &#x20;In **Service** part, select the service(s) that this employee will serve
6. Enable Team Portal Access (Optional)&#x20;
7. Click **Save**

***

### 🕒 Set up Availability of a team member

Availability controls which time slots customers will see.

Use the dedicated guide for full steps: [**Set Availability for services**](https://docs.tipo.io/tipo-appointment-booking/availability-team-members/set-availability-for-services).

***

### 📍 Add locations to a team member

Use this when staff work at specific locations (e.g., Uptown, ABC street or Downtown, ABC street).

1\. Open the  app > click **Team members** > open the a team member detail you want to edit

2\. In the **Location** field, enter the location detail

3\. Click **Save**

More detail [here](https://docs.tipo.io/tipo-appointment-booking/service-setup/assign-locations#using-multiple-locations)

<figure><img src="/files/HNds6V0rTguaAdyiVqJV" alt=""><figcaption></figcaption></figure>

***

### 🧾 Assign services to a team member

Only assigned services can be booked with that staff member.

1\. Open the  app > click **Team members** > open the employee detail you want to edit

2\. In **Service** section, select service(s) that the Team member will serve

3\. Click **Save**

<figure><img src="/files/g4rFQaj7YCz5CBUsjP4c" alt=""><figcaption></figcaption></figure>

***

### 🔐 Team Portal access (optional)

Turn this on if staff should log in and view their own bookings.

Learn more in [**Team Portal (Employee Login Access)**](https://docs.tipo.io/tipo-appointment-booking/availability-team-members/team-portal-employee-login-access)

***

### ✅ Example setup

**Goal:** Customers can book “Yoga Class” with “Staff 1” at “Downtown, ABC street”.

1. Create **Staff 1**
2. Assign **Yoga Class** in Services
3. Assign **Downtown, ABC street** in Locations
4. Set availability: Mon–Fri, 8:00–16:00
5. Save → set status **Active**

**Result:** Customers will see Staff 1’s available time slots when booking Yoga Class.

<figure><img src="/files/K20kmsI1zdKsvEtf8sEA" alt=""><figcaption></figcaption></figure>

***

### 🛠 Common issues&#x20;

* **No time slots shown** → Check staff availability + day offs
* **Service not bookable with a staff member** → Staff is not assigned to that service
* **Wrong location appears** → Staff not assigned to the correct location

***

**🙋 Still need support?**

If you still need help, please feel free to contact us at <hi@tipo.io>. We’ll be happy to assist you further.

<figure><img src="https://tipo.io/wp-content/uploads/2023/12/2023-12-25_15-16-34-1024x642.png" alt=""><figcaption></figcaption></figure>

&#x20;

&#x20;

&#x20;


# Limit how far ahead customers can book

Use Maximum days customers can book ahead to control how far into the future customers can schedule appointments for a service.

This is the easiest way to prevent customers from booking too early (for example, months in advance).

***

### ✅ What this setting does

Maximum days customers can book ahead sets a booking window like:

* **7 days** → customers can book **today + the next 7 days**
* **30 days** → customers can book up to **30 days from today**
* **leave the field blank** > all future days are available to be booked

If a date is beyond the limit, customers won’t be able to select it in the booking calendar.

***

### 🛠️ **Steps to set date range**

1. Open the app >  click **Services** > open the service you want to edit
2. Scroll to **More options**
3. Find **Maximum days customers can book ahead**
4. Enter a number, example: **14**
5. Click **Save**

<figure><img src="/files/TiQAzhsocIGvoXL6nzr8" alt=""><figcaption></figcaption></figure>

***

### 🧪 Example

If today is **Dec 1** and you set:

* Maximum days customers can book ahead = 14

Customers can book from:\
✅ Dec 1 → Dec 15

Customers cannot book:\
🚫 Dec 16 and later

***

### ⚙️ How it works with other rules

A time slot will appear only if **all** of these allow it:

* The date is within the “book ahead” limit
* Staff availability exists for that time
* The time isn’t blocked (days off / blocked time)
* &#x20;The service duration fits

So if customers can’t see any slots, this field might be too low **or** availability is missing.

***

### ⭐ Recommended values

* **7–14 days:** clinics, busy teams, short planning cycles
* **30 days:** salons, classes, common services
* **60–90 days:** weddings/events planning

***

### 🛠 Quick troubleshooting

**Customers say “no dates available”**

* Check if the value is **0** or too small
* Make sure the service has availability set (team members + working hours)

***

**🙋 Still need support?**

If you still need help, please feel free to contact us at <hi@tipo.io>. We’ll be happy to assist you further.


# Allow overlapping time slots

Overlapping time slots lets customers choose **more start times** for the same service duration. It’s great when you want flexible booking times like **9:00, 9:15, 9:30…** instead of only **9:00, 10:00, 11:00**.

***

### ✅  How it works

Your service still keeps the same duration (example: 60 minutes).\
Overlapping only changes how frequently start times appear.

#### Example (60-minute service)

**Without overlapping**\
Customers see slots every 60 minutes: **9:00, 10:00, 11:00**&#x20;

**With overlapping (every 15 minutes)**\
Customers see more start times: **9:00, 9:15, 9:30, 9:45, 10:00…**&#x20;

⇒ This gives customers more flexibility to book a time that fits their schedule.

<figure><img src="/files/d8ocgbIHSZBIFapeazcN" alt=""><figcaption></figcaption></figure>

***

### **💡** When to use this setting

Use **Allow overlapping** if you want:

* More booking options
* Busy schedules where customers need flexibility
* Services like **haircuts, consultations, yoga classes**, etc.

Avoid very small intervals (like 5 minutes) unless you truly need it, your booking list can become too long.

***

### 🛠️ Set up overlapping time slots

1. Open the app > click **Settings** > **Advanced** > scroll down to **Allow flexible time slots**
2. Select option **Allow overlapping**
3. Select **Time stepping**
4. Click **Save**

<figure><img src="/files/Dw3fVN0HXRrbnv6onVNP" alt=""><figcaption></figcaption></figure>

**Example**

If you set:

* **Service duration:** 60 minutes
* **Time stepping:** 15 minutes

Customers may see available start times like:\
**9:00, 9:15, 9:30, 9:45, 10:00, 10:15…**

Each booking still lasts **60 minutes**, but customers can start at more times.

***

### 📌 Important notes

* **Overlapping slots do NOT mean double booking.**\
  A booking still blocks the full service duration.
* If you allow overlapping but still don’t see extra slots, check:
  * staff availability hours
  * blocked time/off dates
  * booking date range limits
  * service duration (very long durations naturally reduce available starts)

***

**🙋 Still need support?**

If you still need help, please feel free to contact us at <hi@tipo.io>. We’ll be happy to assist you further.


---

[Next Page](/llms-full.txt/1)